Spring MVCでAOPを利用してみた
今回は、Spring MVC上のサンプルプログラムで、AOP(Aspect Oriented Programming、アスペクト指向プログラミング)でログ出力する処理を追加してみたので、そのサンプルプログラムを共有する。
前提条件
下記記事の実装が完了していること。

Spring MVCでMyBatisによるOracle連携処理を実装してみた今回は、Spring MVC上で、MyBatisによるOracle連携処理を行うプログラムを作成してみたので、そのサンプルプログラムを共...
サンプルプログラムの作成
作成したサンプルプログラムの構成は以下の通り。
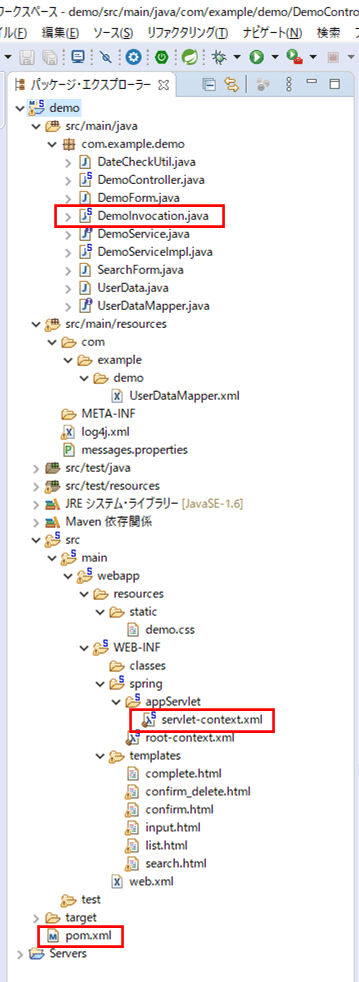
なお、上記の赤枠は、「前提条件」のプログラムから変更したプログラムである。
pom.xmlに追加した内容は以下の通りで、AOPの実装に必要なライブラリを追加している。
<!-- AOP -->
<dependency>
    <groupId>org.springframework</groupId>
    <artifactId>spring-context</artifactId>
    <version>${org.springframework-version}</version>
</dependency>
<dependency>
    <groupId>org.springframework</groupId>
    <artifactId>spring-aop</artifactId>
    <version>${org.springframework-version}</version>
</dependency>
<dependency>
    <groupId>org.aspectj</groupId>
    <artifactId>aspectjweaver</artifactId>
    <version>${org.aspectj-version}</version>
</dependency>
<dependency>
    <groupId>cglib</groupId>
    <artifactId>cglib</artifactId>
    <version>2.2</version>
</dependency>
また、servlet-context.xmlの内容は以下の通りで、先頭のbeans:beansタグにAOPの名前空間を追加すると共に、aop:aspectj-autoproxyタグを追加している。
<?xml version="1.0" encoding="UTF-8"?>
<beans:beans xmlns="http://www.springframework.org/schema/mvc"
	xmlns:xsi="http://www.w3.org/2001/XMLSchema-instance"
	xmlns:beans="http://www.springframework.org/schema/beans"
	xmlns:context="http://www.springframework.org/schema/context"
	xmlns:aop="http://www.springframework.org/schema/aop"
	xsi:schemaLocation="http://www.springframework.org/schema/mvc https://www.springframework.org/schema/mvc/spring-mvc.xsd
		http://www.springframework.org/schema/beans https://www.springframework.org/schema/beans/spring-beans.xsd
		http://www.springframework.org/schema/context https://www.springframework.org/schema/context/spring-context.xsd
		http://www.springframework.org/schema/aop http://www.springframework.org/schema/aop/spring-aop.xsd">

	<!-- DispatcherServlet Context: defines this servlet's request-processing infrastructure -->

	<!-- Enables the Spring MVC @Controller programming model -->
	<annotation-driven />

	<!-- Handles HTTP GET requests for /resources/** by efficiently serving up static resources in the ${webappRoot}/resources directory -->
	<resources mapping="/resources/**" location="/resources/" />

    <!-- Thymeleafの読み込み -->
	<beans:bean id="templateResolver" class="org.thymeleaf.spring3.templateresolver.SpringResourceTemplateResolver">
	    <beans:property name="prefix" value="/WEB-INF/templates/" />
	    <beans:property name="suffix" value=".html" />
	    <beans:property name="templateMode" value="HTML5" />
	    <beans:property name="characterEncoding" value="UTF-8" />
	</beans:bean>
	<beans:bean id="templateEngine" class="org.thymeleaf.spring3.SpringTemplateEngine">
		<beans:property name="templateResolver" ref="templateResolver" />
	</beans:bean>
	<beans:bean class="org.thymeleaf.spring3.view.ThymeleafViewResolver">
		<beans:property name="templateEngine" ref="templateEngine" />
		<beans:property name="characterEncoding" value="UTF-8" />
	</beans:bean>

	<!-- メッセージリソースの読み込み -->
    <beans:bean id="messageSource" class="org.springframework.context.support.ReloadableResourceBundleMessageSource">
        <beans:property name="basename" value="classpath:messages" />
        <beans:property name="defaultEncoding" value="UTF-8" />
    </beans:bean>

    <!-- DB接続先の読み込み -->
    <beans:bean id="dataSource" class="org.springframework.jdbc.datasource.DriverManagerDataSource">
        <beans:property name="driverClassName" value="oracle.jdbc.driver.OracleDriver" />
        <beans:property name="url" value="jdbc:oracle:thin:@localhost:1521:xe" />
        <beans:property name="username" value="USER01" />
        <beans:property name="password" value="USER01" />
    </beans:bean>

    <!-- MyBatisのMapperオブジェクトの生成 -->
    <beans:bean id="sqlSessionFactory" class="org.mybatis.spring.SqlSessionFactoryBean">
        <beans:property name="dataSource" ref="dataSource" />
        <beans:property name="mapperLocations" value="classpath*:com/example/demo/*.xml" />
    </beans:bean>
    <beans:bean id="userDataMapper" class="org.mybatis.spring.mapper.MapperFactoryBean">
        <beans:property name="mapperInterface" value="com.example.demo.UserDataMapper" />
        <beans:property name="sqlSessionFactory" ref="sqlSessionFactory" />
    </beans:bean>

    <!-- AOP使用設定の追加 -->
    <aop:aspectj-autoproxy />

	<context:component-scan base-package="com.example.demo" />

</beans:beans>


![]()
![]()
さらに、ログ出力するAOPのクラスは以下の通りで、Spring Bootの場合と同じように@Aspectアノテーション等を利用していて、コントローラクラスの呼出前後にログを出力する仕組みになっている。
package com.example.demo;

import org.slf4j.Logger;
import org.slf4j.LoggerFactory;
import org.aspectj.lang.JoinPoint;
import org.aspectj.lang.annotation.After;
import org.aspectj.lang.annotation.Aspect;
import org.aspectj.lang.annotation.Before;
import org.springframework.stereotype.Component;

@Aspect
@Component
public class DemoInvocation {

    //ログ出力のためのクラス
    private static final Logger logger = LoggerFactory.getLogger(DemoInvocation.class);

    /**
     * Beforeアノテーションにより、指定したメソッドの前に処理を追加する
     * Beforeアノテーションの引数には、Pointcut式 execution(戻り値 パッケージ.クラス.メソッド(引数))を
     * 指定し、ここではControllerクラスの全メソッドの実行前にログ出力するようにしている
     *
     * @param jp 横断的な処理を挿入する場所
     */
    @Before("execution(public String com.example.demo.*Controller.*(..))")
    public void startLog(JoinPoint jp){
        //開始ログを出力
        String signature = jp.getSignature().toString();
        logger.info("開始ログ : " + signature);
    }

    /**
     * Afterアノテーションにより、指定したメソッドの前に処理を追加する
     * Afterアノテーションの引数には、Pointcut式を指定
     *
     * @param jp 横断的な処理を挿入する場所
     */
    @After("execution(public String com.example.demo.*Controller.*(..))")
    public void endLog(JoinPoint jp){
        //終了ログを出力
        String signature = jp.getSignature().toString();
        logger.info("終了ログ : " + signature);
    }

}
その他のソースコード内容は、以下のサイトを参照のこと。
https://github.com/purin-it/java/tree/master/spring-mvc-web-aop/demo
サンプルプログラムの実行結果
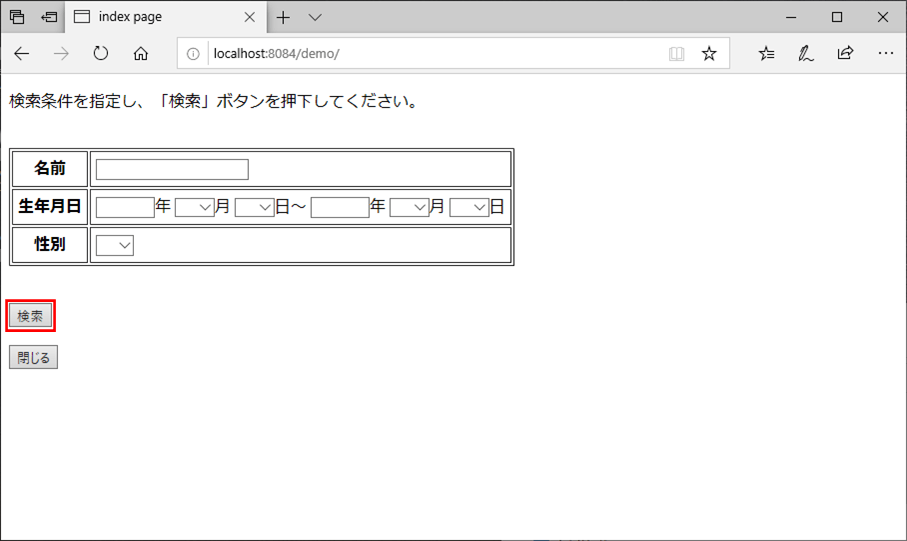
サンプルプログラムを実行したときの画面・ログの内容は、以下の通り。
1) サーバーを起動後、Webブラウザ上で「http://(サーバー名):(ポート番号)/(プロジェクト名)/」とアクセスすると、以下の画面が表示されるので、「検索」ボタンを押下
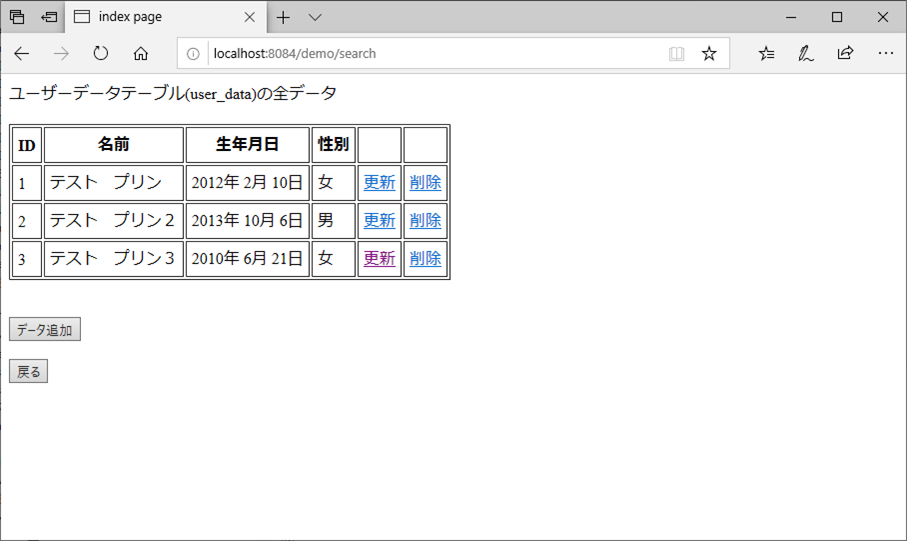
2) 以下の一覧画面が表示される。
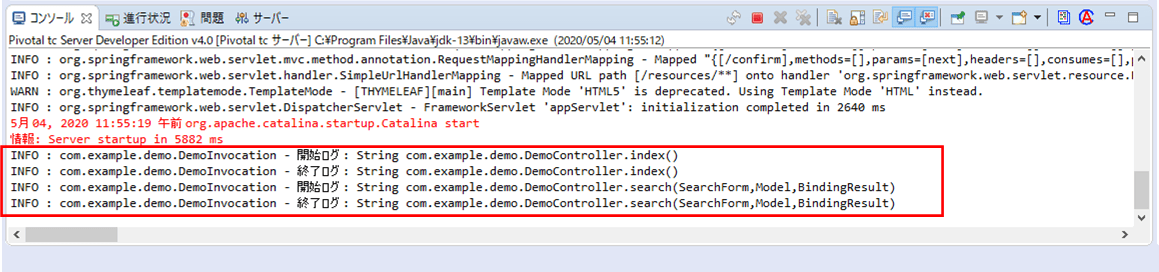
3) このときのコンソールログは以下の通りで、下記赤枠のログがDemoInvocation.javaによって出力されることが確認できる。
要点まとめ
- Spring MVCプロジェクトでAOPを利用するには、AOP接続に必要なライブラリ(spring-context, spring-aop, aspectjweaver, cglib)を追加し、servlet-context.xmlに、先頭のbeans:beansタグにAOPの名前空間を追加すると共に、aop:aspectj-autoproxyタグを追加する必要がある。