Spring Boot上でSpring Securityを利用しリクエスト毎にCSRFトークンを変えてみた
Spring Securityを利用すると、CSRFトークンのチェックが自動で実施されるようになるが、CSRFトークンは、セッション毎に1つの固定トークンを発行する仕組みになっている。
今回は、Spring Securityを利用して、さらにリクエスト毎にCSRFトークンの値を変更するよう修正してみたので、そのサンプルプログラムを共有する。
前提条件
下記記事の実装が完了し、Oracleデータベース上にuser_passテーブルが作成できていること

サンプルプログラムの作成
作成したサンプルプログラムの構成は以下の通り。
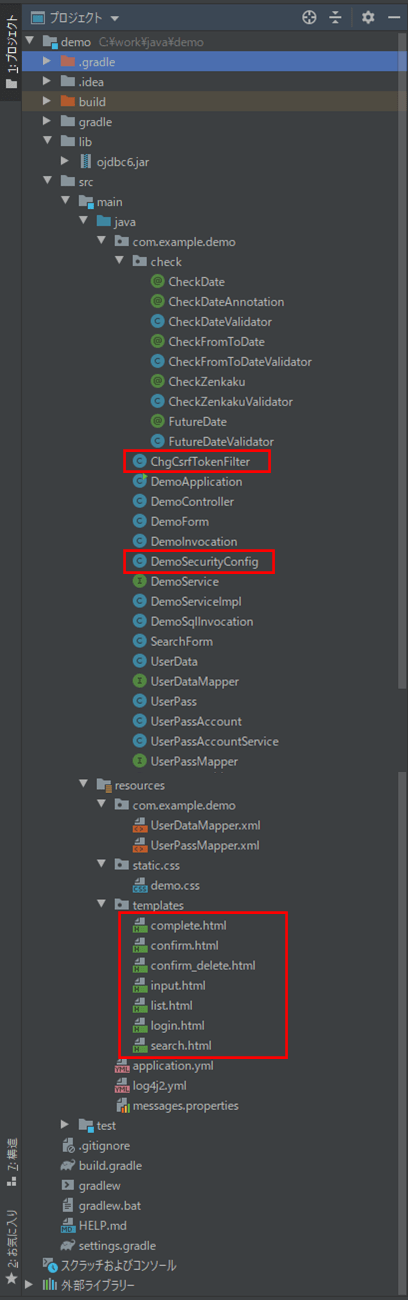
なお、上記の赤枠は、前提条件のプログラムから変更したプログラムである。
HTMLファイルについては、「<input type=”text” style=”background-color:#FFCCCC” size=”80″ th:name=”${_csrf.parameterName}” th:value=”${_csrf.token}”/>」というタグを、各formタグ毎に追加している。例えば、検索画面のHTMLの内容は以下の通り。
<!DOCTYPE html>
<html lang="ja" xmlns:th="http://www.thymeleaf.org">
<head>
    <meta charset="UTF-8">
    <link th:href="@{/css/demo.css}" rel="stylesheet" type="text/css" />
    <title>index page</title>
</head>
<body>
    <p>検索条件を指定し、「検索」ボタンを押下してください。</p><br/>
    <form method="post" th:action="@{/search}" th:object="${searchForm}">
        <!-- 2行エラーがある場合は、エラーメッセージを改行して表示 -->
        <span th:if="*{#fields.hasErrors('fromBirthYear')}"
              th:errors="*{fromBirthYear}" class="errorMessage"></span>
        <span th:if="*{#fields.hasErrors('fromBirthYear') && #fields.hasErrors('toBirthYear')}">
            <br/>
        </span>
        <span th:if="*{#fields.hasErrors('toBirthYear')}"
              th:errors="*{toBirthYear}" class="errorMessage"></span>
        <table border="1" cellpadding="5">
            <tr>
                <th>名前</th>
                <td><input type="text" th:value="*{searchName}" th:field="*{searchName}" /></td>
            </tr>
            <tr>
                <th>生年月日</th>
                <td><input type="text" th:value="*{fromBirthYear}" size="4"
                           maxlength="4" th:field="*{fromBirthYear}" th:errorclass="fieldError"/>年
                    <select th:field="*{fromBirthMonth}" th:errorclass="fieldError"
                            th:classappend="${#fields.hasErrors('fromBirthYear')} ? 'fieldError'">
                        <option value=""></option>
                        <option th:each="item : *{getMonthItems()}"
                                th:value="${item.key}" th:text="${item.value}"/>
                    </select>月
                    <select th:field="*{fromBirthDay}" th:errorclass="fieldError"
                            th:classappend="${#fields.hasErrors('fromBirthYear')} ? 'fieldError'">
                        <option value=""></option>
                        <option th:each="item : *{getDayItems()}"
                                th:value="${item.key}" th:text="${item.value}"/>
                    </select>日~
                    <input type="text" th:value="*{toBirthYear}" size="4"
                           maxlength="4" th:field="*{toBirthYear}" th:errorclass="fieldError"/>年
                    <select th:field="*{toBirthMonth}" th:errorclass="fieldError"
                            th:classappend="${#fields.hasErrors('toBirthYear')} ? 'fieldError'">
                        <option value=""></option>
                        <option th:each="item : *{getMonthItems()}"
                                th:value="${item.key}" th:text="${item.value}"/>
                    </select>月
                    <select th:field="*{toBirthDay}" th:errorclass="fieldError"
                            th:classappend="${#fields.hasErrors('toBirthYear')} ? 'fieldError'">
                        <option value=""></option>
                        <option th:each="item : *{getDayItems()}"
                                th:value="${item.key}" th:text="${item.value}"/>
                    </select>日
                </td>
            </tr>
            <tr>
                <th>性別</th>
                <td>
                    <select th:field="*{searchSex}">
                        <option value=""></option>
                        <option th:each="item : *{getSexItems()}"
                                th:value="${item.key}" th:text="${item.value}"/>
                    </select>
                </td>
            </tr>
        </table>
        <br/><br/>
        <input type="submit" value="検索" />
        <input type="text" style="background-color:#FFCCCC" size="80" th:name="${_csrf.parameterName}" th:value="${_csrf.token}"/>
    </form>
    <br/>
    <form method="post" th:action="@{/logout}">
        <button type="submit">ログアウト</button>
        <input type="text" style="background-color:#FFCCCC" size="80" th:name="${_csrf.parameterName}" th:value="${_csrf.token}"/>
    </form>
</body>
</html>
また、リクエスト毎に、CSRFトークンの値を変更するようなフィルタの内容は以下の通り。
package com.example.demo;

import java.io.IOException;
import javax.servlet.FilterChain;
import javax.servlet.ServletException;
import javax.servlet.http.HttpServletRequest;
import javax.servlet.http.HttpServletResponse;
import org.springframework.security.web.csrf.CsrfToken;
import org.springframework.security.web.csrf.HttpSessionCsrfTokenRepository;
import org.springframework.web.filter.OncePerRequestFilter;

public class ChgCsrfTokenFilter extends OncePerRequestFilter {

    /**
     * CSRFトークンリポジトリ
     */
    private final HttpSessionCsrfTokenRepository csrfTokenRepository;

    /**
     * コンストラクタ
     * @param csrfTokenRepository CSRFトークンリポジトリ
     */
    public ChgCsrfTokenFilter(HttpSessionCsrfTokenRepository csrfTokenRepository) {
        this.csrfTokenRepository = csrfTokenRepository;
    }

    @Override
    protected void doFilterInternal(HttpServletRequest request
        , HttpServletResponse response, FilterChain filterChain)
        throws ServletException, IOException {
             //CSRFトークンを取得する
             CsrfToken beforeToken = this.csrfTokenRepository.loadToken(request);
             //CSRFトークンが取得できた場合は、CSRFトークンを更新する
             if(beforeToken != null){
                 this.csrfTokenRepository.saveToken(null, request, response);
                 CsrfToken csrfToken = this.csrfTokenRepository.generateToken(request);
                 this.csrfTokenRepository.saveToken(csrfToken, request, response);
                 request.setAttribute(CsrfToken.class.getName(), csrfToken);
                 request.setAttribute(csrfToken.getParameterName(), csrfToken);
             }
        //次のFilterを呼び出す
        filterChain.doFilter(request, response);
    }

}
さらに、Spring Securityの設定を行うクラスの内容は以下の通りで、configure(HttpSecurity http)メソッド内に、CSRFトークンをリクエスト毎に更新する処理を追加している。また、configure(WebSecurity web)メソッド内に、CSSファイルを読み込む際はSpring Securityのフィルタを通過しないように修正している。
package com.example.demo;

import org.springframework.beans.factory.annotation.Autowired;
import org.springframework.context.annotation.Bean;
import org.springframework.context.annotation.Configuration;
import org.springframework.security.config.annotation.authentication.builders.AuthenticationManagerBuilder;
import org.springframework.security.config.annotation.web.builders.HttpSecurity;
import org.springframework.security.config.annotation.web.builders.WebSecurity;
import org.springframework.security.config.annotation.web.configuration.EnableWebSecurity;
import org.springframework.security.config.annotation.web.configuration.WebSecurityConfigurerAdapter;
import org.springframework.security.crypto.bcrypt.BCryptPasswordEncoder;
import org.springframework.security.crypto.password.PasswordEncoder;
import org.springframework.security.web.csrf.CsrfFilter;
import org.springframework.security.web.csrf.HttpSessionCsrfTokenRepository;
import org.springframework.security.web.firewall.DefaultHttpFirewall;

@Configuration
@EnableWebSecurity
public class DemoSecurityConfig extends WebSecurityConfigurerAdapter {

    /**
     * Spring-Security用のユーザーアカウント情報を
     * 取得・設定するサービスへのアクセス
     */
    @Autowired
    private UserPassAccountService userDetailsService;

    @Override
    public void configure(WebSecurity web) {
        //org.springframework.security.web.firewall.RequestRejectedException:
        //The request was rejected because the URL contained a potentially malicious String ";"
        //というエラーログがコンソールに出力されるため、下記を追加
        DefaultHttpFirewall firewall = new DefaultHttpFirewall();
        web.httpFirewall(firewall);
        //セキュリティ設定を無視するリクエスト設定
        //静的リソースに対するアクセスの場合は、Spring Securityのフィルタを通過しないように設定する
        web.ignoring().antMatchers("/css/**");
    }

    /**
     * SpringSecurityによる認証を設定
     * @param http HttpSecurityオブジェクト
     * @throws Exception 例外
     */
    @Override
    protected void configure(HttpSecurity http) throws Exception {
        final HttpSessionCsrfTokenRepository repository
                  = new HttpSessionCsrfTokenRepository();

        //初期表示画面を表示する際にログイン画面を表示する
        http.formLogin()
                //ログイン画面は常にアクセス可能とする
                .loginPage("/login").permitAll()
                //ログインに成功したら検索画面に遷移する
                .defaultSuccessUrl("/")
                .and()
                //ログイン画面のcssファイルとしても共通のdemo.cssを利用するため、
                //src/main/resources/static/cssフォルダ下は常にアクセス可能とする
                .authorizeRequests().antMatchers("/css/**").permitAll()
                .and()    //かつ
                //それ以外の画面は全て認証を有効にする
                .authorizeRequests().anyRequest().authenticated()
                .and()    //かつ
                //ログアウト時はログイン画面に遷移する
                .logout().logoutSuccessUrl("/login").permitAll()
                .and()    //かつ
                //CSRFトークンのリポジトリを設定する
                .csrf().csrfTokenRepository(repository)
                .and()    //かつ
                //CSRFトークンをリクエスト毎に更新する処理を、
                //CsrfFilter(CSRFトークンチェックを行うFilter)が呼ばれた後に実行するようにする
                .addFilterAfter(new ChgCsrfTokenFilter(repository), CsrfFilter.class);
    }

    /**
     * 認証するユーザー情報をデータベースからロードする処理
     * @param auth 認証マネージャー生成ツール
     * @throws Exception
     */
    @Override
    protected void configure(AuthenticationManagerBuilder auth) throws Exception {
        //認証するユーザー情報をデータベースからロードする
        //その際、パスワードはBCryptで暗号化した値を利用する
        auth.userDetailsService(userDetailsService).passwordEncoder(passwordEncoder());
    }

    /**
     * パスワードをBCryptで暗号化するクラス
     * @return パスワードをBCryptで暗号化するクラスオブジェクト
     */
    @Bean
    PasswordEncoder passwordEncoder(){
        return new BCryptPasswordEncoder();
    }

}
その他のソースコード内容は、以下のサイトを参照のこと。
https://github.com/purin-it/java/tree/master/spring-boot-security-request-token/demo
サンプルプログラムの実行結果
「サンプルプログラムの作成」に記載したプログラムのうち、HTMLファイルのみを変更した場合の実行結果は以下の通りで、ログイン後はリクエストトークンの値が同じ値になっている。
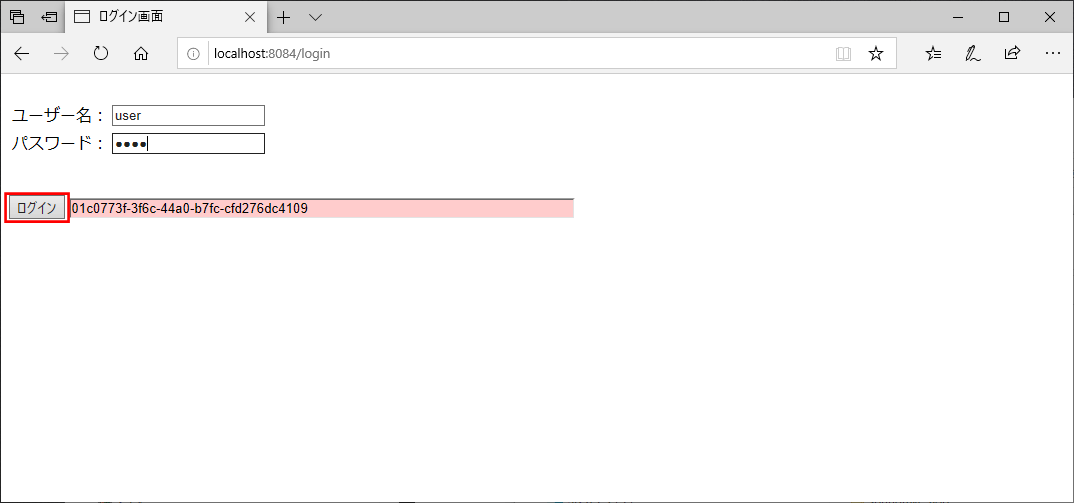
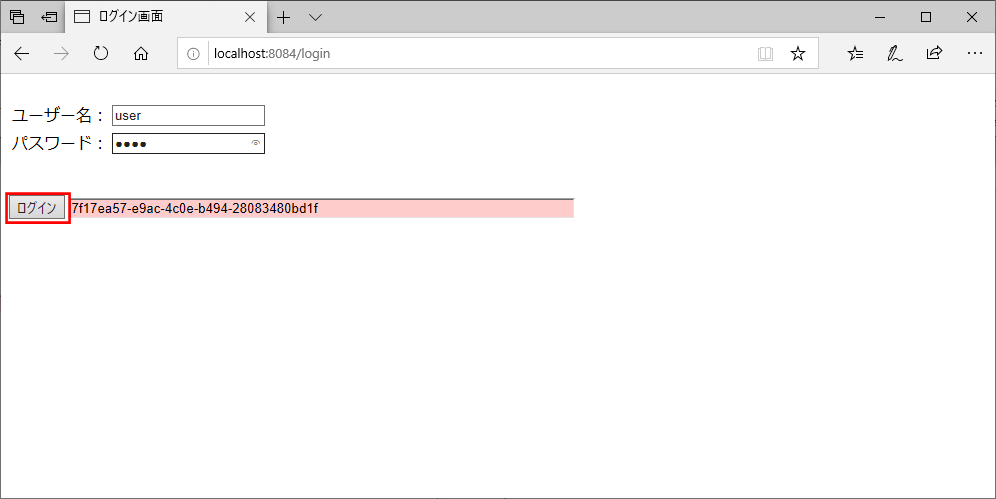
1) Spring Bootアプリケーションを起動し、「http://(サーバー名):(ポート番号)/」とアクセスすると、以下のログイン画面が表示されるので、ユーザー名・パスワードを入力し「ログイン」ボタンを押下
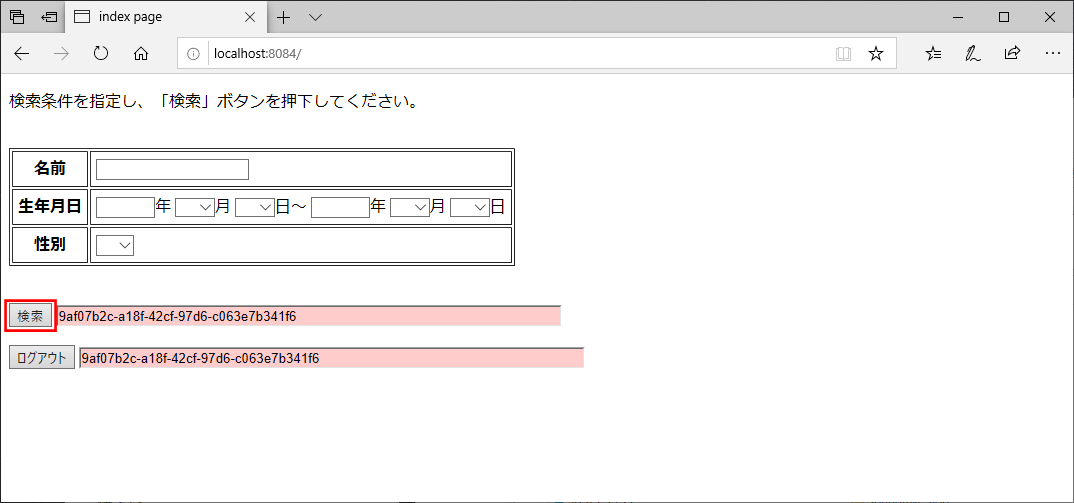
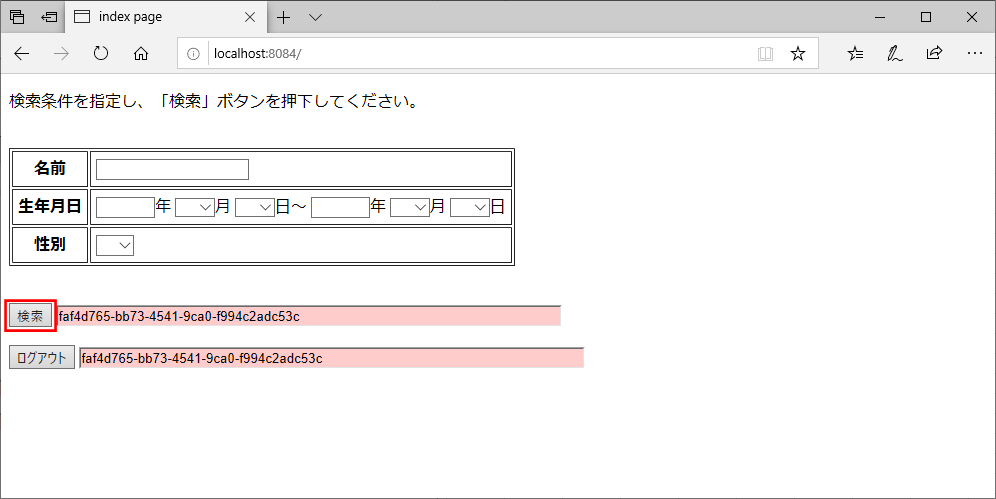
2) ログインすると、CSRFトークンの値が変わっていることが確認できる。この状態で「検索」ボタンを押下
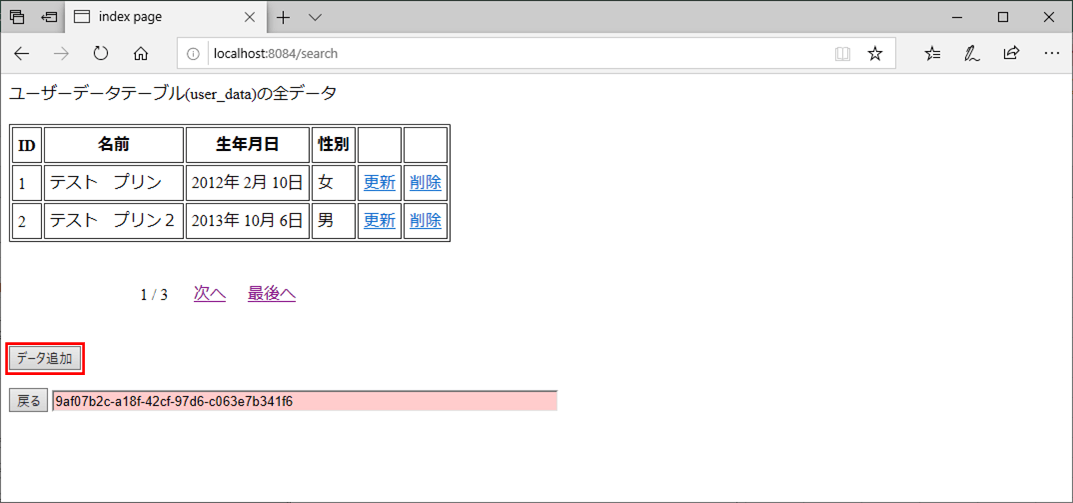
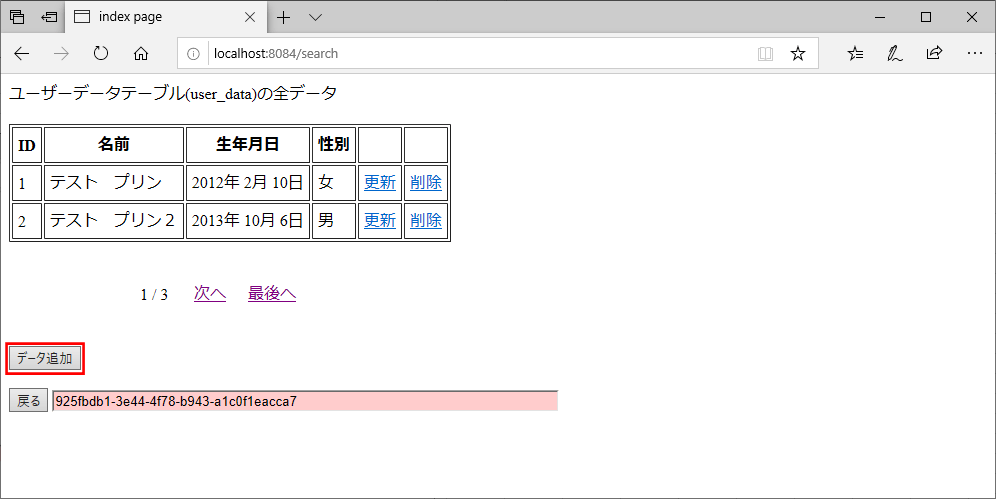
3) 一覧画面が表示され、CSRFトークンの値が変わっていないことが確認できる。この状態で「データ追加」ボタンを押下
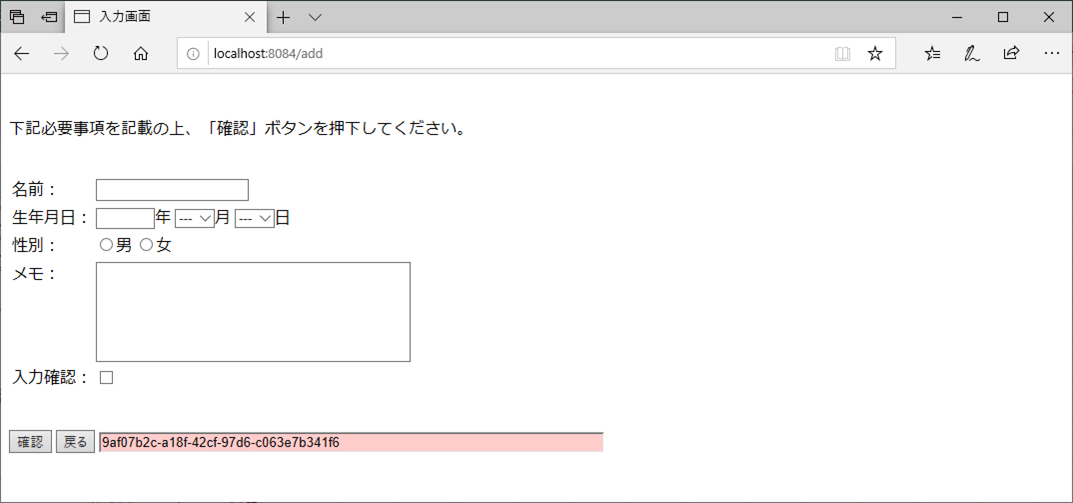
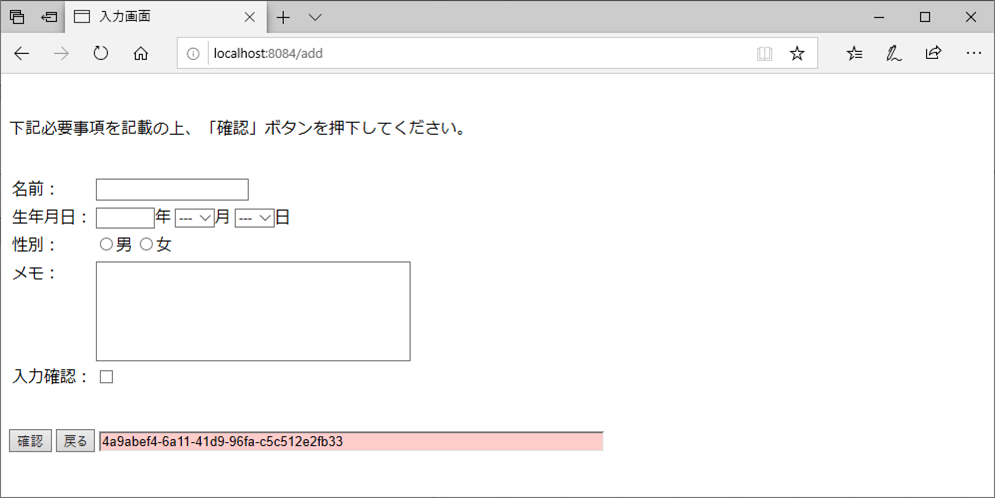
4) 入力画面が表示され、CSRFトークンの値が変わっていないことが確認できる
また、「サンプルプログラムの作成」に記載したプログラムを全て変更した場合の実行結果は以下の通りで、ログイン後も、リクエスト毎に違うCSRFトークンが表示されるようになっている。
5) Spring MVCアプリケーションを起動し、「http://(サーバー名):(ポート番号)/」とアクセスすると、以下のログイン画面が表示されるので、ユーザー名・パスワードを入力し「ログイン」ボタンを押下
6) ログインすると、CSRFトークンの値が変わっていることが確認できる。この状態で「検索」ボタンを押下
7) 一覧画面が表示され、CSRFトークンの値が変わっていることが確認できる。この状態で「データ追加」ボタンを押下
8) 入力画面が表示され、さらにCSRFトークンの値が変わっていることが確認できる
なお、今回のサンプルプログラムは、複数のウィンドウを開く場合に対応できていない。複数のウィンドウを開く場合に対応するプログラムについては、以下の記事を参照のこと。

要点まとめ
- Spring SecurityのCSRFトークンは、セッション毎に1つの固定トークンを発行する仕組みになっている。
- Spring Securityを利用してCSRFトークンをリクエスト毎に変更するようにするには、Spring Securityのフィルタ(CsrfFilter)の後に、リクエスト毎にCSRFトークンの値を変更するようなフィルタを追加すればよい。