Spring BootのWebアプリケーションでは、messages.propertiesに定義したメッセージを、入力チェックエラーのメッセージに加え、通常のメッセージとしても表示することができる。
今回は、Spring BootのWebアプリケーションで、messages.propertiesに定義した完了メッセージを表示してみたので、そのサンプルプログラムを共有する。
前提条件
下記記事の実装が完了していること。

サンプルプログラムの作成
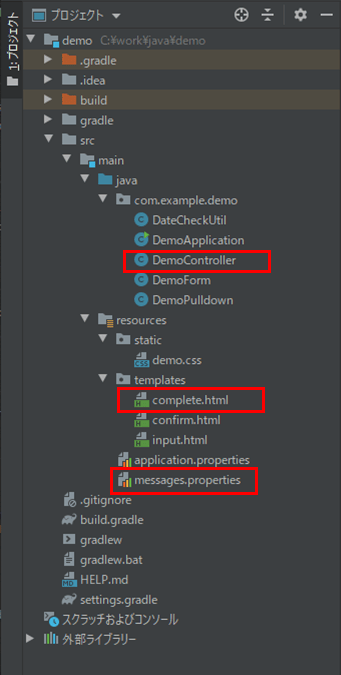
作成したサンプルプログラムの構成は以下の通り。

なお、上記の赤枠は、前提条件のプログラムから変更したプログラムである。
messages.propertiesの内容は以下の通りで、完了メッセージ(regist.complete)を追加している。
# エラーメッセージ
validation.date-empty={0}を入力してください。
validation.date-invalidate=生年月日が存在しない日付になっています。
validation.date-future=生年月日が未来の日付になっています。
validation.empty-msg=
javax.validation.constraints.NotEmpty.message={0}を入力してください。
validation.sex-invalidate=性別に不正な値が入っています。

# 完了メッセージ
regist.complete=お申し込みが完了しました。

# フィールド名
name=名前
sex=性別
checked=確認チェック
また、完了画面のHTMLファイルは以下の通りで、完了メッセージをmessages.propertiesから取得し表示している。
<!DOCTYPE html>
<html lang="ja" xmlns:th="http://www.thymeleaf.org">
<head>
    <meta charset="UTF-8">
    <title>完了画面</title>
</head>
<body>
<p th:text="#{regist.complete}">ここに完了メッセージが表示されます<p>
<input type="button" value="閉じる" onclick="window.close();" />
</body>
</html>
さらに、コントローラクラスの内容は以下の通りで、完了画面に遷移するcompleteメソッド内で、コンソールに表示する完了メッセージをmessages.propertiesから取得し表示している。
package com.example.demo;

import org.springframework.beans.factory.annotation.Autowired;
import org.springframework.context.MessageSource;
import org.springframework.stereotype.Controller;
import org.springframework.validation.BindingResult;
import org.springframework.validation.annotation.Validated;
import org.springframework.web.bind.annotation.GetMapping;
import org.springframework.web.bind.annotation.PostMapping;
import org.springframework.web.bind.annotation.ModelAttribute;
import org.springframework.web.bind.annotation.SessionAttributes;
import org.springframework.web.bind.support.SessionStatus;

import java.util.LinkedHashMap;
import java.util.Locale;
import java.util.Map;

/**
 * コントローラクラス
 * 「@SessionAttributes(types = DemoForm.class)」により、
 * 生成したFormオブジェクトをセッションとしてもたせている
 */
@Controller
@SessionAttributes(types = DemoForm.class)
public class DemoController {

    // プルダウンリスト(sessionスコープ)
    @Autowired
    private DemoPulldown demoPulldown;

    // 完了メッセージ表示用
    @Autowired
    private MessageSource messageSource;

    /**
     * Formオブジェクトを初期化して返却する
     * @return Formオブジェクト
     */
    @ModelAttribute("demoForm")
    public DemoForm createDemoForm(){
        DemoForm demoForm = new DemoForm();
        return demoForm;
    }

    /**
     * 入力画面に遷移する
     * @return 入力画面へのパス
     */
    @GetMapping("/")
    public String index(){
        // プルダウンリスト(sessionスコープ)を生成後、入力画面に遷移
        initDemoPulldown();
        return "input";
    }

    /**
     * プルダウンリスト(sessionスコープ)を初期化する
     */
    private void initDemoPulldown(){
        // 生年月日_月のMapオブジェクトを生成しプルダウンリストに設定
        Map<String, String> monthMap = new LinkedHashMap<String, String>();
        for(int i = 1; i <= 12; i++){
            monthMap.put(String.valueOf(i), String.valueOf(i));
        }
        demoPulldown.setMonthMap(monthMap);

        // 生年月日_日のMapオブジェクトを生成しプルダウンリストに設定
        Map<String, String> dayMap = new LinkedHashMap<String, String>();
        for(int i = 1; i <= 31; i++){
            dayMap.put(String.valueOf(i), String.valueOf(i));
        }
        demoPulldown.setDayMap(dayMap);

        // 性別のMapオブジェクトを生成しプルダウンリストに設定
        Map<String, String> sexMap = new LinkedHashMap<String, String>();
        sexMap.put("1", "男");
        sexMap.put("2", "女");
        demoPulldown.setSexMap(sexMap);
    }

    /**
     * エラーチェックを行い、エラーが無ければ確認画面に遷移し、
     * エラーがあれば入力画面のままとする
     * @param demoForm Formオブジェクト
     * @param result バインド結果
     * @return 確認画面または入力画面へのパス
     */
    @PostMapping("/confirm")
    public String confirm(@Validated DemoForm demoForm, BindingResult result){
        // formオブジェクトのチェック処理を行う
        if(result.hasErrors()){
            // エラーがある場合は、入力画面のままとする
            return "input";
        }
        // アノテーション以外のチェック処理を行い、画面遷移する
        return checkOthers(demoForm, result, "confirm");
    }

    /**
     * エラーチェックを行い、エラーが無ければ完了画面へのリダイレクトパスに遷移し、
     * エラーがあれば入力画面に戻す
     * @param demoForm Formオブジェクト
     * @param result バインド結果
     * @return 完了画面へのリダイレクトパスまたは入力画面へのパス
     */
    @PostMapping(value = "/send", params = "next")
    public String send(@Validated DemoForm demoForm, BindingResult result){
        // formオブジェクトのチェック処理を行う
        if(result.hasErrors()){
            // エラーがある場合は、入力画面に戻す
            return "input";
        }
        // アノテーション以外のチェック処理を行い、画面遷移する
        return checkOthers(demoForm, result, "redirect:/complete");
    }

    /**
     * アノテーション以外のチェック処理を行い、画面遷移先を返却
     * @param demoForm Formオブジェクト
     * @param result バインド結果
     * @param normalPath 正常時の画面遷移先
     * @return 正常時の画面遷移先または入力画面へのパス
     */
    private String checkOthers(DemoForm demoForm
            , BindingResult result, String normalPath){
        //** アノテーション以外のチェック処理を行う
        //** エラーがある場合は、エラーメッセージ・(エラー時に赤反転するための)
        //** エラーフィールドの設定を行い、入力画面のままとする
        //生年月日のチェック処理
        int checkDate = DateCheckUtil.checkDate(demoForm.getBirthYear()
                , demoForm.getBirthMonth(), demoForm.getBirthDay());
        switch(checkDate){
            case 1:
                //生年月日_年が空文字の場合のエラー処理
                result.rejectValue("birthYear", "validation.date-empty"
                        , new String[]{"生年月日_年"}, "");
                return "input";
            case 2:
                //生年月日_月が空文字の場合のエラー処理
                result.rejectValue("birthMonth", "validation.date-empty"
                        , new String[]{"生年月日_月"}, "");
                return "input";
            case 3:
                //生年月日_日が空文字の場合のエラー処理
                result.rejectValue("birthDay", "validation.date-empty"
                        , new String[]{"生年月日_日"}, "");
                return "input";
            case 4:
                //生年月日の日付が不正な場合のエラー処理
                result.rejectValue("birthYear", "validation.date-invalidate");
                //生年月日_月・生年月日_日は、エラーフィールドの設定を行い、
                //メッセージを空文字に設定している
                result.rejectValue("birthMonth", "validation.empty-msg");
                result.rejectValue("birthDay", "validation.empty-msg");
                return "input";
            case 5:
                //生年月日の日付が未来日の場合のエラー処理
                result.rejectValue("birthYear", "validation.date-future");
                //生年月日_月・生年月日_日は、エラーフィールドの設定を行い、
                //メッセージを空文字に設定している
                result.rejectValue("birthMonth", "validation.empty-msg");
                result.rejectValue("birthDay", "validation.empty-msg");
                return "input";
            default:
                //性別が不正に書き換えられていないかチェックする
                if(!demoPulldown.getSexMap().keySet().contains(demoForm.getSex())){
                    result.rejectValue("sex", "validation.sex-invalidate");
                    return "input";
                }
                //エラーチェックに問題が無いので、正常時の画面遷移先に遷移
                return normalPath;
        }
    }

    /**
     * 完了画面に遷移する
     * @param sessionStatus セッションステータス
     * @return 完了画面
     */
    @GetMapping("/complete")
    public String complete(SessionStatus sessionStatus){
        // @SessionAttributeアノテーションで設定したセッションオブジェクトを破棄
        sessionStatus.setComplete();
        // プルダウンリスト(sessionスコープ)をクリア
        clearDemoPulldown();
        // 完了メッセージを取得しコンソールに表示
        String message = messageSource.getMessage(
              "regist.complete", null, Locale.JAPAN);
        System.out.println(message);
        return "complete";
    }

    /**
     * プルダウンリスト(sessionスコープ)をクリアする
     */
    private void clearDemoPulldown(){
        demoPulldown.setMonthMap(null);
        demoPulldown.setDayMap(null);
        demoPulldown.setSexMap(null);
    }

    /**
     * 入力画面に戻る
     * @return 入力画面
     */
    @PostMapping(value = "/send", params = "back")
    public String back(){
        return "input";
    }

}
その他のソースコード内容は、以下のサイトを参照のこと。
https://github.com/purin-it/java/tree/master/spring-boot-complete-message/demo
サンプルプログラムの実行結果
サンプルプログラムを実行結果は、以下の通り。
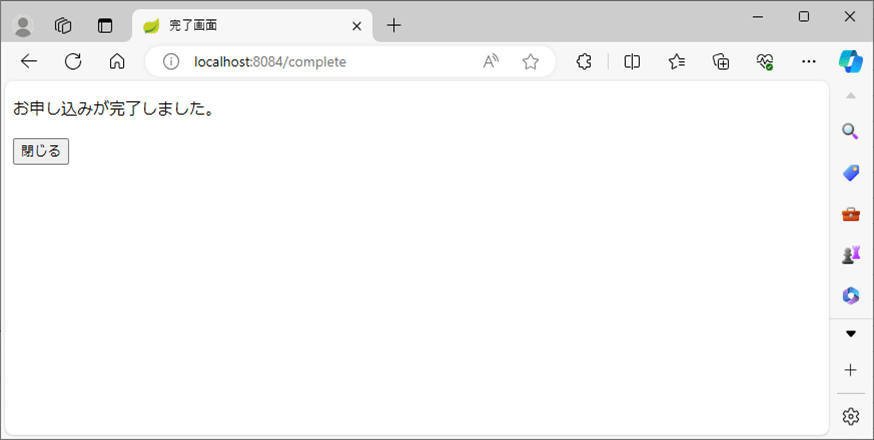
1) 完了画面の表示は以下の通りで、messages.propertiesから取得した完了メッセージが表示されていることが確認できる。

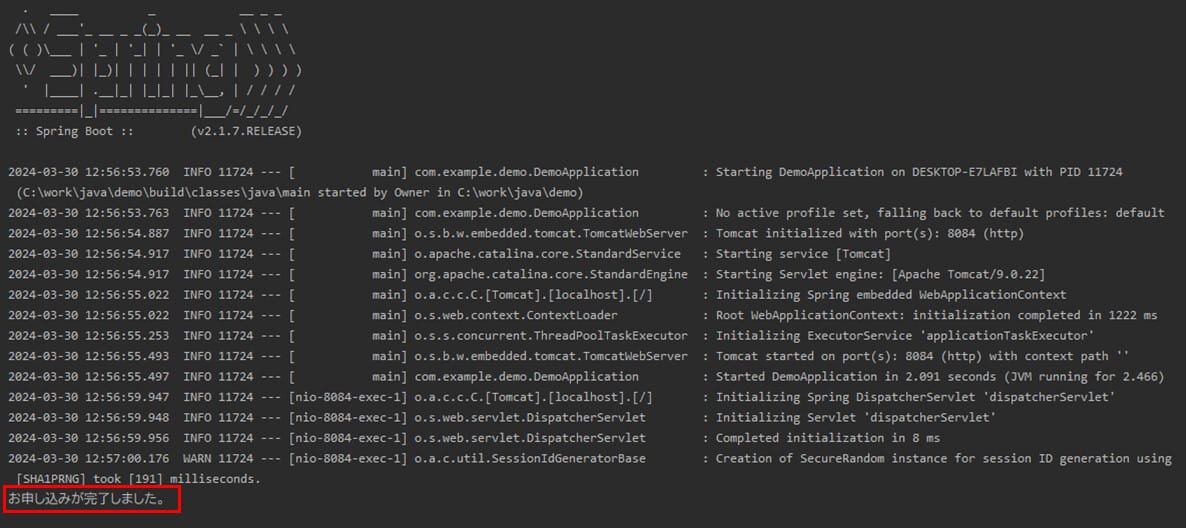
2) コンソール上の完了メッセージは以下の通りで、1)と同様、messages.propertiesから取得した完了メッセージが表示されていることが確認できる。

要点まとめ
- Spring BootのWebアプリケーション上では、messages.propertiesに定義したメッセージを、入力チェックエラーのメッセージに加え、通常のメッセージとしても表示することができる。


