PythonのプログラムからAzure SQL Databaseに接続する場合、データ抽出に加え、データ追加/データ更新も行うことができる。
今回は、FastAPIを利用したPythonのプログラムからAzure SQL Databaseに接続し、データ追加/データ更新を行ってみたので、その手順を共有する。
前提条件
下記サイトの手順に従って、Linux系のOS(Ubuntu)上のPythonの仮想環境(venv)で、FastAPIでAzure SQL Databaseに接続できること。

サンプルプログラムの内容
作成したサンプルプログラムの内容は以下の通りで、USER_DATAテーブルのモデル定義と、save_userメソッドを追加している。
from fastapi import FastAPI
import sqlalchemy as sa
import urllib
from pydantic import BaseModel

# SQL Databaseへの接続情報
driver='{ODBC Driver 18 for SQL Server}'
server = 'azure-db-purinit.database.windows.net'
database = 'azureSqlDatabase'
username = 'purinit@azure-db-purinit'
password = '(DBのパスワード)'

# SQL Databaseに接続
odbc_connect = urllib.parse.quote_plus('DRIVER=' + driver + ';SERVER=' + server
        + ';DATABASE=' + database + ';UID=' + username + ';PWD=' + password)
engine = sa.create_engine('mssql+pyodbc:///?odbc_connect=' + odbc_connect)

# USER_DATAテーブルのモデルを定義
class User(BaseModel):
    id: int
    name: str
    birth_year: int
    birth_month: int
    birth_day: int
    sex: str
    memo: str
    version: int

app = FastAPI()

@app.get("/")
def read_root():
    return {"Hello": "FastAPI"}

@app.get("/users")
def read_users():
    ret_val = '{'  # 返却用文字列
    with engine.connect() as conn:
        query = sa.text("SELECT * FROM dbo.USER_DATA ORDER BY ID ASC;")
        rs = conn.execute(query)
        for row in rs:
            # 各レコードの各項目をJSON形式に編集
            ret_val += "{'id':'" + str(row[0]) + "'"
            ret_val += ", 'name':'" + row[1] + "'"
            ret_val += ", 'birthday':'" + str(row[2]) + '年'
            ret_val += str(row[3]) + '月' + str(row[4]) + '日' + "'"
            ret_val += ", 'sex':'" + ('男' if row[5]=='1' else '女') + "'"
            ret_val += ", 'memo':'" + str(row[6]) + "'"
            ret_val += ", 'version':'" + str(row[7]) + "'},"
        # 末尾のカンマを削除し、閉じ括弧を付与
        ret_val = ret_val.rstrip(',')
        ret_val += "}"
    return ret_val

@app.post("/save/user")
def save_user(user: User):
    # ユーザー情報を追加するSQL
    SQL_INSERT = "INSERT INTO dbo.USER_DATA\
     (ID, NAME, BIRTH_YEAR, BIRTH_MONTH, BIRTH_DAY, SEX, MEMO, VERSION )\
    VALUES (:id, :name, :birth_year, :birth_month, :birth_day, :sex, :memo, :version);"

    # ユーザー情報を更新するSQL
    SQL_UPDATE = "UPDATE dbo.USER_DATA SET NAME = :name\
     , BIRTH_YEAR = :birth_year, BIRTH_MONTH = :birth_month, BIRTH_DAY = :birth_day\
     , SEX = :sex, MEMO = :memo, VERSION = :version WHERE ID = :id;"

    # 引数のユーザ情報をparamsに設定
    params = {"id":user.id, "name":user.name, "birth_year":user.birth_year\
       , "birth_month":user.birth_month, "birth_day":user.birth_day, "sex":user.sex\
       , "memo":user.memo, "version":user.version}

    with engine.connect() as conn:
        # USER_DATAテーブルに、引数のIDと一致するデータ件数を取得
        query = sa.text("SELECT COUNT(*) AS CNT FROM dbo.USER_DATA WHERE ID = :id;")
        rs = conn.execute(query, {"id":user.id})
        query_save = ''
        for row in rs:
            # USER_DATAテーブルに、引数のIDと一致するデータが無ければ追加、あれば更新
            if int(row[0]) == 0:
                query_save = sa.text(SQL_INSERT)
            else:
                query_save = sa.text(SQL_UPDATE)
        # 追加/更新SQLを実行しコミット
        conn.execute(query_save, params)
        conn.commit()

    return user

サンプルプログラムの実行結果
サンプルプログラムの実行結果は、以下の通り。
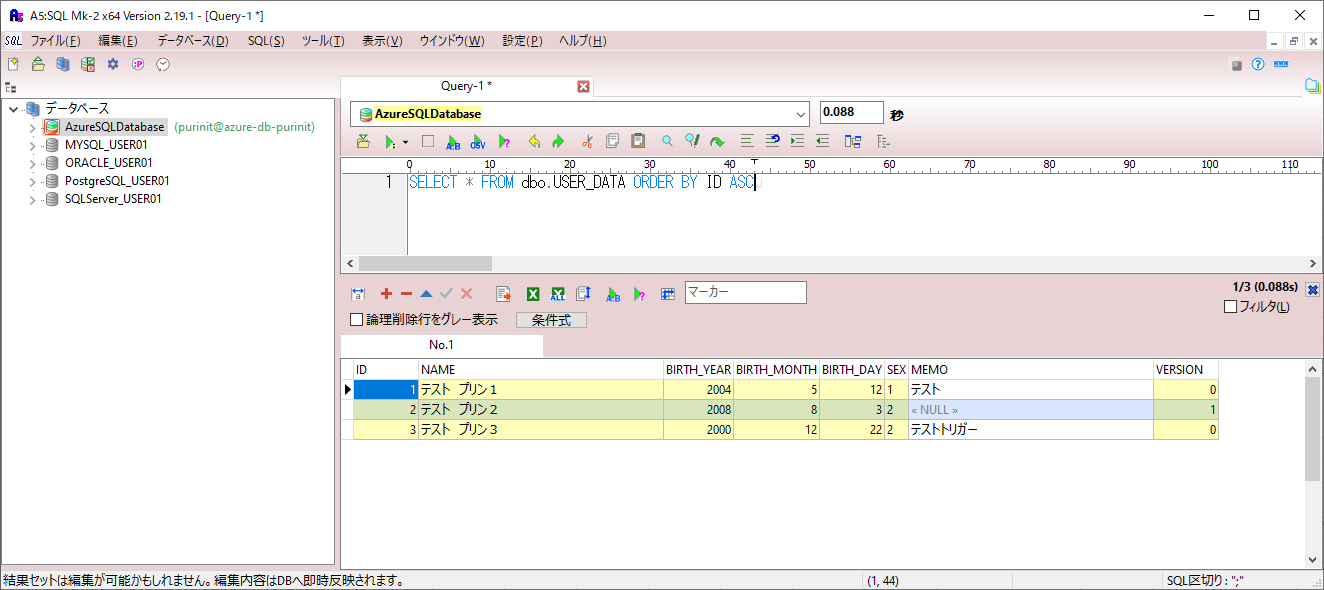
1) サンプルプログラム実行前の、SQL DatabaseのUSER_DATAテーブルの内容は、以下の通り。

2)「uvicorn main:app –reload」コマンドで、Uvicornを使用したFastAPIアプリケーションを実行する。

3) 別セッションからID=4であるデータを追加するcurl コマンドを実行した結果は、以下の通り。
<実行コマンド>
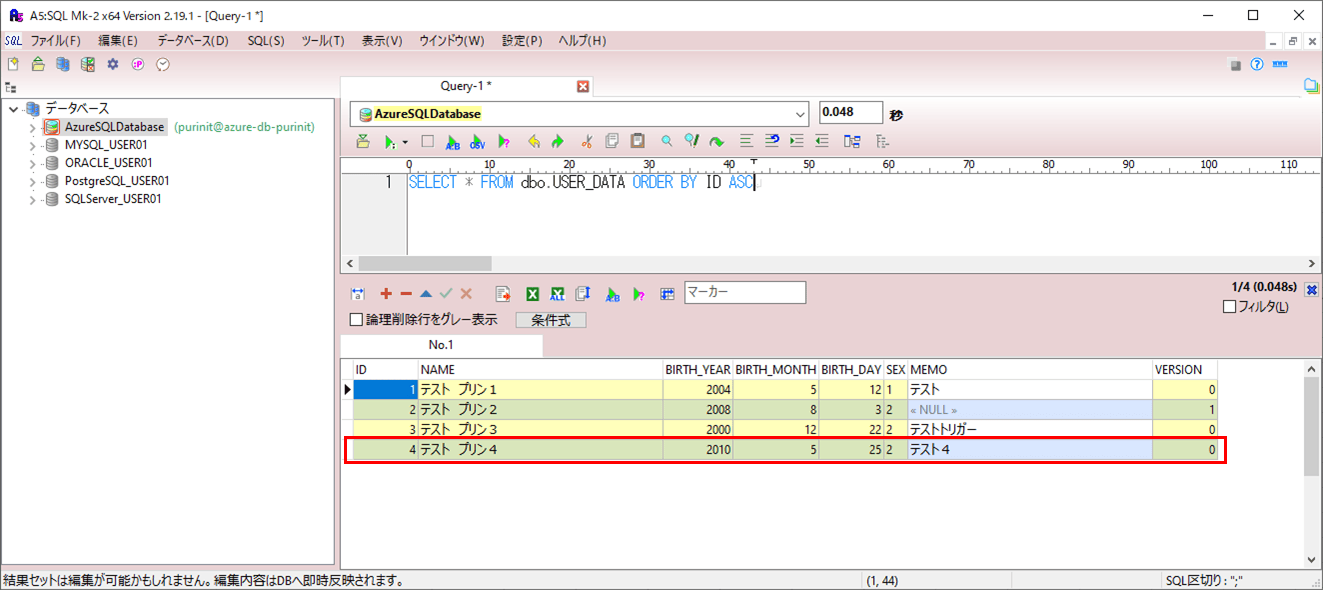
curl -X POST -H “Content-Type: application/json” -d ‘{“id” : “4” , “name” : “テスト プリン4” , “birth_year” : “2010” , “birth_month” : “5” , “birth_day” : “25” , “sex” : “2”, “memo” : “テスト4”, “version” : “0”}’ http://127.0.0.1:8000/save/user

4) 3)実行後の、SQL DatabaseのUSER_DATAテーブルの内容は以下の通りで、ID=4の指定したデータが追加されていることが確認できる。

5) 別セッションからID=4であるデータを更新するcurl コマンドを実行した結果は、以下の通り。
<実行コマンド>
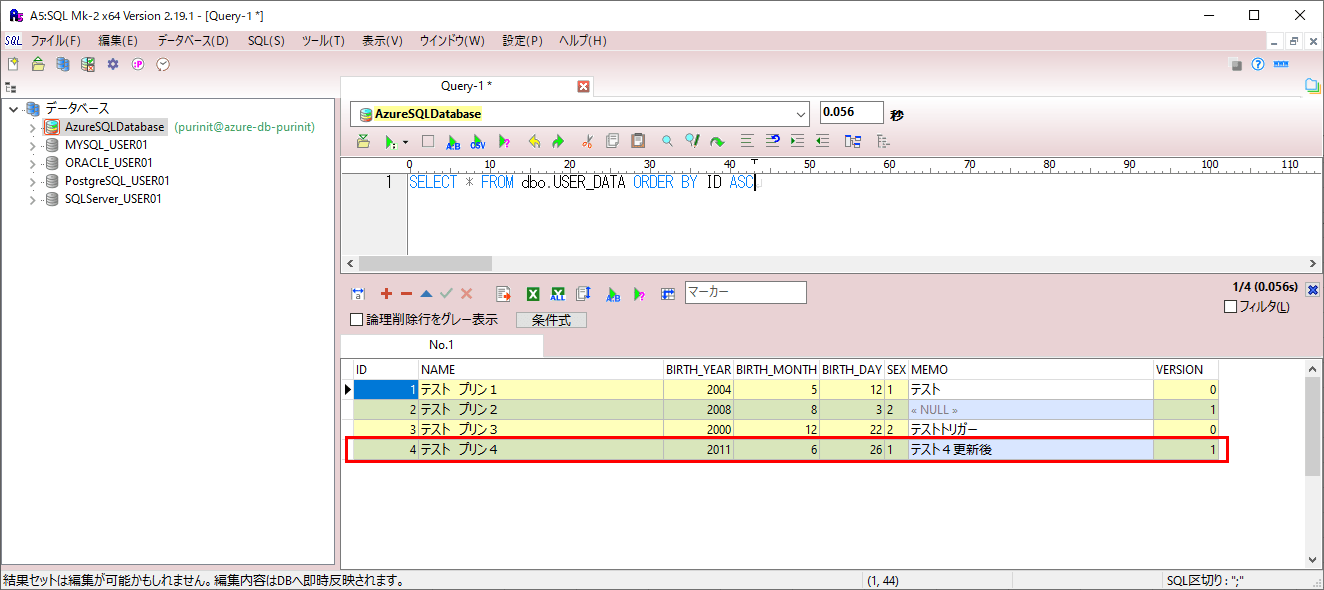
curl -X POST -H “Content-Type: application/json” -d ‘{“id” : “4” , “name” : “テスト プリン4” , “birth_year” : “2011” , “birth_month” : “6” , “birth_day” : “26” , “sex” : “1”, “memo” : “テスト4更新後”, “version” : “1”}’ http://127.0.0.1:8000/save/user

6) 5)実行後の、SQL DatabaseのUSER_DATAテーブルの内容は以下の通りで、ID=4の指定したデータが更新されていることが確認できる。

要点まとめ
- PythonのプログラムからAzure SQL Databaseに接続する場合、データ抽出に加え、データ追加/データ更新も行うことができる。


