これまでは、Azure App ServiceからAzure Functionsを直接呼び出していたが、Azure API Managementを経由してAzure Functionsを呼び出すこともできる。
今回は、Azure FunctionsをAzure API Management経由で呼び出してみたので、その手順を共有する。
前提条件
下記記事のAPI Managementの作成が完了していること。

また、下記記事のAzure App ServiceからAzure Functionsのサービスを呼び出し処理のプログラム作成が完了していること。

やってみたこと
- 作成したサンプルプログラム(App Service側)の内容
- 作成したサンプルプログラム(Azure Functions側)の内容
- 作成したサンプルプログラムの実行結果(API Management利用前)
- Azure FunctionsのAPI Managementへの追加
- 作成したサンプルプログラムの実行結果(API Management利用後)
作成したサンプルプログラム(App Service側)の内容
作成したサンプルプログラム(App Service側)の構成は以下の通り。
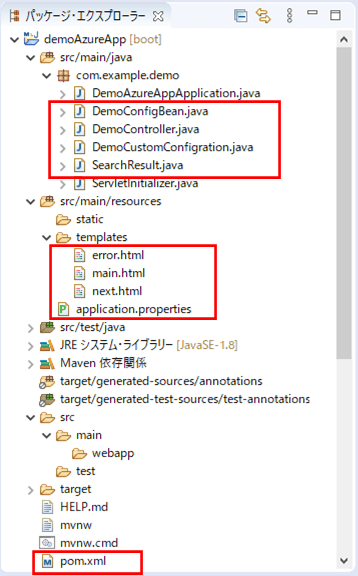
なお、上記の赤枠は、前提条件のプログラムから追加・変更したプログラムである。
pom.xmlの追加内容は以下の通りで、lombokの設定を追加している。
<!-- lombokの設定 -->
<dependency>
    <groupId>org.projectlombok</groupId>
    <artifactId>lombok</artifactId>
    <scope>provided</scope>
</dependency>
また、application.propertiesの設定内容は以下の通りで、Azure上でAzure API Managementを経由してAzure Functionsを呼び出す場合のURLを追加している。なお、このURLについては後述する。
server.port = 8084
#ローカルでAzure Functionsを呼び出す場合のURL
demoAzureFunc.urlBase = http://localhost:7071/api/

#Azure上でAzure Functionsを呼び出す場合のURL
#demoAzureFunc.urlBase = https://azurefuncdemoapp.azurewebsites.net/api/

#Azure上でAzure API Managementを経由してAzure Functionsを呼び出す場合のURL
#demoAzureFunc.urlBase = https://azureapipurinit.azure-api.net/azureFuncDemoApp/
さらに、コントローラクラスの内容は以下の通りで、ファンクションの呼び出しや画面遷移を定義している。
package com.example.demo;

import org.springframework.beans.factory.annotation.Autowired;
import org.springframework.beans.factory.annotation.Value;
import org.springframework.http.HttpEntity;
import org.springframework.http.HttpHeaders;
import org.springframework.http.HttpMethod;
import org.springframework.http.MediaType;
import org.springframework.http.ResponseEntity;
import org.springframework.stereotype.Controller;
import org.springframework.ui.Model;
import org.springframework.util.LinkedMultiValueMap;
import org.springframework.util.MultiValueMap;
import org.springframework.web.bind.annotation.GetMapping;
import org.springframework.web.bind.annotation.PostMapping;
import org.springframework.web.bind.annotation.RequestMapping;
import org.springframework.web.client.RestTemplate;
import com.fasterxml.jackson.databind.ObjectMapper;

@Controller
public class DemoController {

    /** RestTemplateオブジェクト */
    @Autowired
    private RestTemplate restTemplate;

    /** ObjectMapperオブジェクト */
    @Autowired
    private ObjectMapper objectMapper;

    /** application.propertiesからdemoAzureFunc.urlBaseの値を取得 */
    @Value("${demoAzureFunc.urlBase}")
    private String demoAzureFuncBase;

    /**
     * メイン画面を初期表示する.
     * @return メイン画面
     */
    @GetMapping("/")
    public String index() {
        return "main";
    }

    /**
     * Azure FunctionsのcallFunctionApi関数呼出処理.
     * @param model Modelオブジェクト
     * @return 次画面
     */
    @RequestMapping("/callFunction")
    public String callFunction(Model model) {
        // Azure FunctionsのcallFunctionApi関数を呼び出すためのヘッダー情報を設定する
        HttpHeaders headers = new HttpHeaders();
        headers.setContentType(MediaType.APPLICATION_JSON);

        // Azure FunctionsのcallFunctionApi関数を呼び出すための引数を設定する
        MultiValueMap<String, Object> map = new LinkedMultiValueMap<>();
        try {
            map.add("param", "DemoController callFunction calling.");
        } catch (Exception ex) {
            throw new RuntimeException(ex);
        }
        HttpEntity<MultiValueMap<String, Object>> entity
             = new HttpEntity<>(map, headers);

        // Azure FunctionsのcallFunctionApi関数を呼び出す
        ResponseEntity<String> response = restTemplate.exchange(
             demoAzureFuncBase + "callFunctionApi", HttpMethod.POST,
             entity, String.class);

        // callFunctionApi関数の呼出結果を設定する
        SearchResult searchResult = null;
        try {
            searchResult = objectMapper.readValue(
                response.getBody(), SearchResult.class);
            if (searchResult != null) {
                model.addAttribute("result", searchResult.getResult());
            }
        } catch (Exception ex) {
            throw new RuntimeException(ex);
        }
        return "next";
    }

    /**
     * メイン画面に戻る処理.
     * @return メイン画面
     */
    @PostMapping("/backToMain")
    public String backToMain() {
        return "main";
    }

    /**
     * エラー画面に遷移する処理.
     * @return エラー画面
     */
    @RequestMapping("/toError")
    public String toError() {
        return "error";
    }

}
なお、上記コントローラクラスで利用しているBean定義クラスと検索結果定義クラスの内容は以下の通り。
package com.example.demo;

import org.springframework.context.annotation.Bean;
import org.springframework.context.annotation.Configuration;
import org.springframework.web.client.RestTemplate;

import com.fasterxml.jackson.databind.ObjectMapper;

@Configuration
public class DemoConfigBean {

    /**
     * RestTemplateオブジェクトを作成する
     * @return RestTemplateオブジェクト
     */
    @Bean
    public RestTemplate getRestTemplate() {
        return new RestTemplate();
    }

    /**
     * ObjectMapperオブジェクトを作成する
     * @return ObjectMapperオブジェクト
     */
    @Bean
    public ObjectMapper getObjectMapper() {
        return new ObjectMapper();
    }
}
package com.example.demo;
import lombok.Data;
@Data
public class SearchResult {
/** 検索結果 */
private String result;
public SearchResult() {}
public SearchResult(String result) {
this.result = result;
}
}また、HTTPレスポンスで429(Too Many Requests)エラーが発生した場合にエラー画面に遷移する定義は、以下のクラスで定義している。
package com.example.demo;

import org.springframework.boot.web.server.ErrorPage;
import org.springframework.boot.web.server.WebServerFactoryCustomizer;
import org.springframework.boot.web.servlet.server.ConfigurableServletWebServerFactory;
import org.springframework.http.HttpStatus;
import org.springframework.stereotype.Component;

@Component
public class DemoCustomConfigration
    implements WebServerFactoryCustomizer<ConfigurableServletWebServerFactory> {

   @Override
   public void customize(ConfigurableServletWebServerFactory factory) {
       // HTTP 429(Too Many Requests)エラーが発生した場合に、パス「/toError」に遷移するよう設定
       factory.addErrorPages(new ErrorPage(HttpStatus.TOO_MANY_REQUESTS, "/toError"));
   }

}
さらに、HTMLファイルの内容は以下の通りで、メイン画面・遷移先画面・エラー画面を設定している。
<!DOCTYPE html>
<html lang="ja" xmlns:th="http://www.thymeleaf.org">
<head>
<meta charset="UTF-8">
<title>メイン画面</title>
</head>
<body>
    <form method="post" th:action="@{/callFunction}">
    	ファンクションを呼び出すには、ボタンを押下してください。<br/><br/>
    	<input type="submit" value="ファンクション呼び出し" />
	</form>
</body>
</html>
<!DOCTYPE html>
<html lang="ja" xmlns:th="http://www.thymeleaf.org">
<head>
<meta charset="UTF-8">
<title>遷移先画面</title>
</head>
<body>
<form method="post" th:action="@{/backToMain}">
ファンクション呼出が完了しました。<br/>
呼出結果:<span th:text="${result}">ここにファンクション呼出結果が設定されます。</span>
<br/><br/>
<input type="submit" value="戻る" />
</form>
</body>
</html><!DOCTYPE html>
<html lang="ja" xmlns:th="http://www.thymeleaf.org">
<head>
<meta charset="UTF-8">
<title>エラー画面</title>
</head>
<body>
<form method="post" th:action="@{/backToMain}">
エラー(HTTP 429 TOO_MANY_REQUESTS)が発生しました。
<br/><br/>
<input type="submit" value="戻る" />
</form>
</body>
</html>その他のソースコード内容は、以下のサイトを参照のこと。
https://github.com/purin-it/azure/tree/master/call-azure-functions-by-api-management/demoAzureApp
作成したサンプルプログラム(Azure Functions側)の内容
作成したサンプルプログラム(Azure Functions側)の構成は以下の通り。
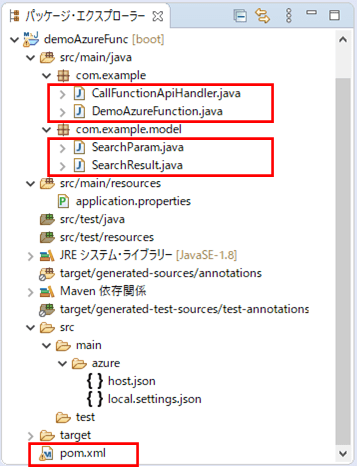
なお、上記の赤枠は、前提条件のプログラムから追加・変更したプログラムである。
pom.xmlの設定内容は以下の通りで、lombokの設定を追加している。
<!-- lombokを利用するための設定 -->
<dependency>
    <groupId>org.projectlombok</groupId>
    <artifactId>lombok</artifactId>
    <scope>provided</scope>
</dependency>
ハンドラークラスの内容は以下の通りで、Azure App Serviceのコントローラクラスから呼ばれるcallFunctionApi関数である。
package com.example;

import java.util.Optional;

import org.springframework.cloud.function.adapter.azure.FunctionInvoker;

import com.example.model.SearchParam;
import com.example.model.SearchResult;
import com.fasterxml.jackson.core.type.TypeReference;
import com.fasterxml.jackson.databind.ObjectMapper;
import com.microsoft.azure.functions.ExecutionContext;
import com.microsoft.azure.functions.HttpMethod;
import com.microsoft.azure.functions.HttpRequestMessage;
import com.microsoft.azure.functions.HttpResponseMessage;
import com.microsoft.azure.functions.HttpStatus;
import com.microsoft.azure.functions.annotation.AuthorizationLevel;
import com.microsoft.azure.functions.annotation.FunctionName;
import com.microsoft.azure.functions.annotation.HttpTrigger;

public class CallFunctionApiHandler
    extends FunctionInvoker<SearchParam, SearchResult> {

    /**
     * HTTP要求に応じて、DemoAzureFunctionクラスのcallFunctionApiメソッドを呼び出し、
     * その戻り値をボディに設定したレスポンスを返す.
     * @param request リクエストオブジェクト
     * @param context コンテキストオブジェクト
     * @return レスポンスオブジェクト
     */
    @FunctionName("callFunctionApi")
    public HttpResponseMessage execute(
            @HttpTrigger(name = "request", methods = HttpMethod.POST
                , authLevel = AuthorizationLevel.ANONYMOUS)
                   HttpRequestMessage<Optional<String>> request,
            ExecutionContext context) {

        // リクエストオブジェクトからパラメータ値を取得し、検索用パラメータに設定する
        ObjectMapper mapper = new ObjectMapper();
        String jsonParam = request.getBody().get();
        jsonParam = jsonParam.replaceAll("\\[", "").replaceAll("\\]", "");

        SearchParam searchParam = new SearchParam();
        try {
            searchParam = mapper.readValue(jsonParam
                , new TypeReference<SearchParam>() {
            });
        } catch (Exception ex) {
            throw new RuntimeException(ex);
        }

        // handleRequestメソッド内でDemoAzureFunctionクラスのcallFunctionApiメソッドを
        // 呼び出し、その戻り値をボディに設定したレスポンスを、JSON形式で返す
        return request.createResponseBuilder(HttpStatus.OK)
                .body(handleRequest(searchParam, context))
                .header("Content-Type", "text/json").build();
    }
}
また、Azure Functionsのメインクラスは以下の通りで、先ほどのハンドラークラスのhandleRequestメソッドで呼び出される。
package com.example;

import java.util.function.Function;

import org.springframework.boot.SpringApplication;
import org.springframework.boot.autoconfigure.SpringBootApplication;
import org.springframework.context.annotation.Bean;

import com.example.model.SearchParam;
import com.example.model.SearchResult;

@SpringBootApplication
public class DemoAzureFunction {

    public static void main(String[] args) throws Exception {
        SpringApplication.run(DemoAzureFunction.class, args);
    }

    /**
     * API呼出結果を返却する関数.
     * @return API呼出結果
     */
    @Bean
    public Function<SearchParam, SearchResult> callFunctionApi(){
        return searchParam
           -> new SearchResult("param:" + searchParam + ", result:success");
    }
}
さらに、Azure FunctionsのメインクラスのcallFunctionApiメソッドの引数・戻り値は以下のクラスで定義している。
package com.example.model;

import lombok.Data;

@Data
public class SearchParam {

    /** 検索用パラメータ */
    private String param;

}
package com.example.model;
import lombok.Data;
@Data
public class SearchResult {
/** 検索結果 */
private String result;
public SearchResult() {}
public SearchResult(String result) {
this.result = result;
}
}その他のソースコード内容は、以下のサイトを参照のこと。
https://github.com/purin-it/azure/tree/master/call-azure-functions-by-api-management/demoAzureFunc
作成したサンプルプログラムの実行結果(API Management利用前)
API Managementを利用する前に、作成したサンプルプログラムをAzure上で実行した結果は、以下の通り。
1) App Serviceのapplication.propertiesを以下の設定にした状態で、Azure上に、Azure App Service, Azure Functionsのプログラムをデプロイする。

なお、Azure App Serviceにデプロイする過程は、以下の記事の「App ServiceへのSpring Bootを利用したJavaアプリケーションのデプロイ」を参照のこと。

また、Azure Functionsにデプロイする過程は、以下の記事の「Azure FunctionsへのSpring Bootを利用したJavaアプリケーションのデプロイ」を参照のこと。

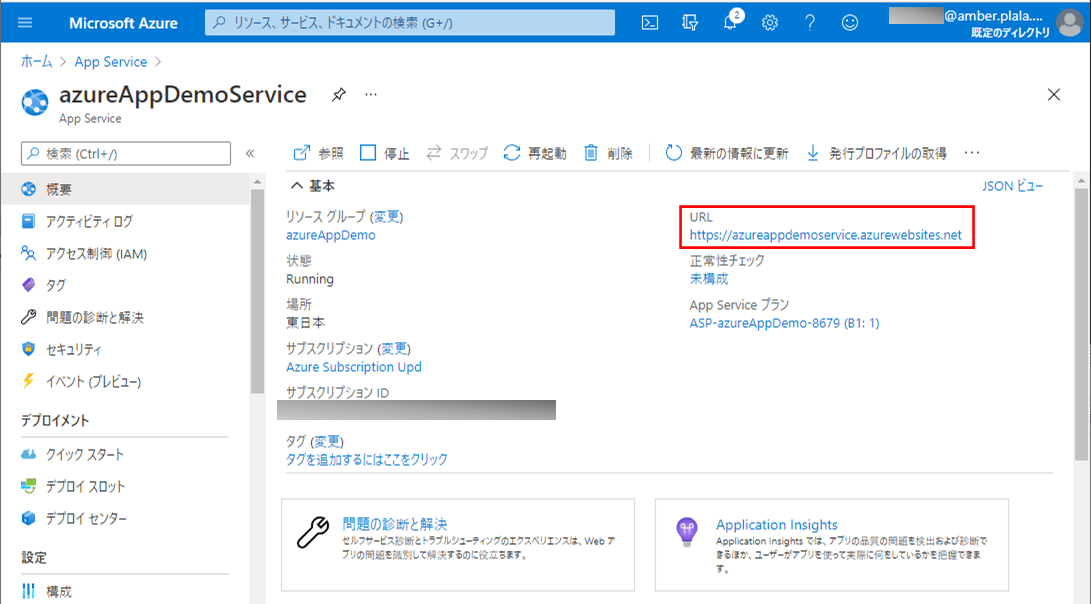
2) デプロイ後、Azure App ServiceのURL「https://azureappdemoservice.azurewebsites.net/」とアクセスすると以下の画面が表示されるため、「ファンクション呼び出し」ボタンを押下する。
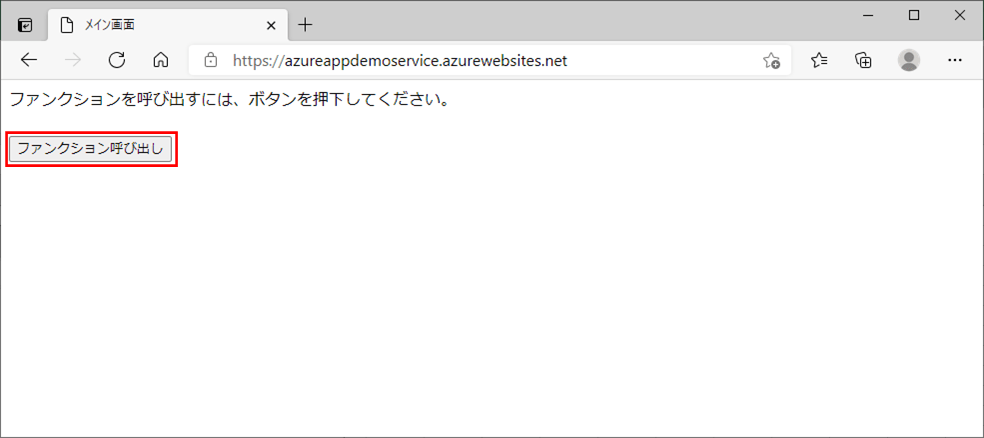
なお、上記URLは、下記Azure App ServiceのURLから確認できる。
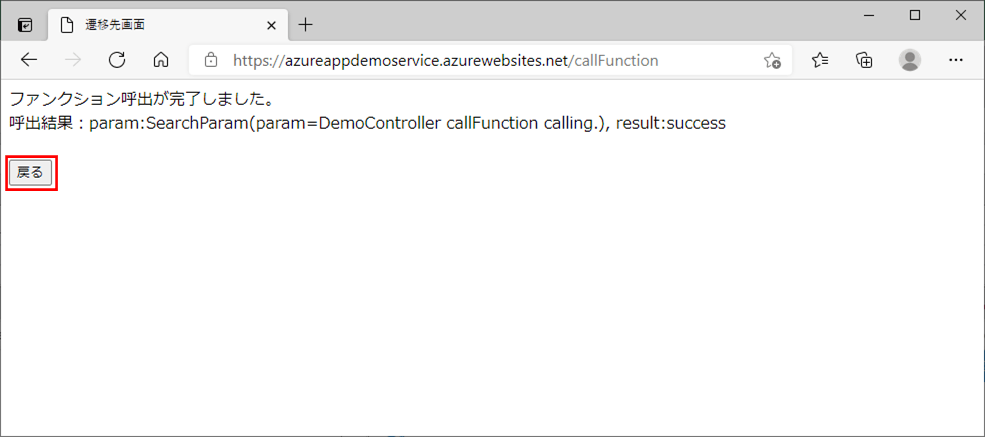
3) callFunctionApi関数が呼び出され、以下の画面に遷移する。その後「戻る」ボタンを押下する。
Azure FunctionsのAPI Managementへの追加
Azure FunctionsのAPI Managementへの追加は、Azure Portalで行える。その手順は、以下の通り。
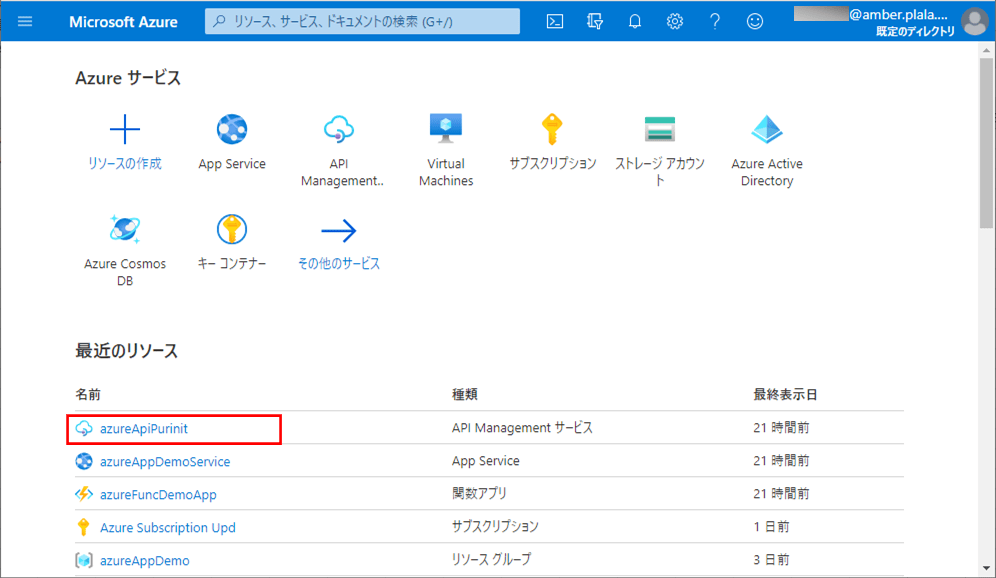
1) Azure Portalにログインし、作成済のAPI Managementを選択する。
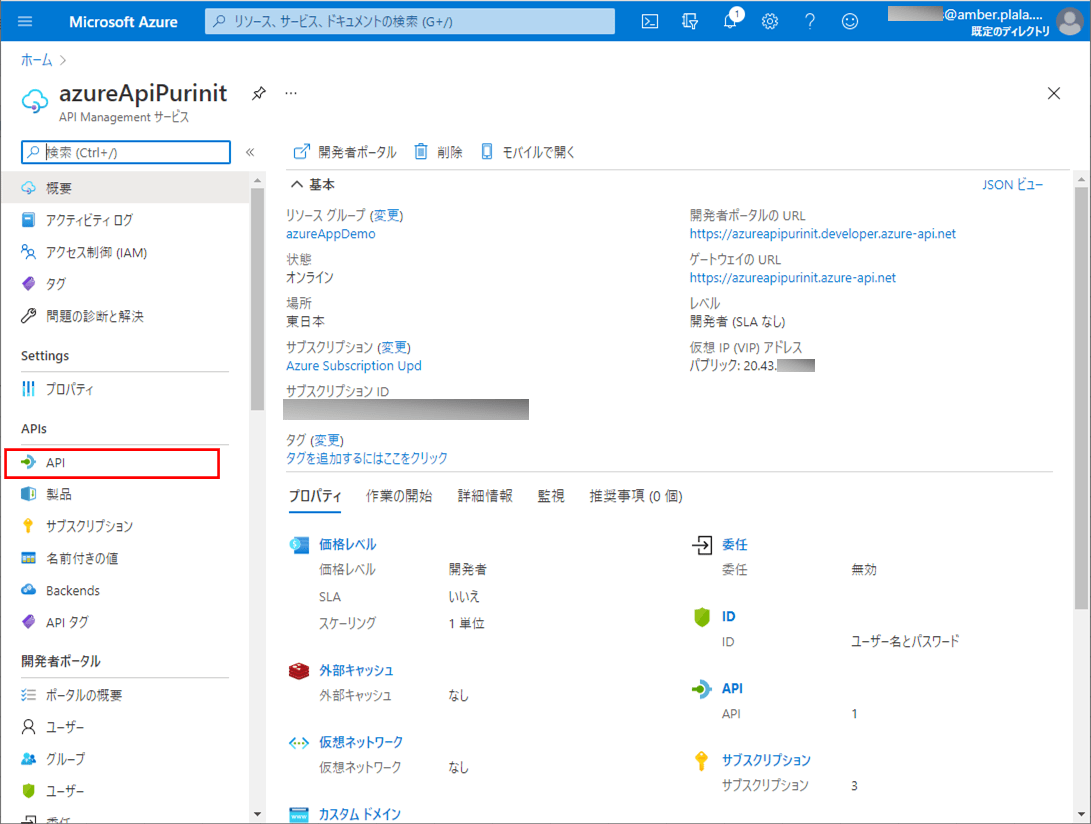
2) 作成済のAzure API Managementの概要画面が表示されるため、「API」メニューを押下する。
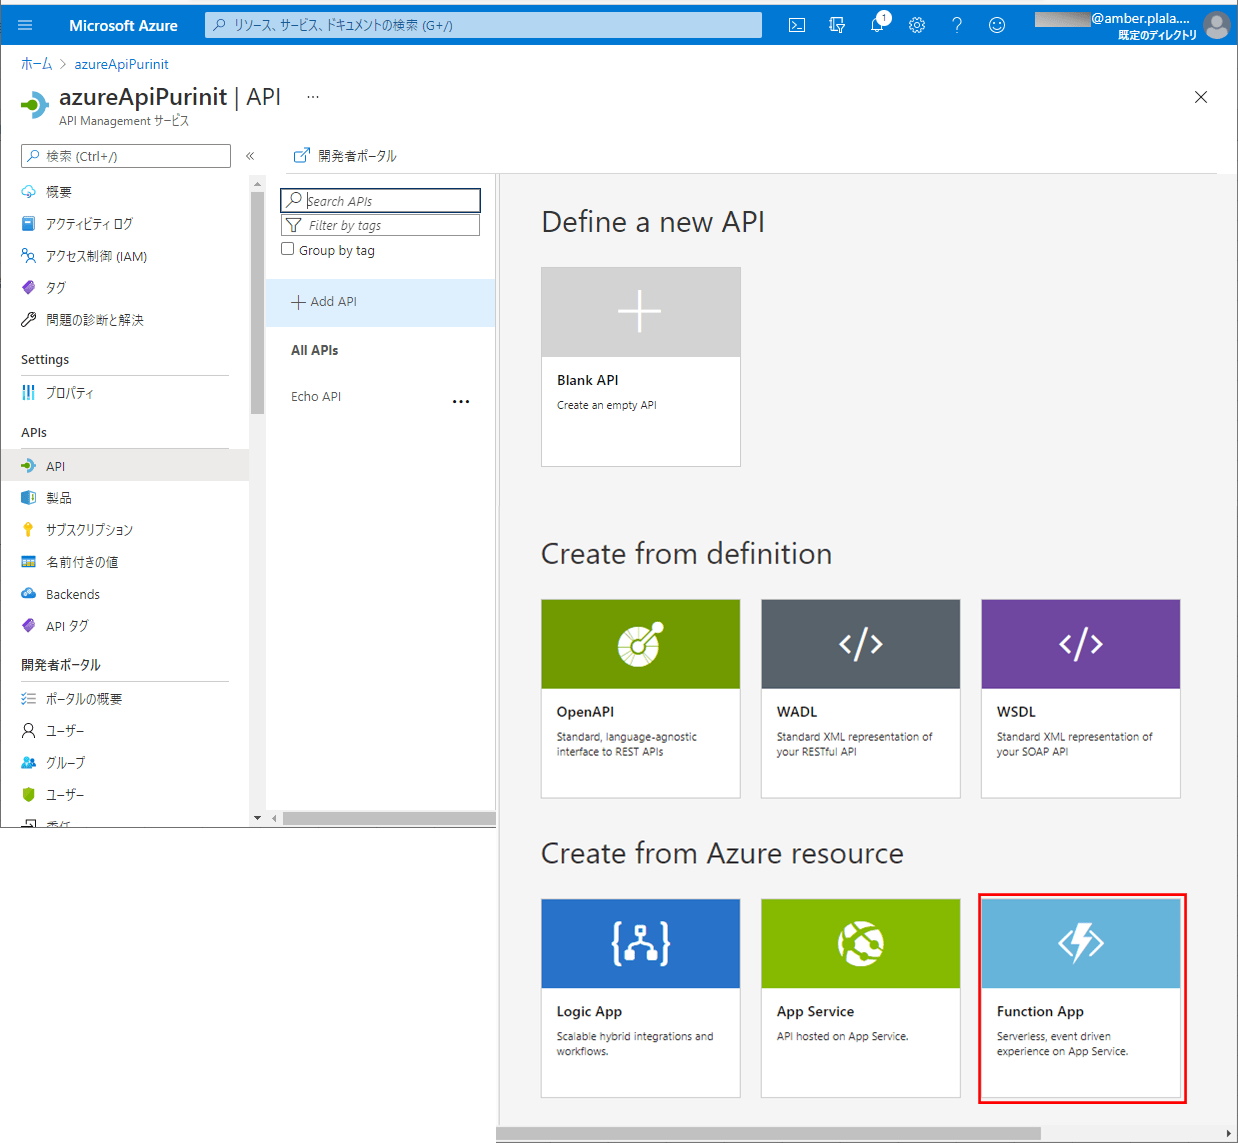
3) 以下のように、API定義画面が表示されるため、「Function App」ボタンを押下する。
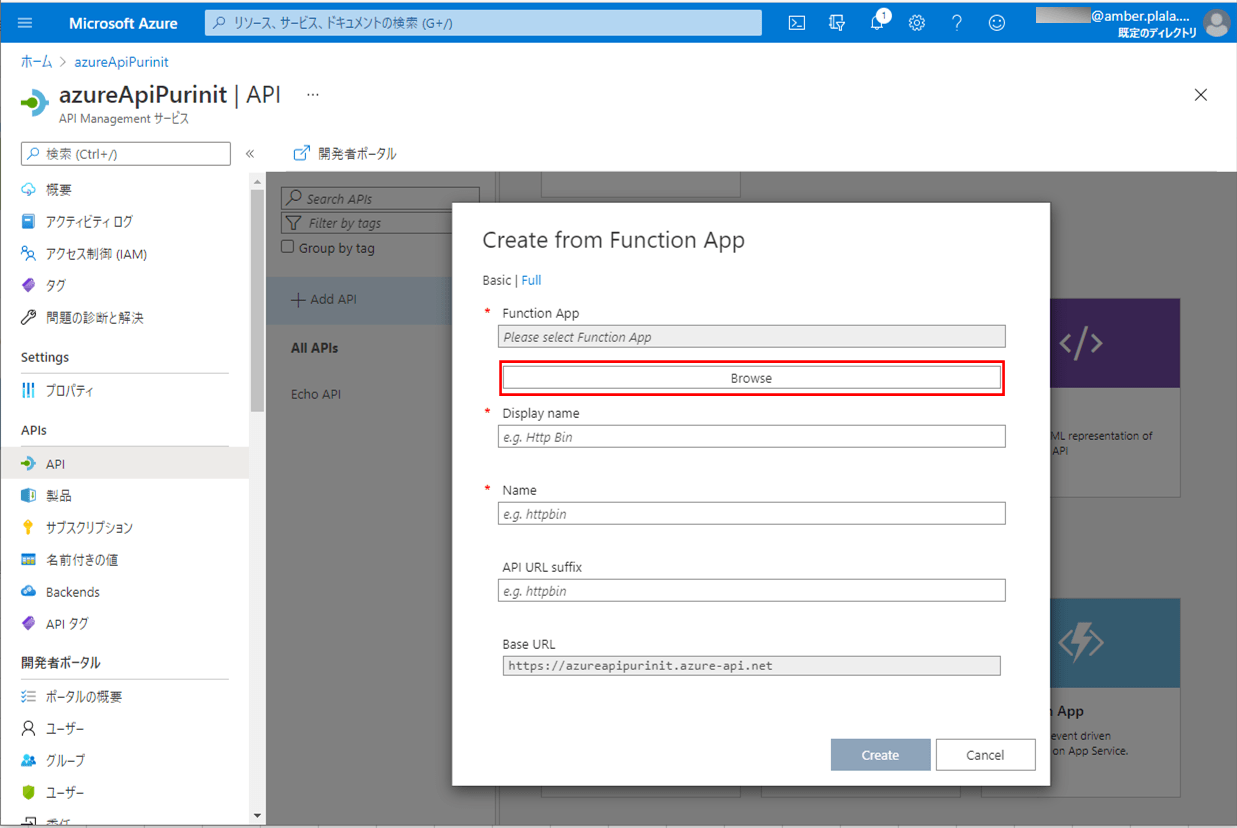
4) 以下の画面が表示されるため、「Browse」ボタンを押下する。
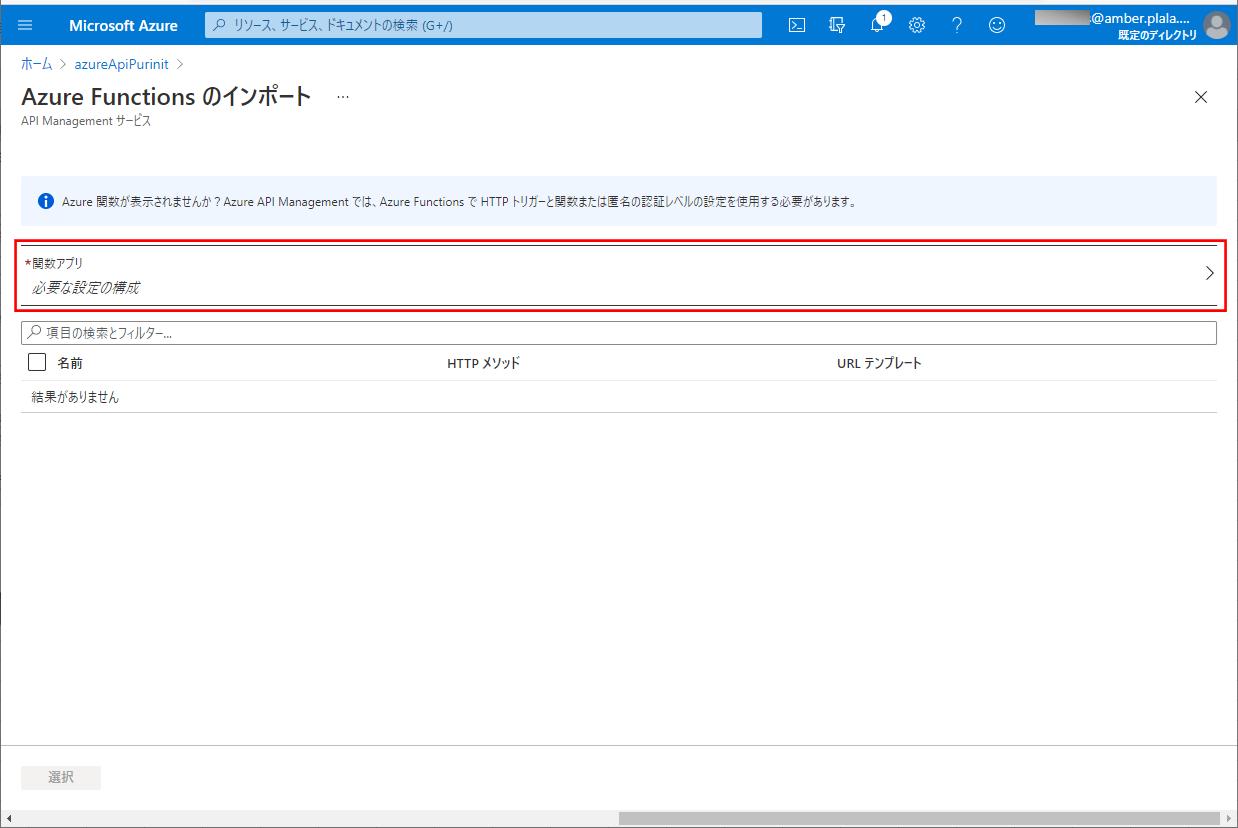
5) Azure Functionmsをインポートするため、「関数アプリ」ボタンを押下する。
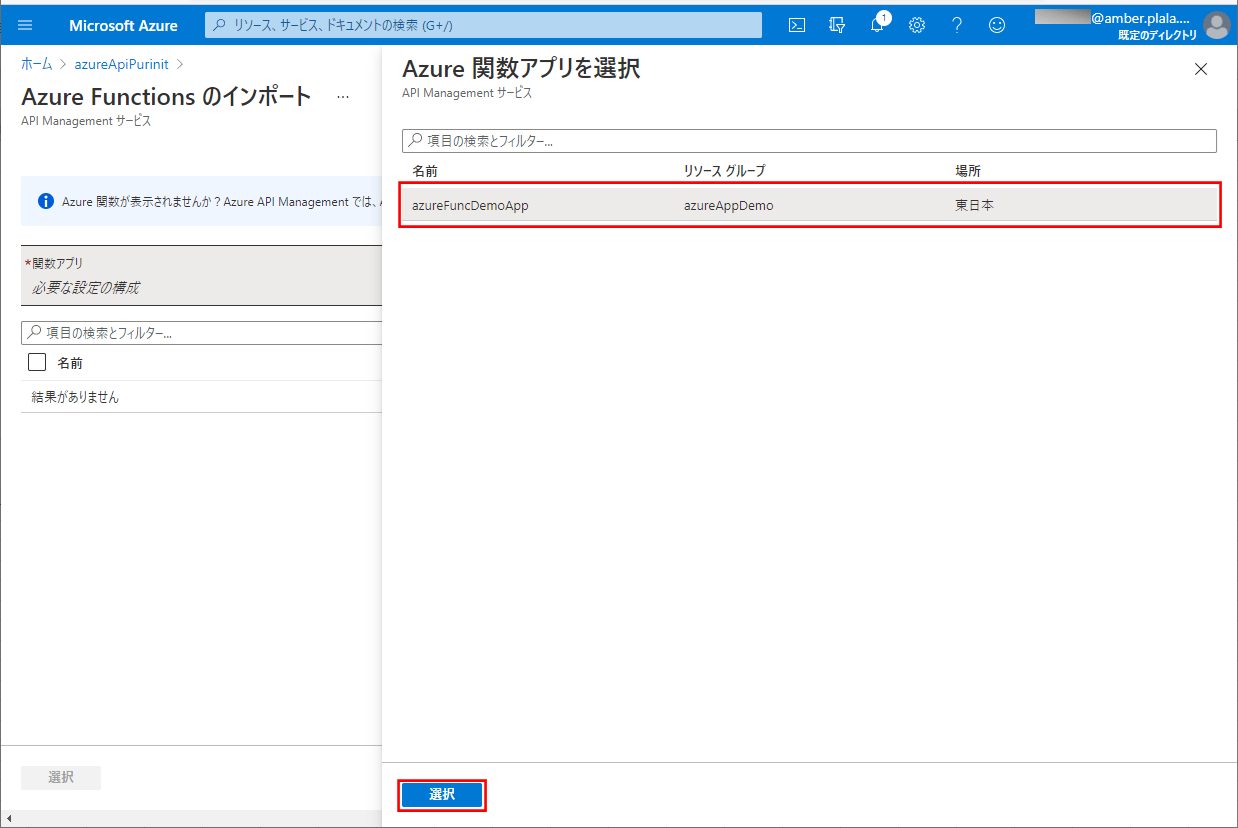
6) 表示された関数アプリ(azureFuncDemoApp)を選択し、「選択」ボタンを押下する。
7) 以下のように、選択した関数アプリが表示されるため、「選択」ボタンを押下する。
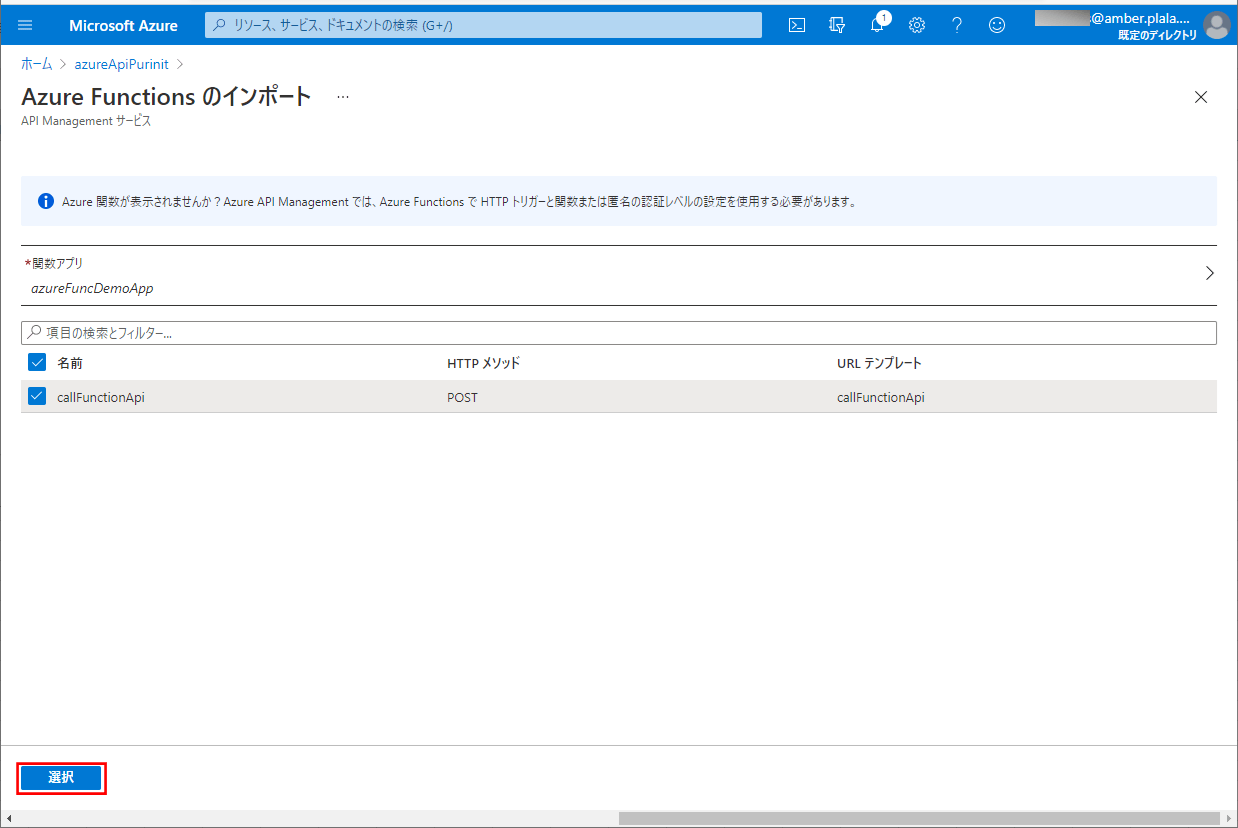
8) 以下のように、関数アプリの内容が自動的に設定されるため、確認後「Create」ボタンを押下する。
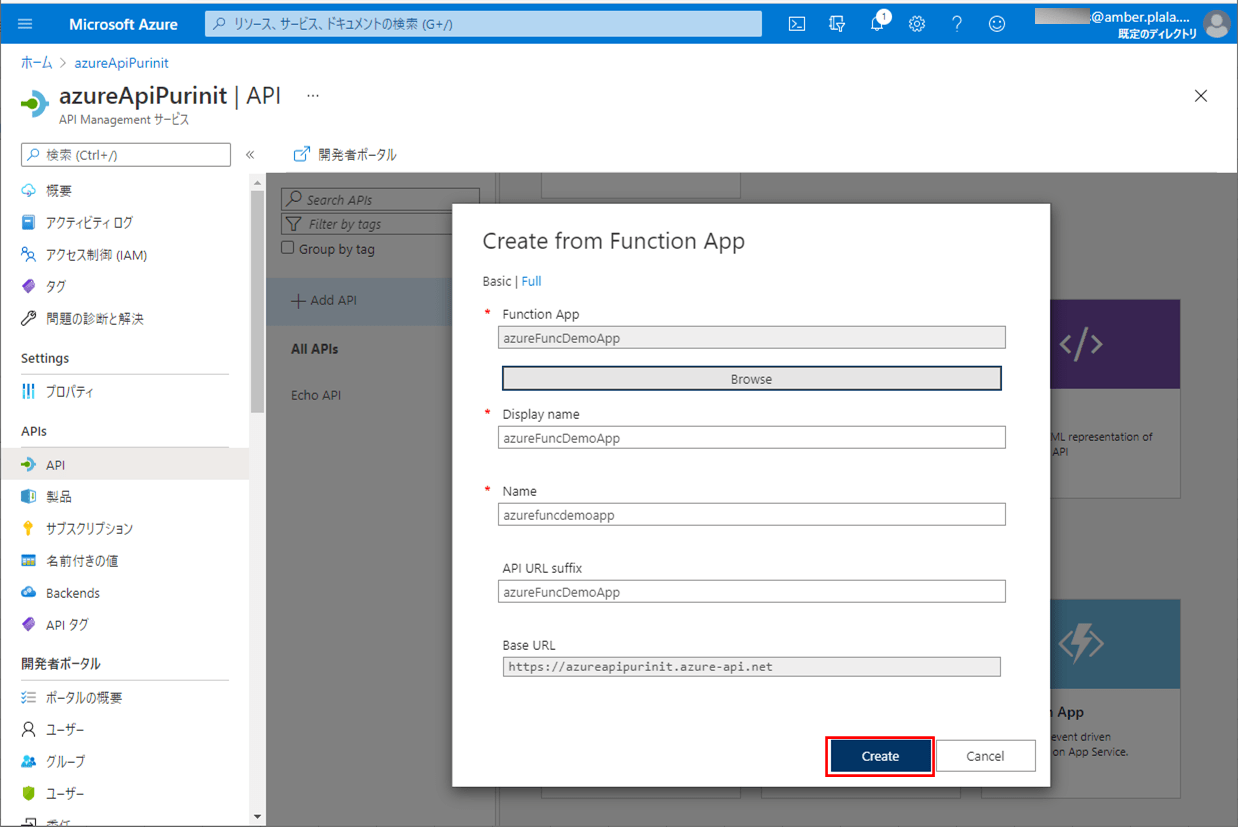
9) 以下のように、All APIsに選択した関数「azureFuncDemoApp」が表示されることが確認できる。
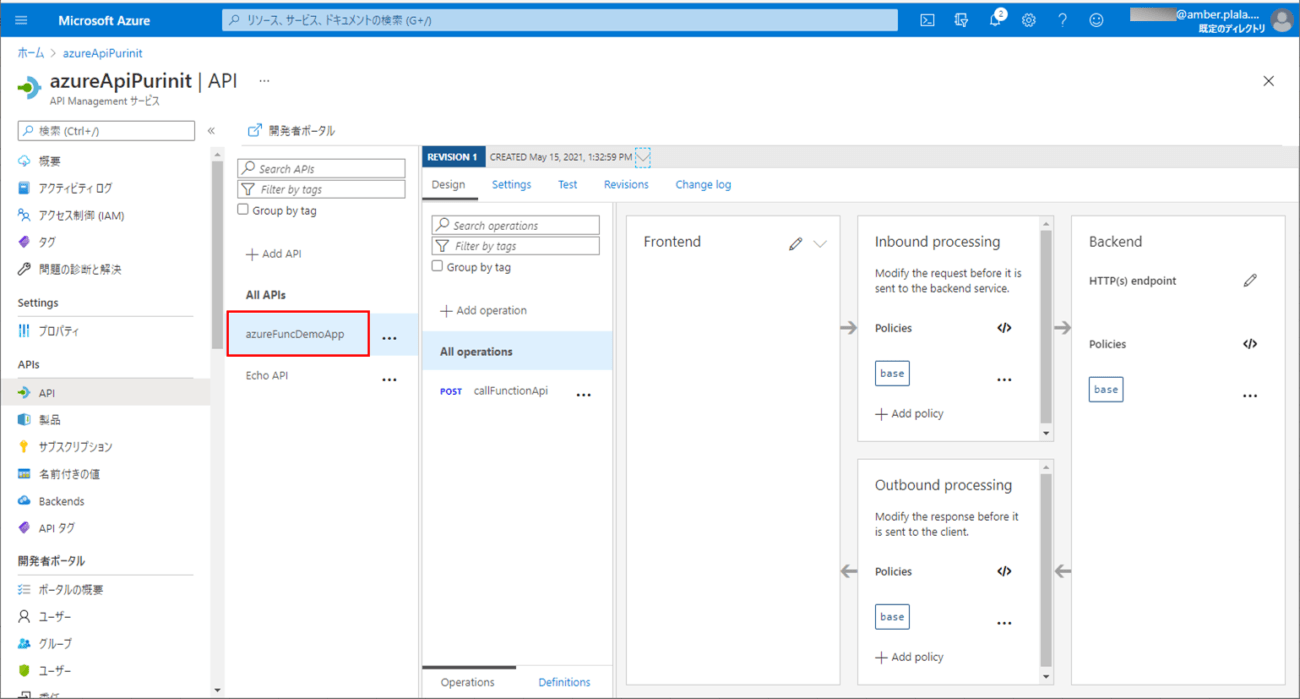
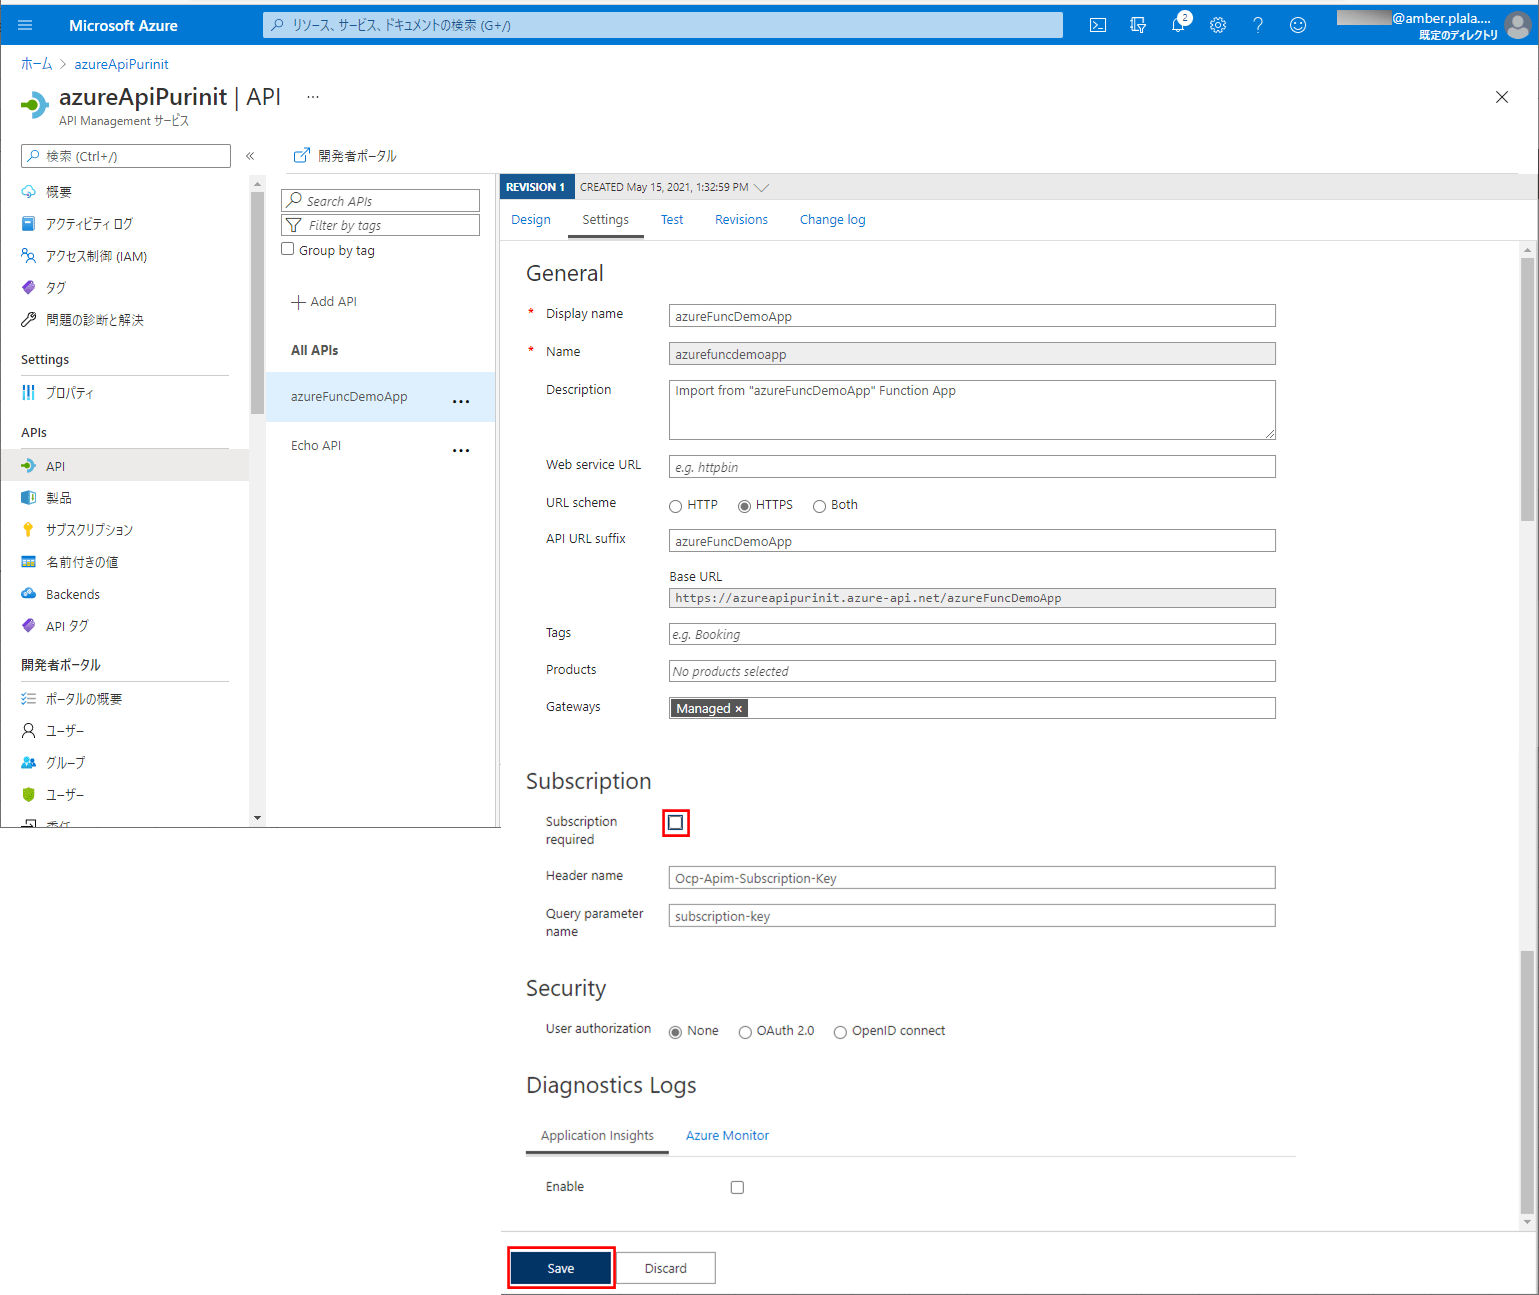
10) デフォルトだとサブスクリプションを指定しないと関数の実行ができない設定になっているため、設定変更を行う。そこで「Settings」タブを選択すると、「Subscription required」にチェックが入っていることが確認できる。
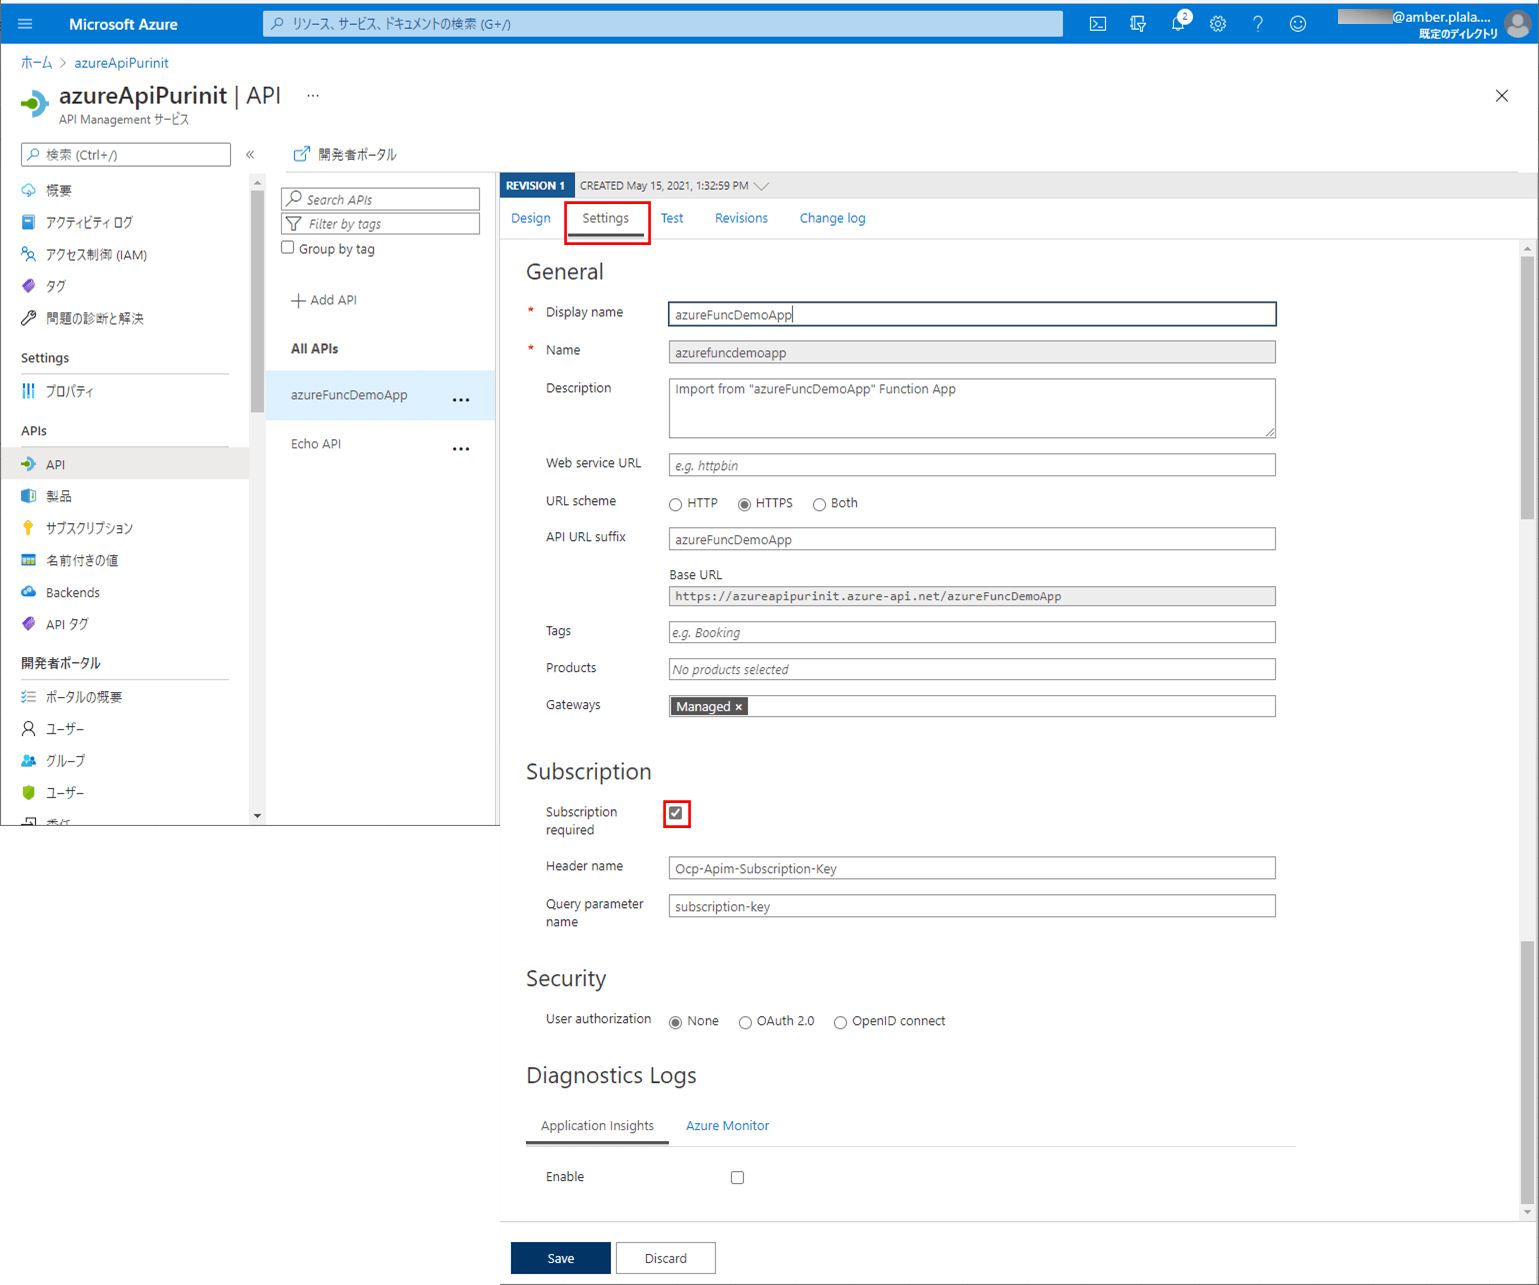
11) 以下のように、「Subscription required」のチェックを外して、「Save」ボタンを押下する。
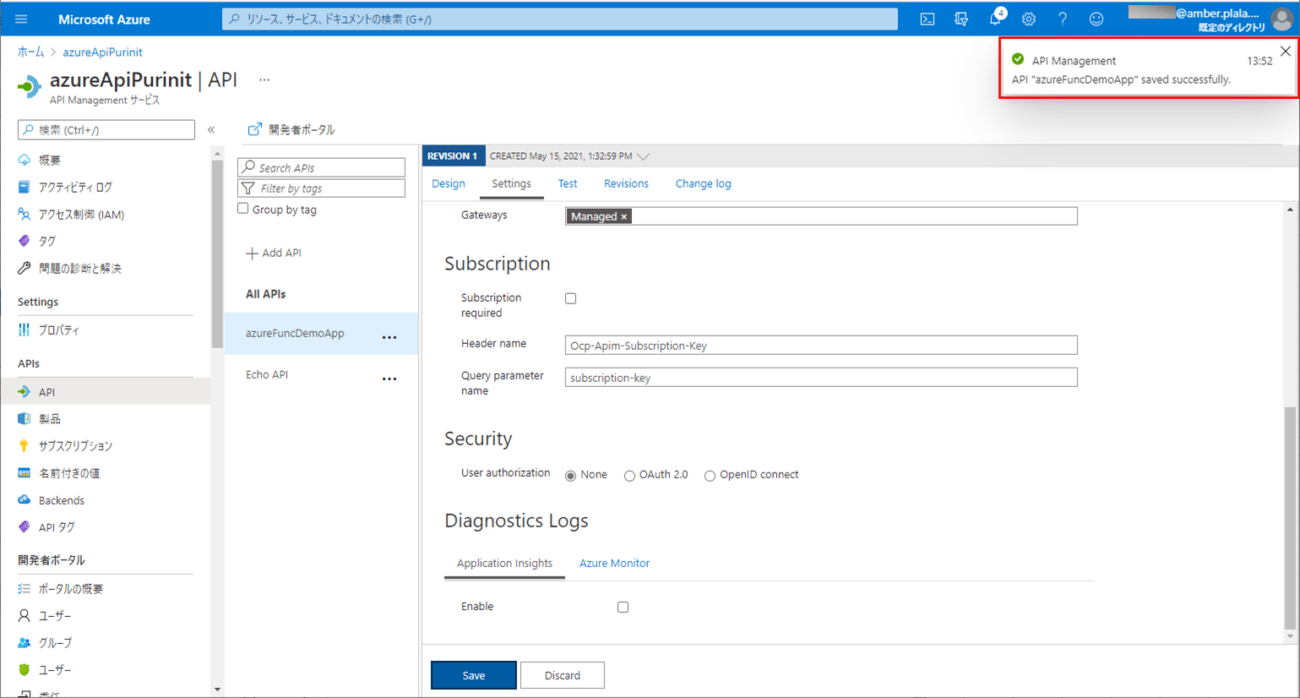
12) 保存が完了すると、右上に完了メッセージが表示される。
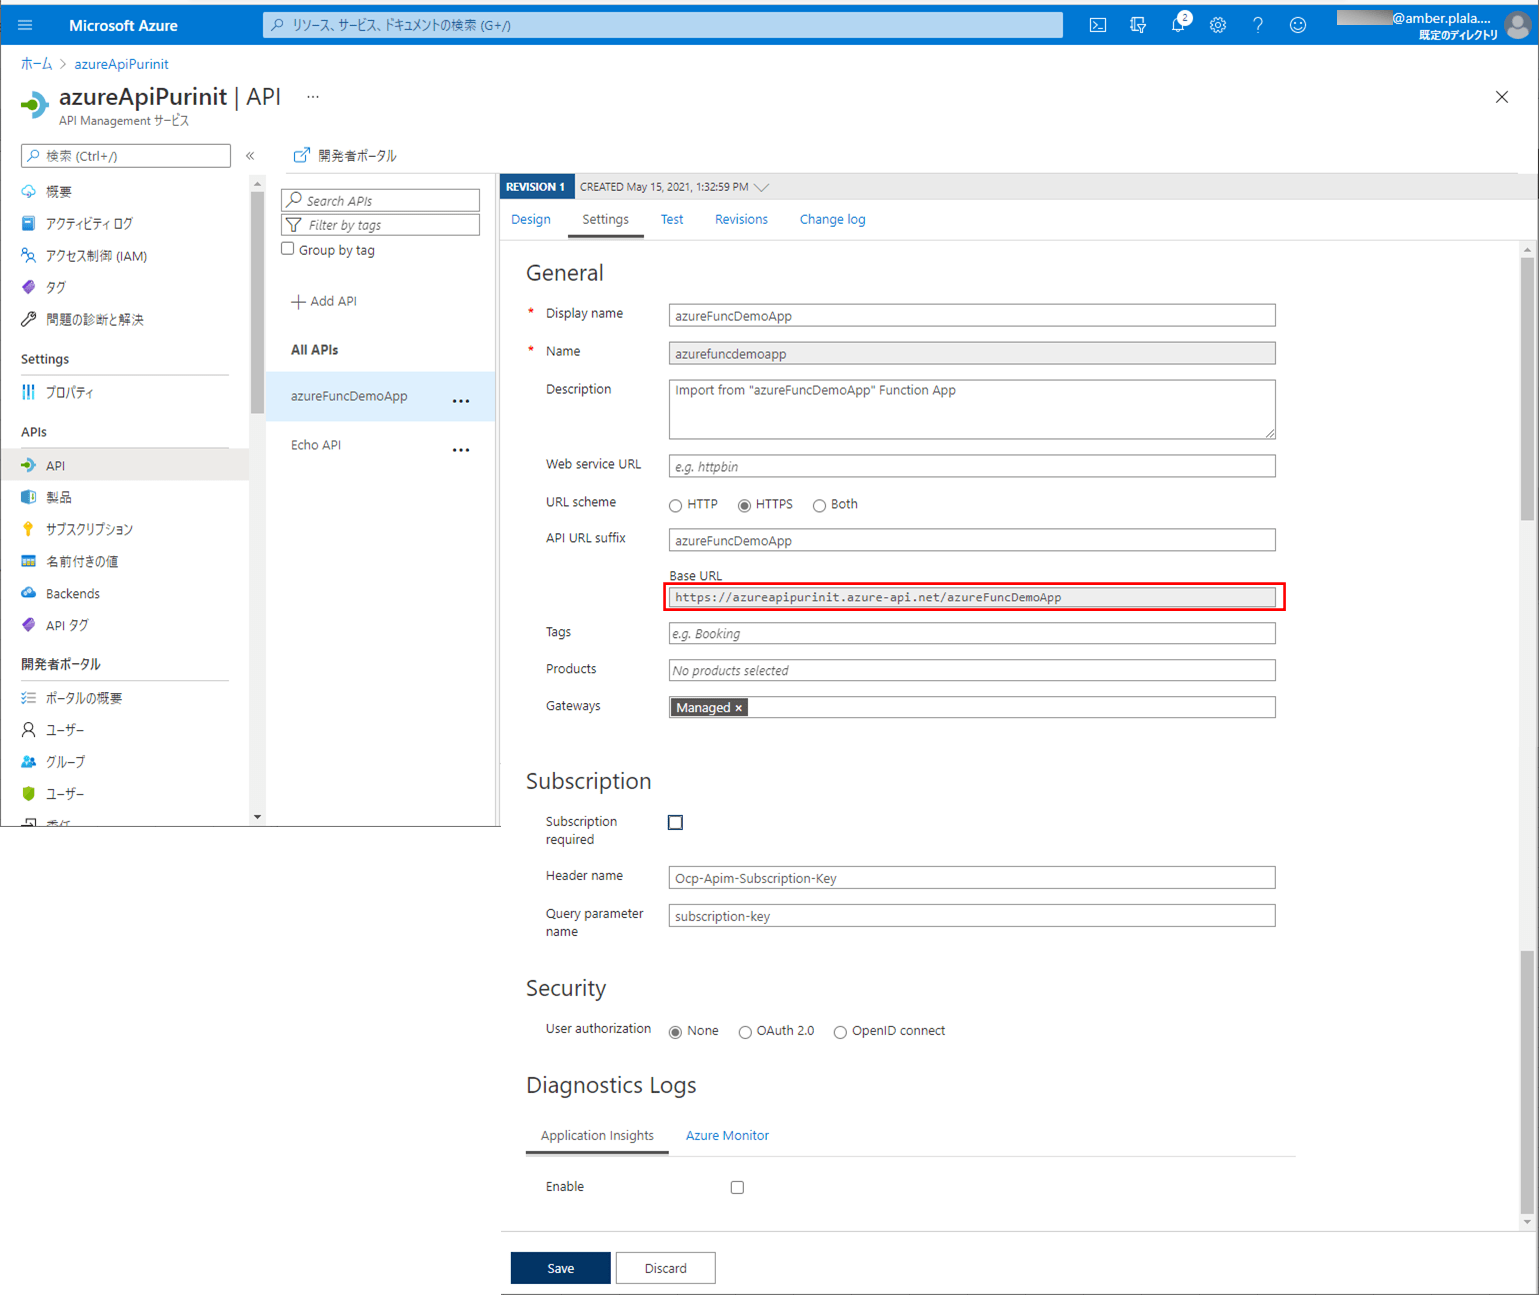
13) なお、App Serviceのapplication.propertiesに定義した「Azure上でAzure API Managementを経由してAzure Functionsを呼び出す場合のURL」については、以下の画面の「BaseURL」から確認できる。
作成したサンプルプログラムの実行結果(API Management利用後)
App Serviceのapplication.propertiesを以下の設定にした状態で、Azure上に、Azure App Service, Azure Functionsのプログラムをデプロイし、実行する。

なお、実行結果は、本記事の「作成したサンプルプログラムの実行結果(API Management利用前)」と同じ結果となる。
要点まとめ
- Azure FunctionsをAzure API Management経由で呼び出せる設定は、Azure Portal上で行える。
- Azure API Managementでは、デフォルトだとサブスクリプションを指定しないと関数の実行ができない設定になっているため、設定変更が必要になる。
