TimerTriggerによって動作するAzure Function上でCSVファイルの内容をDBに書き込んでみた
Timer Triggerによって、一定時間が来たタイミングでAzure Functionsが動作するアプリケーションを生成し、そのバッチ処理内部で、Spring Batch(Taskletモデル)を利用することができる。
今回は、Spring Batch(Taskletモデル)内に、Azure Storageに配置したCSVファイルを読み取って、そのファイルの内容をSQL Database上のテーブルに書き込む処理を追加してみたので、そのサンプルプログラムを共有する。
前提条件
下記記事のサンプルプログラムを作成済であること。

作成したサンプルプログラムの修正
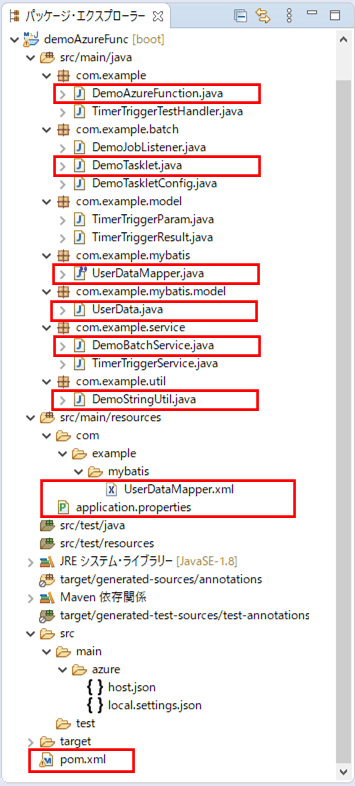
前提条件の記事のサンプルプログラムに、CSVファイルの内容をDBに書き込む処理を追加する。なお、下記の赤枠は、前提条件のプログラムから変更したり、追加したりしたプログラムである。
pom.xmlの追加内容は以下の通りで、Azure StorageやSQL Database(SQL Server)、MyBatisを利用するための設定を追加している。
<!-- Azure Storageの設定 -->
<dependency>
    <groupId>com.microsoft.azure</groupId>
    <artifactId>azure-storage</artifactId>
    <version>8.3.0</version>
</dependency>
<!-- SQL Serverを利用するための設定 -->
<dependency>
    <groupId>com.microsoft.sqlserver</groupId>
    <artifactId>mssql-jdbc</artifactId>
</dependency>
<!-- MyBatisを利用するための設定 -->
<dependency>
    <groupId>org.mybatis.spring.boot</groupId>
    <artifactId>mybatis-spring-boot-starter</artifactId>
    <version>2.1.1</version>
</dependency>
Azure Functionsのメインクラスの内容は以下の通りで、Spring Batchで実施されるデータソースの自動設定を除外していたのを削除している。
package com.example;

import java.util.function.Function;

import org.springframework.beans.factory.annotation.Autowired;
import org.springframework.boot.SpringApplication;
import org.springframework.boot.autoconfigure.SpringBootApplication;
import org.springframework.context.annotation.Bean;

import com.example.model.TimerTriggerParam;
import com.example.model.TimerTriggerResult;
import com.example.service.TimerTriggerService;

@SpringBootApplication
public class DemoAzureFunction {

    /** タイマートリガーのテストを行うサービスクラスのオブジェクト */
    @Autowired
    private TimerTriggerService timerTriggerService;

    public static void main(String[] args) throws Exception {
        SpringApplication.run(DemoAzureFunction.class, args);
    }

    /**
     * タイマートリガーのテストを行い結果を返却する関数
     * @return タイマートリガーのテストを行うサービスクラスの呼出結果
     */
    @Bean
    public Function<TimerTriggerParam, TimerTriggerResult> timerTriggerTest() {
        return timerTriggerParam
                  -> timerTriggerService.timerTriggerTest(timerTriggerParam);
    }

}
Taskletクラスの内容は以下の通りで、CSVファイルの内容をDBに書き込むサービス(DemoBatchService)の呼び出しを追加している。
package com.example.batch;

import org.slf4j.Logger;
import org.slf4j.LoggerFactory;
import org.springframework.batch.core.StepContribution;
import org.springframework.batch.core.scope.context.ChunkContext;
import org.springframework.batch.repeat.RepeatStatus;
import org.springframework.beans.factory.annotation.Autowired;
import org.springframework.stereotype.Component;

import com.example.model.TimerTriggerParam;
import com.example.service.DemoBatchService;
import com.fasterxml.jackson.core.type.TypeReference;
import com.fasterxml.jackson.databind.ObjectMapper;

import org.springframework.batch.core.step.tasklet.Tasklet;

@Component
public class DemoTasklet implements Tasklet {

    /* Spring Bootでログ出力するためのLogbackのクラスを生成 */
    private static final Logger LOGGER = LoggerFactory.getLogger(DemoTasklet.class);

    /**
     * BlobStorageからファイル(user_data.csv)を読み込み、USER_DATAテーブルに書き込むサービス
     */
    @Autowired
    private DemoBatchService demoBatchService;

    /**
     * Spring Batchのジョブ内での処理を定義する.
     */
    @Override
    public RepeatStatus execute(StepContribution contribution
            , ChunkContext chunkContext) throws Exception {
        // Spring Batchのジョブ内での処理が呼び出されたことをログ出力する
        String paramStr = chunkContext.getStepContext().getStepExecution()
                .getJobParameters().getString("timerTriggerParam");
        if (paramStr != null) {
            TimerTriggerParam param = new ObjectMapper().readValue(
              paramStr, new TypeReference<TimerTriggerParam>() {
            });
            LOGGER.info("DemoTasklet execute "
                 + " triggered: " + param.getTimerInfo());
        }

        // BlobStorageからファイル(user_data.csv)を読み込み、
        // USER_DATAテーブルに書き込むサービスを呼び出す
        demoBatchService.readUserData();

        // ジョブが終了したことを返す
        return RepeatStatus.FINISHED;
    }

}
application.propertiesの内容は以下の通りで、Azure StorageとSQL Databaseへの接続設定を追加している。
# Azure Storageの接続先
azure.storage.accountName=azureblobpurinit
azure.storage.accessKey=(Azure Blob Storageのアクセスキー)
azure.storage.containerName=blobcontainer

# DB接続設定
spring.datasource.url=jdbc:sqlserver://azure-db-purinit.database.windows.net:1433;database=azureSqlDatabase
spring.datasource.username=purinit@azure-db-purinit
spring.datasource.password=(DBのパスワード)
spring.datasource.driverClassName=com.microsoft.sqlserver.jdbc.SQLServerDriver
CSVファイルの内容をDBに書き込むサービスの内容は以下の通り。CSVファイルのチェック処理もここに追加している。
package com.example.service;

import java.io.BufferedReader;
import java.io.InputStream;
import java.io.InputStreamReader;
import java.net.URISyntaxException;
import java.security.InvalidKeyException;

import org.apache.commons.lang3.StringUtils;
import org.slf4j.Logger;
import org.slf4j.LoggerFactory;
import org.springframework.beans.factory.annotation.Autowired;
import org.springframework.beans.factory.annotation.Value;
import org.springframework.stereotype.Service;
import org.springframework.transaction.annotation.Transactional;

import com.example.mybatis.UserDataMapper;
import com.example.mybatis.model.UserData;
import com.example.util.DemoStringUtil;
import com.microsoft.azure.storage.CloudStorageAccount;
import com.microsoft.azure.storage.StorageException;
import com.microsoft.azure.storage.blob.CloudBlobClient;
import com.microsoft.azure.storage.blob.CloudBlobContainer;
import com.microsoft.azure.storage.blob.CloudBlockBlob;

@Service
public class DemoBatchService {

    /* Spring Bootでログ出力するためのLogbackのクラスを生成 */
    private static final Logger LOGGER
         = LoggerFactory.getLogger(DemoBatchService.class);

    /** Azure Storageのアカウント名 */
    @Value("${azure.storage.accountName}")
    private String storageAccountName;

    /** Azure Storageへのアクセスキー */
    @Value("${azure.storage.accessKey}")
    private String storageAccessKey;

    /** Azure StorageのBlobコンテナー名 */
    @Value("${azure.storage.containerName}")
    private String storageContainerName;

    /** USER_DATAテーブルにアクセスするマッパー */
    @Autowired
    private UserDataMapper userDataMapper;

    /**
     * BlobStorageからファイル(user_data.csv)を読み込み、USER_DATAテーブルに書き込む
     */
    @Transactional
    public void readUserData() {
        // BlobStorageからファイル(user_data.csv)を読み込む
        try (BufferedReader br
           = new BufferedReader(new InputStreamReader(getBlobCsvData(), "UTF-8"))) {
            String lineStr = null;
            int lineCnt = 0;

            // 1行目(タイトル行)は読み飛ばし、2行目以降はチェックの上、
            // USER_DATAテーブルに書き込む
            // チェックエラー時はエラーログを出力の上、DB更新は行わず先へ進む
            while ((lineStr = br.readLine()) != null) {
                // 1行目(タイトル行)は読み飛ばす
                lineCnt++;
                if (lineCnt == 1) {
                    continue;
                }

                // 引数のCSVファイル1行分の文字列を受け取り、エラーがあればNULLを、
                // エラーがなければUserDataオブジェクトに変換し返す
                UserData userData = checkData(lineStr, lineCnt);

                // 読み込んだファイルをUSER_DATAテーブルに書き込む
                if (userData != null) {
                    userDataMapper.upsert(userData);
                }
            }
        } catch (Exception ex) {
            LOGGER.error(ex.getMessage());
            throw new RuntimeException(ex);
        }
    }

    /**
     * Blobストレージからファイルデータ(user_data.csv)を取得する.
     * @return ファイルデータ(user_data.csv)の入力ストリーム
     * @throws URISyntaxException
     * @throws InvalidKeyException
     * @throws StorageException
     */
    private InputStream getBlobCsvData()
          throws URISyntaxException, InvalidKeyException, StorageException {
        // Blobストレージへの接続文字列
        String storageConnectionString = "DefaultEndpointsProtocol=https;"
                + "AccountName=" + storageAccountName + ";"
                + "AccountKey=" + storageAccessKey + ";";

        // ストレージアカウントオブジェクトを取得
        CloudStorageAccount storageAccount
             = CloudStorageAccount.parse(storageConnectionString);

        // Blobクライアントオブジェクトを取得
        CloudBlobClient blobClient
             = storageAccount.createCloudBlobClient();

        // Blob内のコンテナーを取得
        CloudBlobContainer container
             = blobClient.getContainerReference(storageContainerName);

        // BlobStorageからファイル(user_data.csv)を読み込む
        CloudBlockBlob blob = container.getBlockBlobReference("user_data.csv");
        return blob.openInputStream();
    }

    /**
     * 引数のCSVファイル1行分の文字列を受け取り、エラーがあればNULLを、
     * エラーがなければUserDataオブジェクトに変換し返す.
     * @param lineStr CSVファイル1行分の文字列
     * @param lineCnt 行数
     * @return 変換後のUserData
     */
    private UserData checkData(String lineStr, int lineCnt) {
        // 引数のCSVファイル1行分の文字列をカンマで分割
        String[] strArray = lineStr.split(",");

        // 桁数不正の場合はエラー
        if (strArray == null || strArray.length != 7) {
            LOGGER.info(lineCnt + "行目: 桁数が不正です。");
            return null;
        }

        // 文字列前後のダブルクォーテーションを削除する
        for (int i = 0; i < strArray.length; i++) {
            strArray[i] = DemoStringUtil.trimDoubleQuot(strArray[i]);
        }

        // 1列目が空またはNULLの場合はエラー
        if (StringUtils.isEmpty(strArray[0])) {
            LOGGER.info(lineCnt + "行目: 1列目が空またはNULLです。");
            return null;
        }
        // 1列目が数値以外の場合はエラー
        if (!StringUtils.isNumeric(strArray[0])) {
            LOGGER.info(lineCnt + "行目: 1列目が数値以外です。");
            return null;
        }
        // 1列目の桁数が不正な場合はエラー
        if (strArray[0].length() > 6) {
            LOGGER.info(lineCnt + "行目: 1列目の桁数が不正です。");
            return null;
        }

        // 2列目が空またはNULLの場合はエラー
        if (StringUtils.isEmpty(strArray[1])) {
            LOGGER.info(lineCnt + "行目: 2列目が空またはNULLです。");
            return null;
        }
        // 2列目の桁数が不正な場合はエラー
        if (strArray[1].length() > 40) {
            LOGGER.info(lineCnt + "行目: 2列目の桁数が不正です。");
            return null;
        }

        // 3列目が空またはNULLの場合はエラー
        if (StringUtils.isEmpty(strArray[2])) {
            LOGGER.info(lineCnt + "行目: 3列目が空またはNULLです。");
            return null;
        }
        // 3列目が数値以外の場合はエラー
        if (!StringUtils.isNumeric(strArray[2])) {
            LOGGER.info(lineCnt + "行目: 3列目が数値以外です。");
            return null;
        }
        // 3列目の桁数が不正な場合はエラー
        if (strArray[2].length() > 4) {
            LOGGER.info(lineCnt + "行目: 3列目の桁数が不正です。");
            return null;
        }

        // 4列目が空またはNULLの場合はエラー
        if (StringUtils.isEmpty(strArray[3])) {
            LOGGER.info(lineCnt + "行目: 4列目が空またはNULLです。");
            return null;
        }
        // 4列目が数値以外の場合はエラー
        if (!StringUtils.isNumeric(strArray[3])) {
            LOGGER.info(lineCnt + "行目: 4列目が数値以外です。");
            return null;
        }
        // 4列目の桁数が不正な場合はエラー
        if (strArray[3].length() > 2) {
            LOGGER.info(lineCnt + "行目: 4列目の桁数が不正です。");
            return null;
        }

        // 5列目が空またはNULLの場合はエラー
        if (StringUtils.isEmpty(strArray[4])) {
            LOGGER.info(lineCnt + "行目: 5列目が空またはNULLです。");
            return null;
        }
        // 5列目が数値以外の場合はエラー
        if (!StringUtils.isNumeric(strArray[4])) {
            LOGGER.info(lineCnt + "行目: 5列目が数値以外です。");
            return null;
        }
        // 5列目の桁数が不正な場合はエラー
        if (strArray[4].length() > 2) {
            LOGGER.info(lineCnt + "行目: 5列目の桁数が不正です。");
            return null;
        }

        // 3列目・4列目・5列目から生成される日付が不正であればエラー
        String birthDay = strArray[2] + DemoStringUtil.addZero(strArray[3])
                             + DemoStringUtil.addZero(strArray[4]);
        if (!DemoStringUtil.isCorrectDate(birthDay, "uuuuMMdd")) {
            LOGGER.info(lineCnt + "行目: 3~5列目の日付が不正です。");
            return null;
        }

        // 6列目が1,2以外の場合はエラー
        if (!("1".equals(strArray[5])) && !("2".equals(strArray[5]))) {
            LOGGER.info(lineCnt + "行目: 6列目の性別が不正です。");
            return null;
        }

        // 7列目の桁数が不正な場合はエラー
        if (!StringUtils.isEmpty(strArray[6]) && strArray[6].length() > 1024) {
            LOGGER.info(lineCnt + "行目: 7列目の桁数が不正です。");
            return null;
        }

        // エラーがなければUserDataオブジェクトに変換し返す
        UserData userData = new UserData();
        userData.setId(Integer.parseInt(strArray[0]));
        userData.setName(strArray[1]);
        userData.setBirth_year(Integer.parseInt(strArray[2]));
        userData.setBirth_month(Integer.parseInt(strArray[3]));
        userData.setBirth_day(Integer.parseInt(strArray[4]));
        userData.setSex(strArray[5]);
        userData.setMemo(strArray[6]);
        return userData;
    }
}
上記サービスクラスから呼ばれる、文字列のチェックや加工を行うユーティリティクラスの内容は、以下の通り。
package com.example.util;

import java.time.LocalDate;
import java.time.format.DateTimeFormatter;
import java.time.format.ResolverStyle;

import org.apache.commons.lang3.StringUtils;

public class DemoStringUtil {

    /**
     * 文字列前後のダブルクォーテーションを削除する.
     * @param str 変換前文字列
     * @return 変換後文字列
     */
    public static String trimDoubleQuot(String regStr) {
        if (StringUtils.isEmpty(regStr)) {
            return regStr;
        }
        char c = '"';
        if (regStr.charAt(0) == c
                && regStr.charAt(regStr.length() - 1) == c) {
            return regStr.substring(1, regStr.length() - 1);
        } else {
            return regStr;
        }
    }

    /**
     * DateTimeFormatterを利用して日付チェックを行う.
     * @param dateStr    チェック対象文字列
     * @param dateFormat 日付フォーマット
     * @return 日付チェック結果
     */
    public static boolean isCorrectDate(String dateStr, String dateFormat) {
        if (StringUtils.isEmpty(dateStr) || StringUtils.isEmpty(dateFormat)) {
            return false;
        }
        // 日付と時刻を厳密に解決するスタイルで、DateTimeFormatterオブジェクトを作成
        DateTimeFormatter df = DateTimeFormatter.ofPattern(dateFormat)
                                 .withResolverStyle(ResolverStyle.STRICT);
        try {
            // チェック対象文字列をLocalDate型の日付に変換できれば、チェックOKとする
            LocalDate.parse(dateStr, df);
            return true;
        } catch (Exception e) {
            return false;
        }
    }

    /**
     * 数値文字列が1桁の場合、頭に0を付けて返す.
     * @param intNum 数値文字列
     * @return 変換後数値文字列
     */
    public static String addZero(String intNum) {
        if (StringUtils.isEmpty(intNum)) {
            return intNum;
        }
        if (intNum.length() == 1) {
            return "0" + intNum;
        }
        return intNum;
    }
}
SQL DatabaseのUSER_DATAテーブルにアクセスするためのEntityやMapperの内容は、以下の通り。
package com.example.mybatis.model;

import lombok.Data;

@Data
public class UserData {

    /** ID */
    private int id;

    /** 名前 */
    private String name;

    /** 生年月日_年 */
    private int birth_year;

    /** 生年月日_月 */
    private int birth_month;

    /** 生年月日_日 */
    private int birth_day;

    /** 性別 */
    private String sex;

    /** メモ */
    private String memo;

}
package com.example.mybatis;
import org.apache.ibatis.annotations.Mapper;
import com.example.mybatis.model.UserData;
@Mapper
public interface UserDataMapper {
/**
* DBにUserDataオブジェクトがあれば更新し、なければ追加する.
* @param userData UserDataオブジェクト
*/
void upsert(UserData userData);
}<?xml version="1.0" encoding="UTF-8" ?>
<!DOCTYPE mapper
PUBLIC "-//mybatis.org//DTD Mapper 3.0//EN"
"http://mybatis.org/dtd/mybatis-3-mapper.dtd">
<mapper namespace="com.example.mybatis.UserDataMapper">
<update id="upsert" parameterType="com.example.mybatis.model.UserData">
MERGE INTO USER_DATA AS u
USING ( SELECT #{id} id ) s
ON ( u.id = s.id )
WHEN MATCHED THEN
UPDATE SET name = #{name}, birth_year = #{birth_year}
, birth_month = #{birth_month}, birth_day = #{birth_day}
, sex = #{sex}, memo = #{memo}
WHEN NOT MATCHED THEN
INSERT ( id, name, birth_year, birth_month
, birth_day, sex, memo )
VALUES (#{id}, #{name}, #{birth_year}, #{birth_month}
, #{birth_day}, #{sex}, #{memo})
;
</update>
</mapper>なお、上記Mapperのupsertに定義したSQLは、USER_DATAテーブルの主キー(id)がある場合は更新、無い場合は追加を行う処理になっている。
その他のソースコード内容は、以下のサイトを参照のこと。
https://github.com/purin-it/azure/tree/master/timer-trigger-batch-csv-to-db/demoAzureFunc
また、ビルドとデプロイ手順については、以下の記事を参照のこと。

サンプルプログラムの実行結果(ローカル)
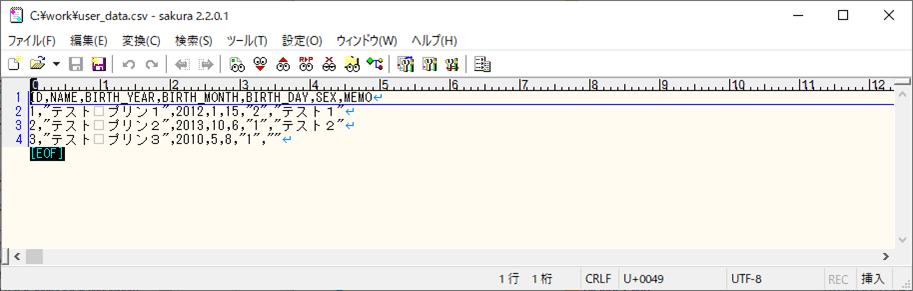
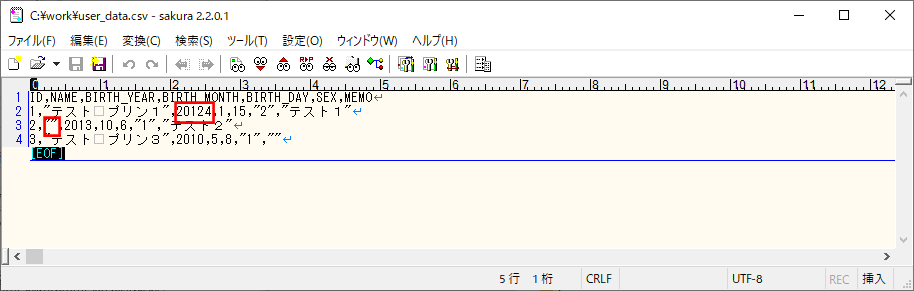
サンプルプログラムをローカルで実行した結果は、以下の通り。なお、CSVファイルの文字コードは、UTF-8とする。
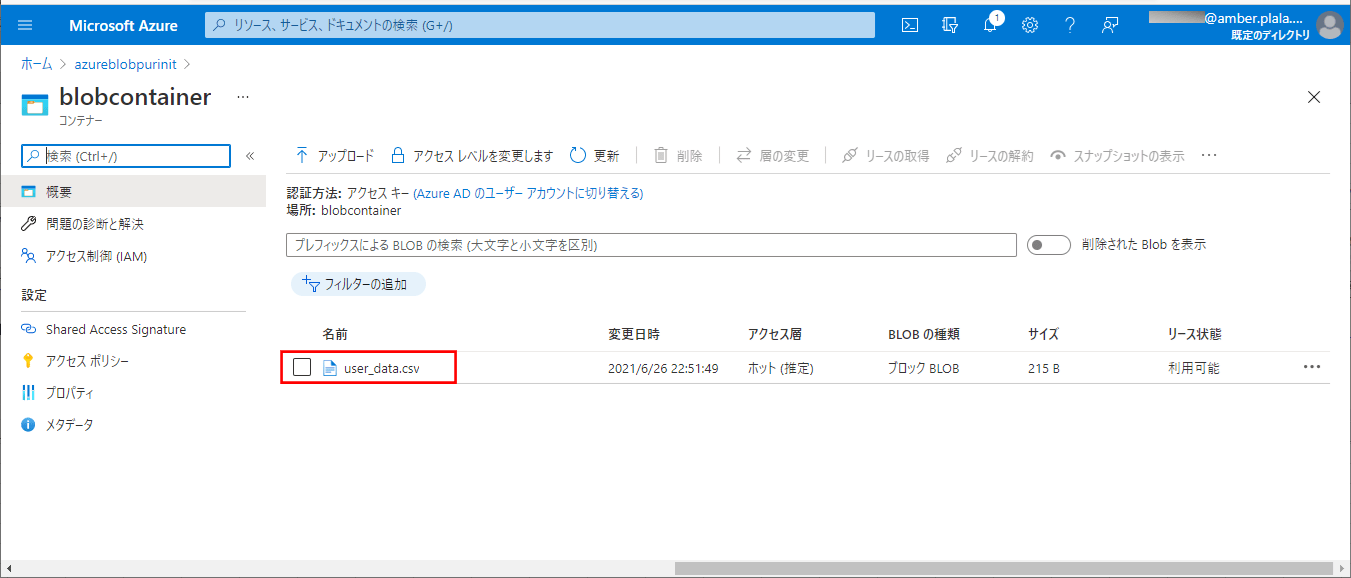
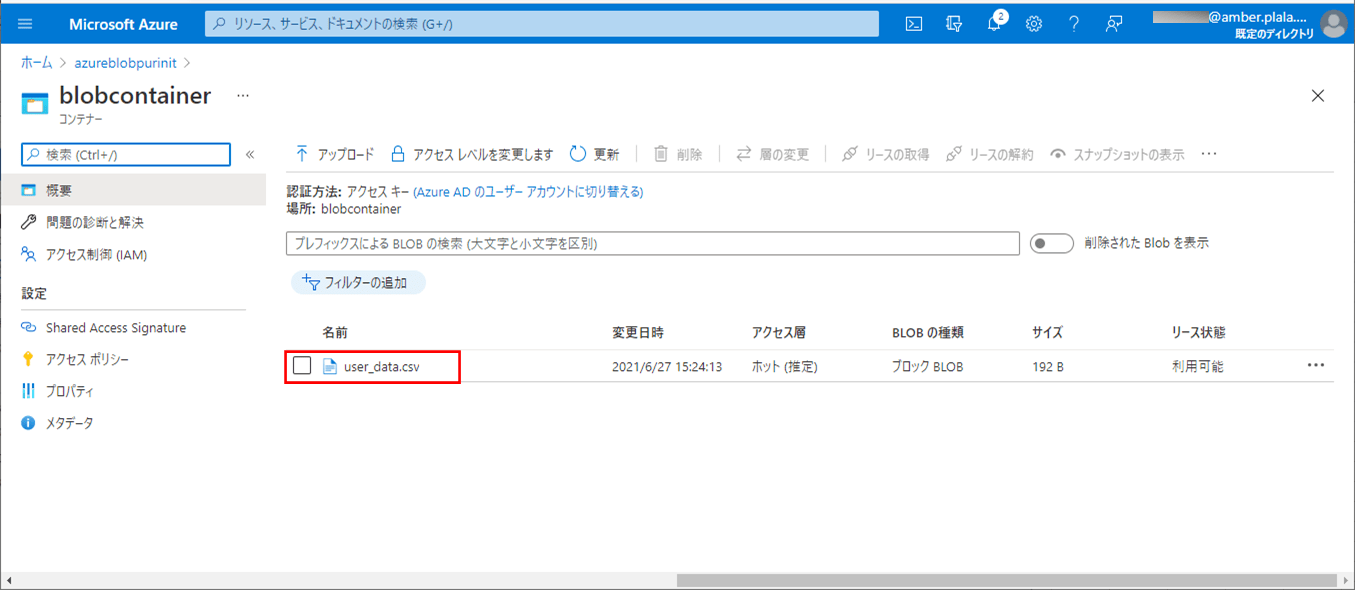
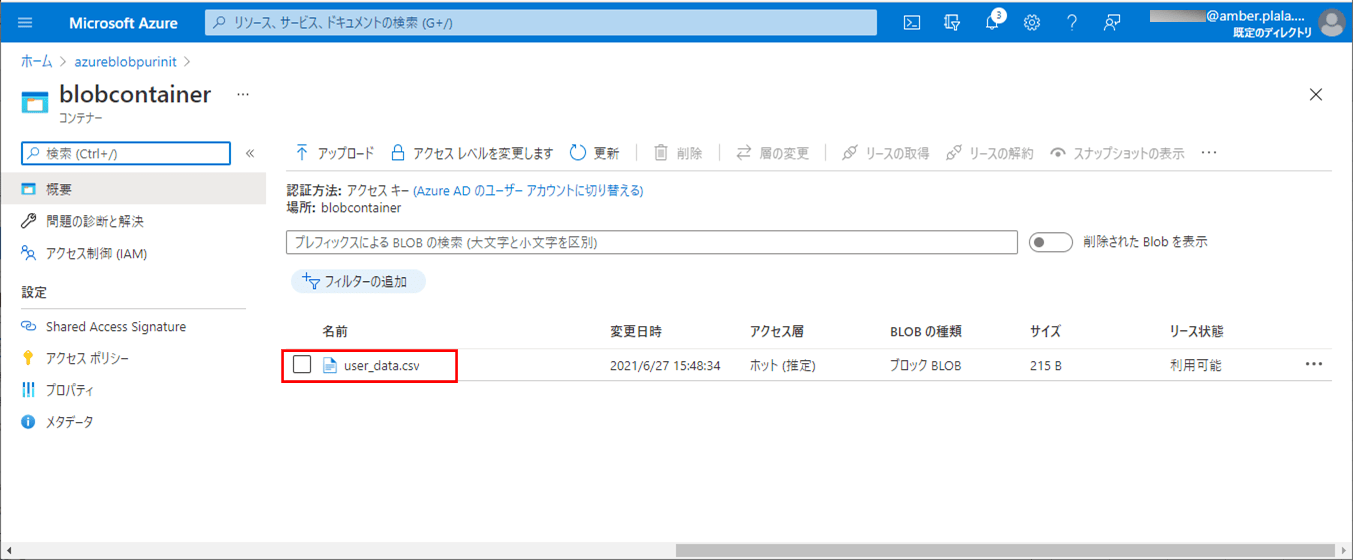
1) 以下の、(エラーが発生しない)CSVファイルを、Azure Storage上の取り込み元になる場所に配置する。
2) SQLデータベース上のUSER_DATAテーブルを、以下のように、1件も存在しない状態に変更する。

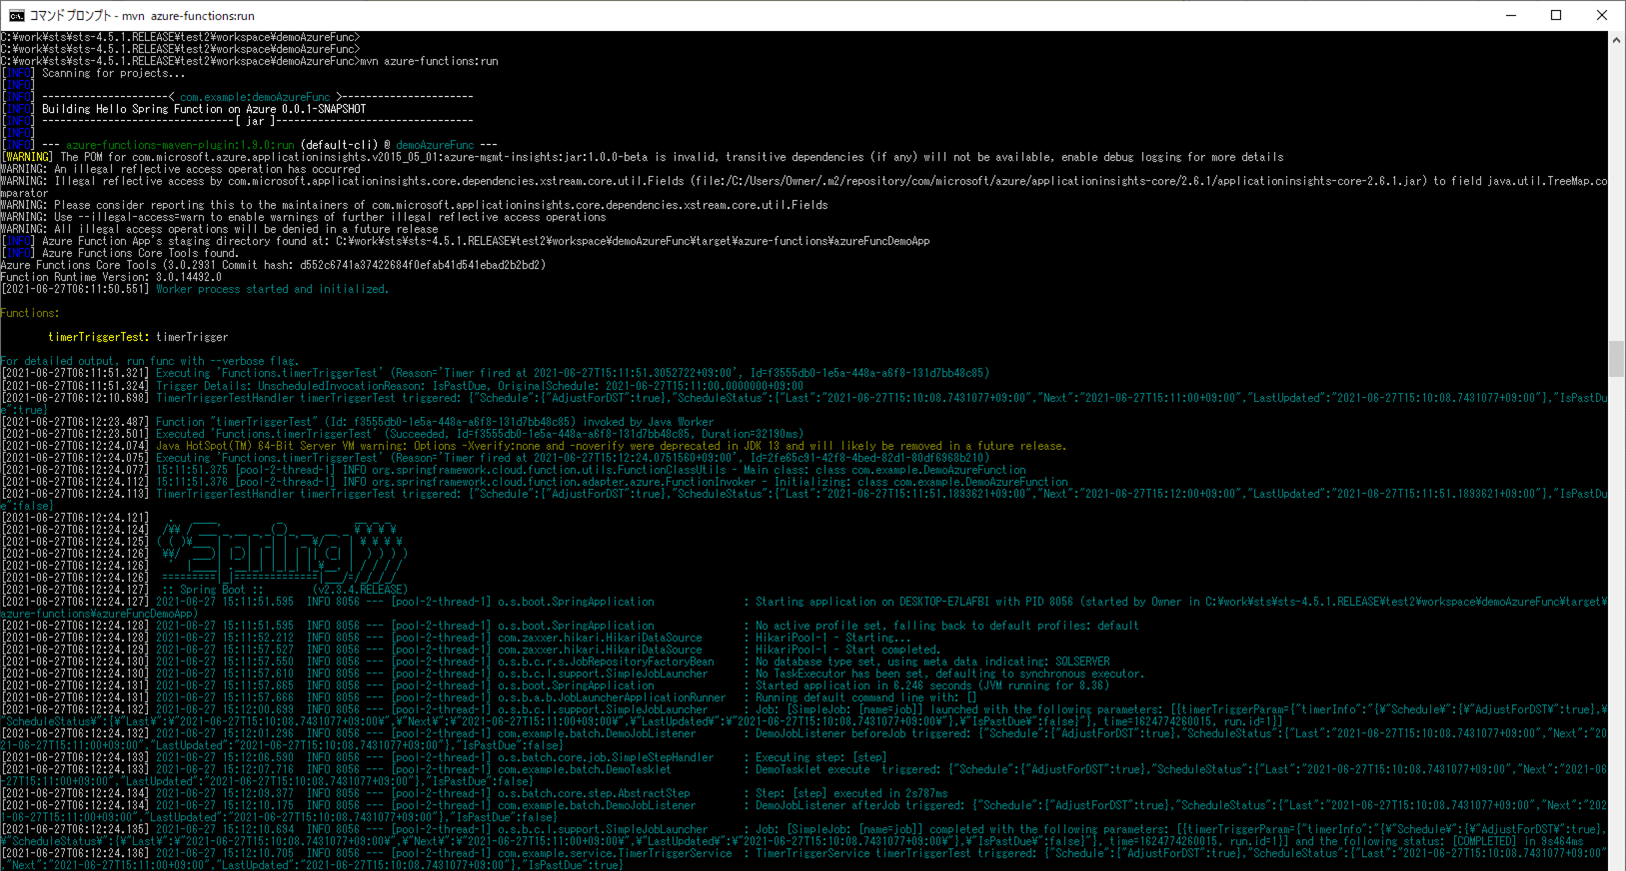
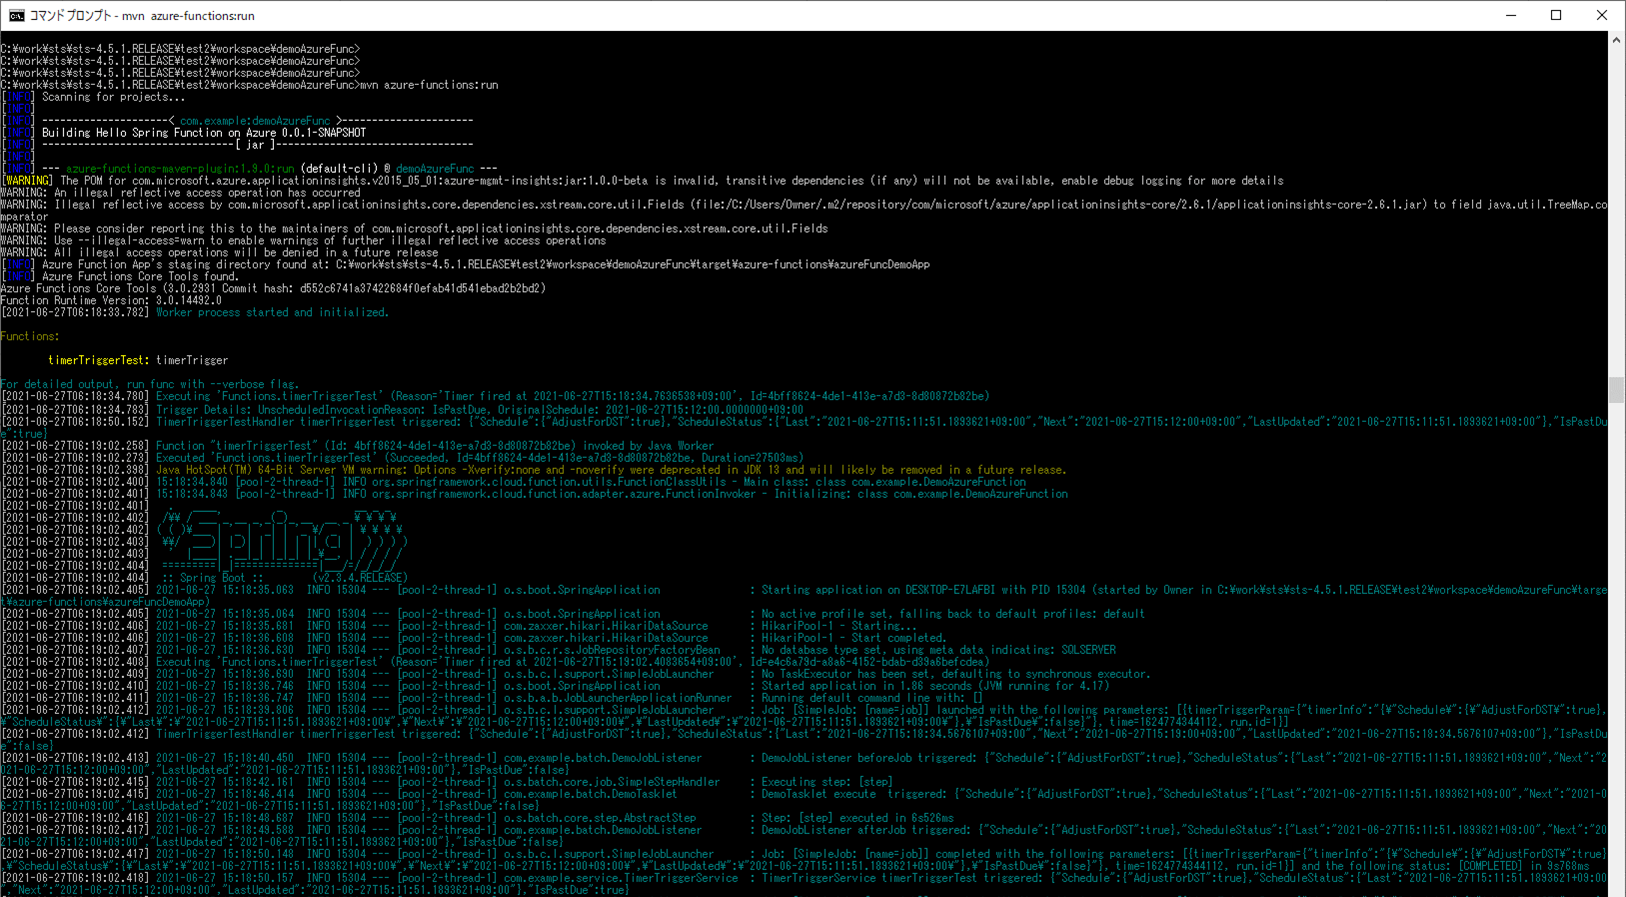
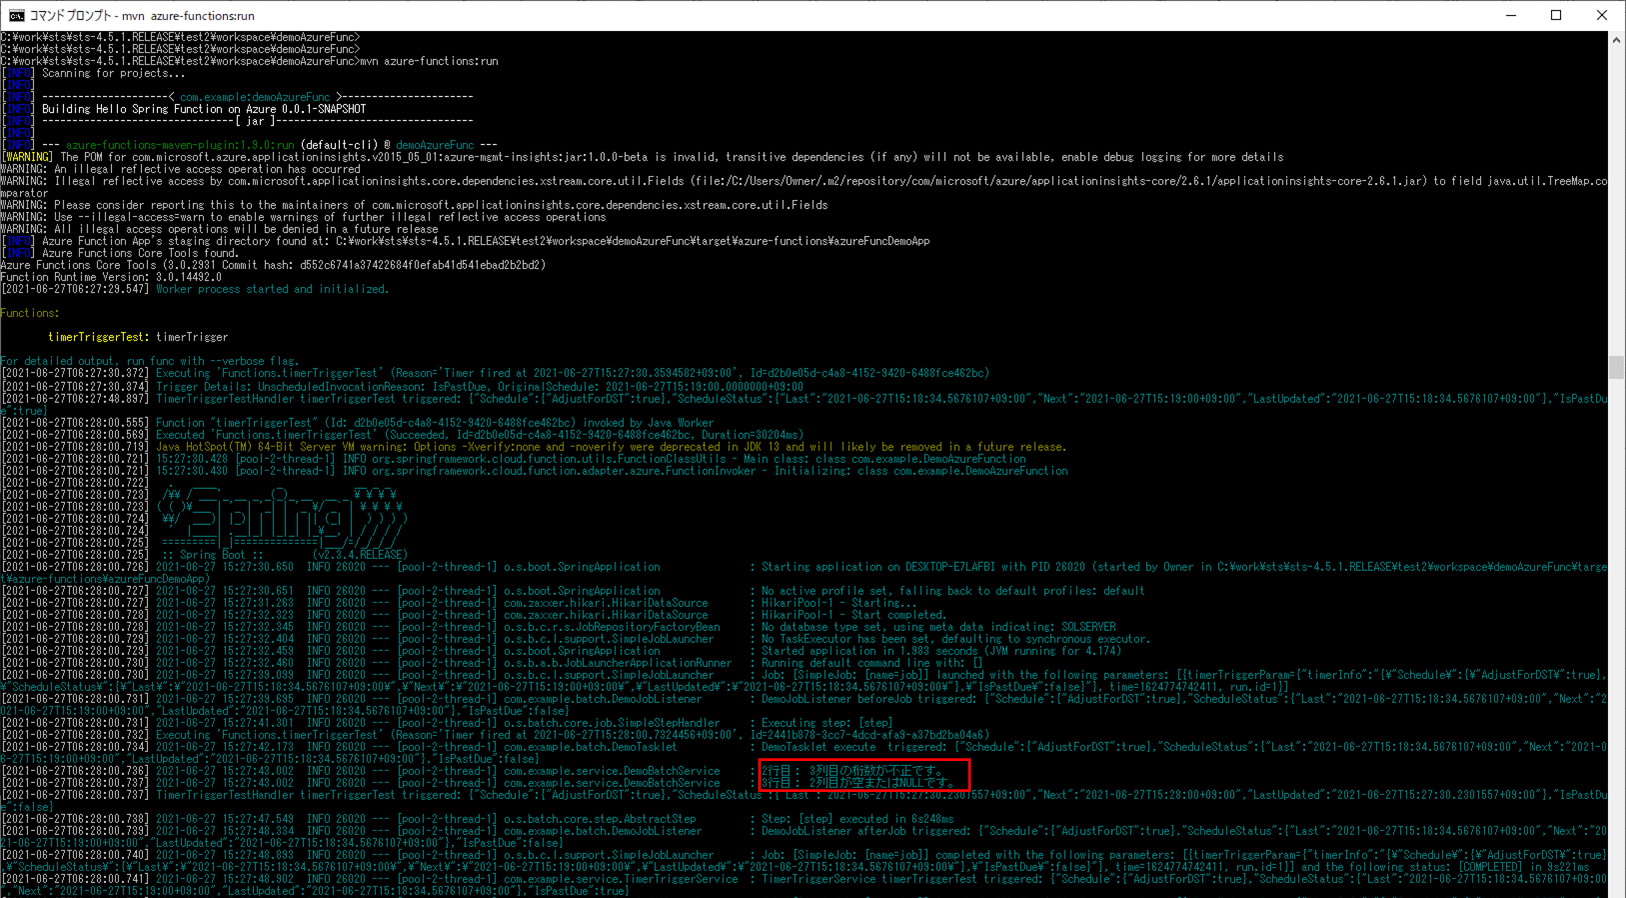
3) ローカル環境で、Azure Functionsを「mvn azure-functions:run」コマンドで実行すると、1分毎に、CSVファイルをDBに書き込むバッチ処理が実行される。
4) バッチ実行後は、SQLデータベース上のUSER_DATAテーブルに、取り込んだCSVファイルが書き込まれることが確認できる。
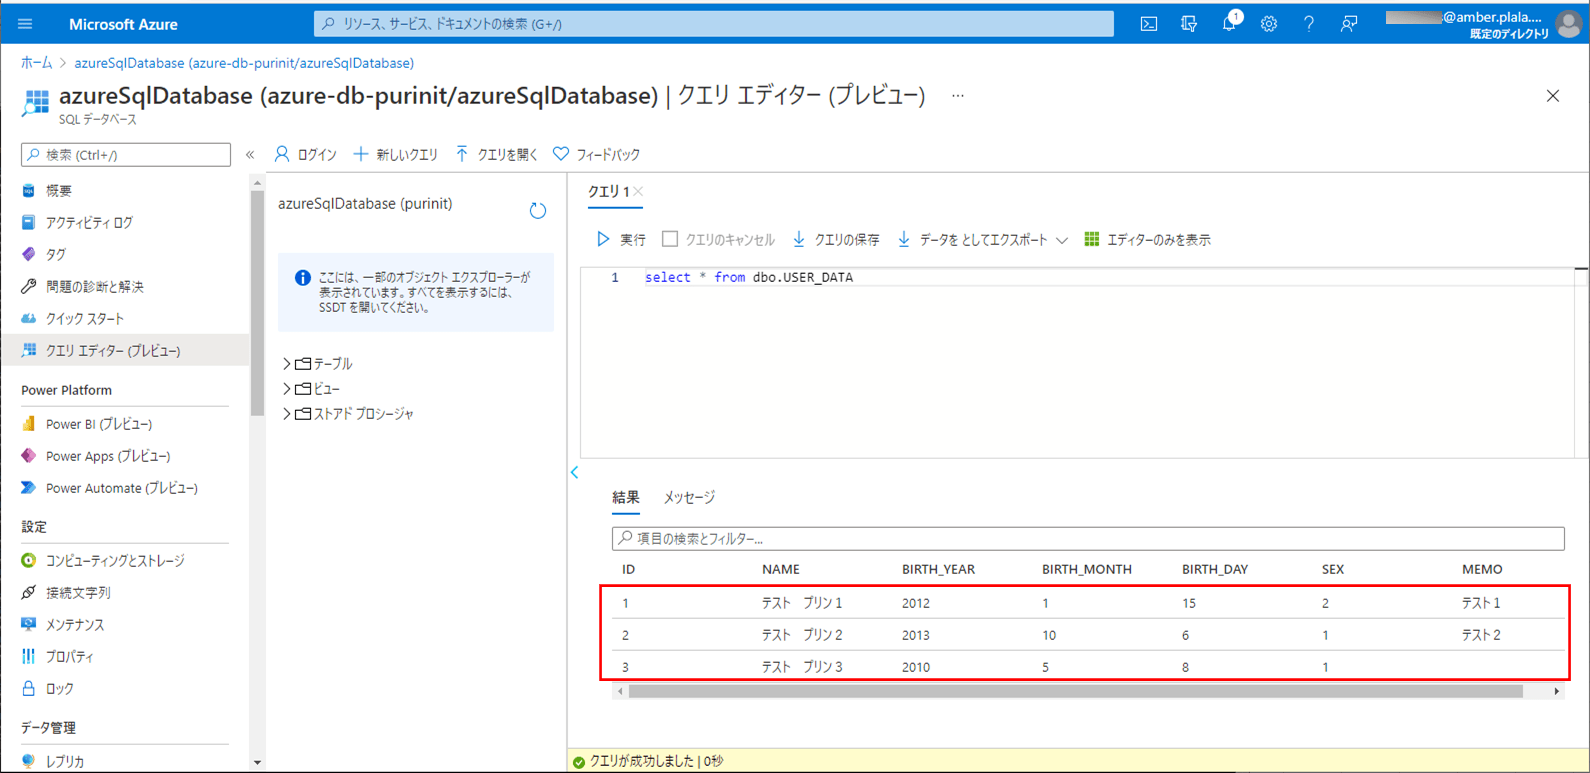
5) SQLデータベースのNAMEの設定値を、以下のように「てすと」と変更する。
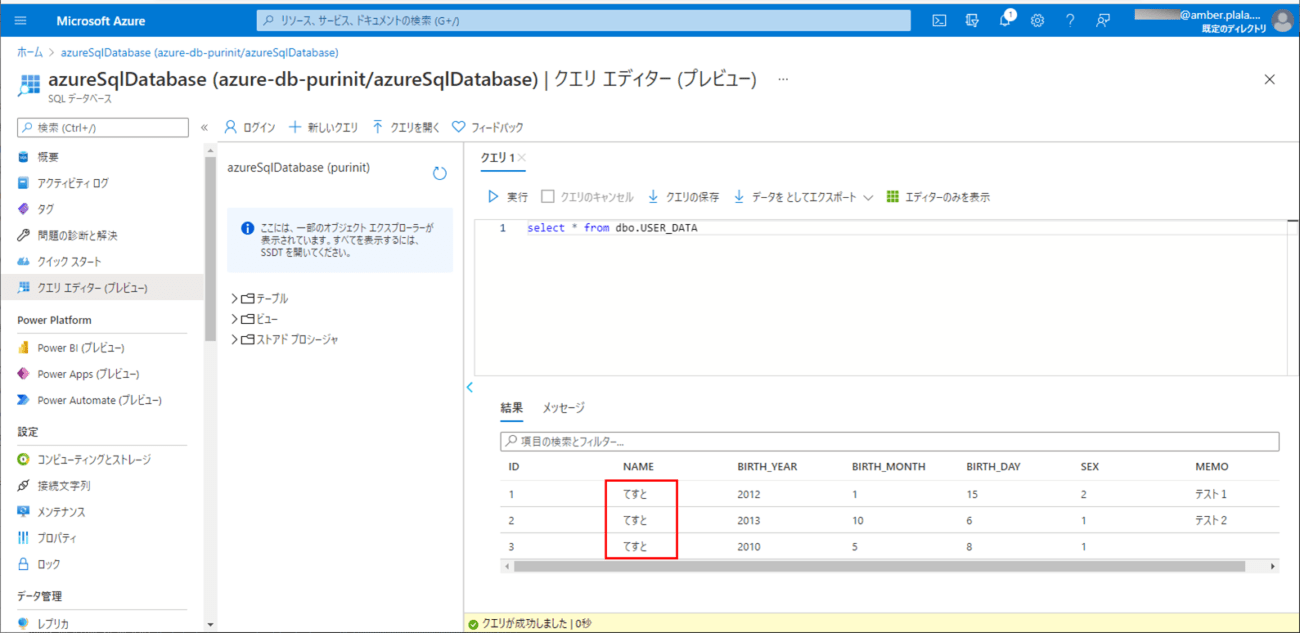
6) ローカル環境で、Azure Functionsを「mvn azure-functions:run」コマンドで再度実行する。
7) バッチ実行後は、SQLデータベース上のUSER_DATAテーブルに、取り込んだCSVファイルによって、NAMEの設定値が元に戻ることが確認できる。

8) 以下の、赤枠でエラーが発生するCSVファイルを、Azure Storage上の取り込み元になる場所に配置する。

9) SQLデータベース上のUSER_DATAテーブルを、以下のように、1件も存在しない状態に変更する。

10) ローカル環境で、Azure Functionsを「mvn azure-functions:run」コマンドで再度実行すると、以下の赤枠のように、エラーメッセージがログに出力されることが確認できる。
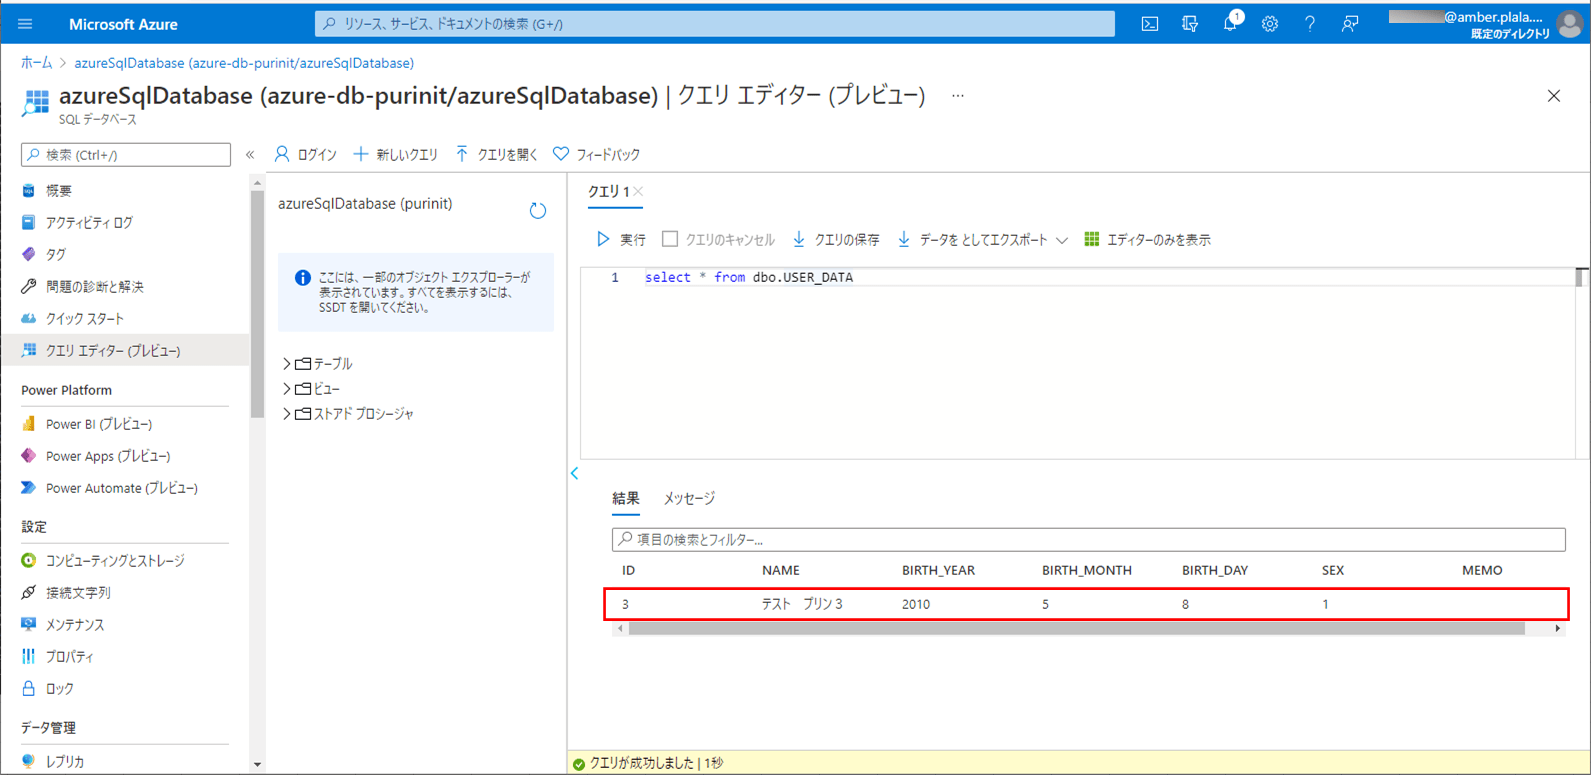
11) バッチ実行後は、SQLデータベース上のUSER_DATAテーブルに、エラーでないid=3のデータのみ取り込まれたことが確認できる。

Azure Functions 環境変数の設定
今回は、エラーログで日本語を利用しているが、このままでは日本語が文字化けするため、アプリケーション設定から環境変数を追加する。
1) Azure PortalでAzure Functionsを開き、「構成」メニューを選択する。
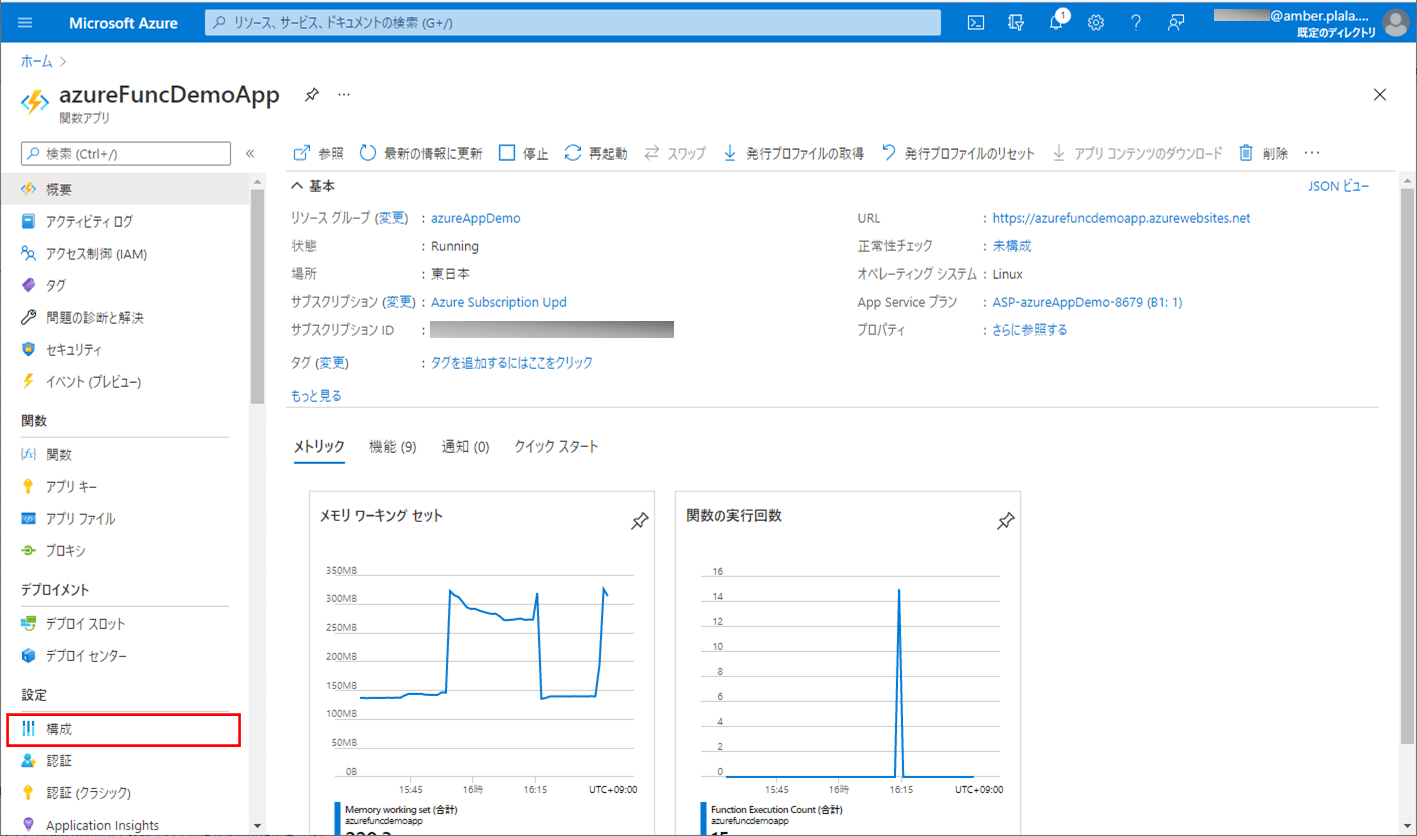
2) 名前に「Java_OPTS」、値に「Dfile.encoding=UTF-8」をもつ環境変数を追加する。

なお、上記内容は、以下のサイトを参考に設定している。
https://kisk0419.hatenablog.com/entry/2019/11/08/104651
また、Application Insightsでのログ確認手順は、以下の記事の「サンプルプログラムの実行結果(Azure上)」の項番6以降を参照のこと。

サンプルプログラムの実行結果(Azure上)
サンプルプログラムをAzure上で実行した結果は、以下の通り。なお、CSVファイルの文字コードは、UTF-8とする。
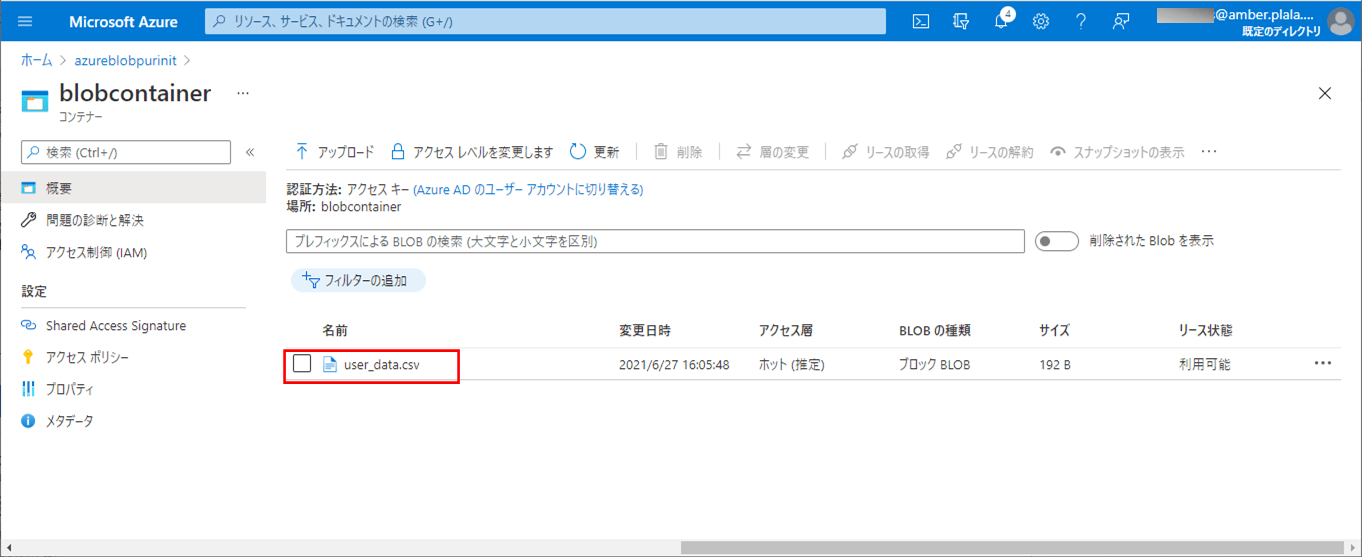
1) 以下の、(エラーが発生しない)CSVファイルを、Azure Storage上の取り込み元になる場所に配置する。

2) SQLデータベース上のUSER_DATAテーブルを、以下のように、1件も存在しない状態に変更する。

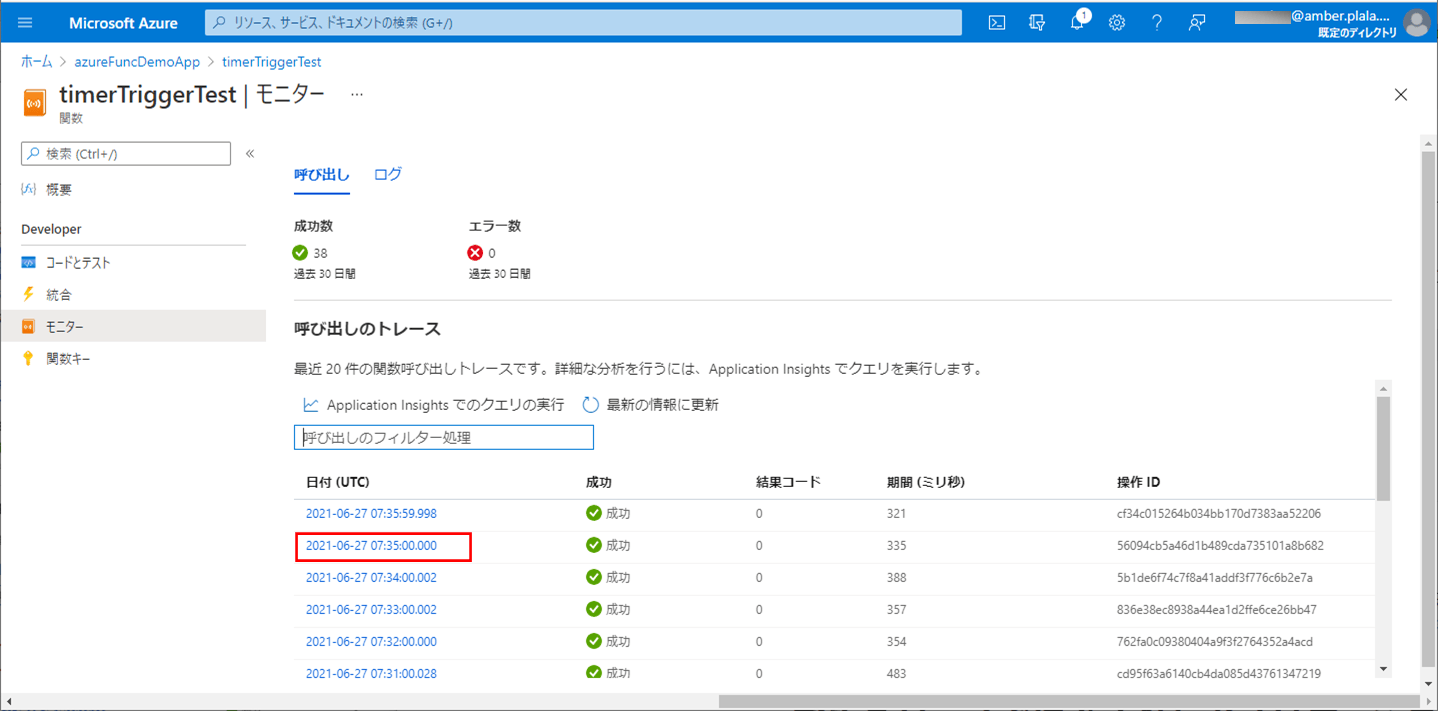
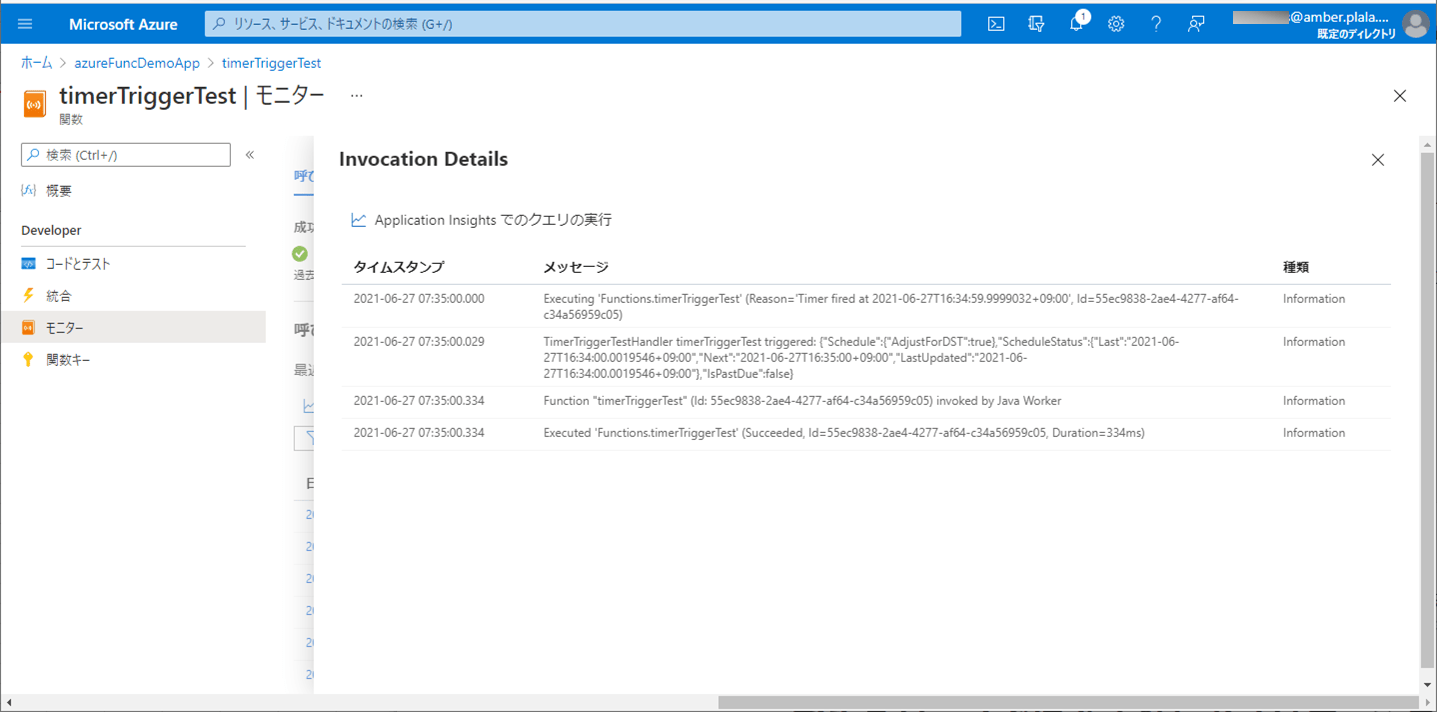
3) Azure上に、Azure Functionsをデプロイし、CSVファイルをDBに書き込むバッチ処理が実行されたログを確認した結果は、以下の通り。
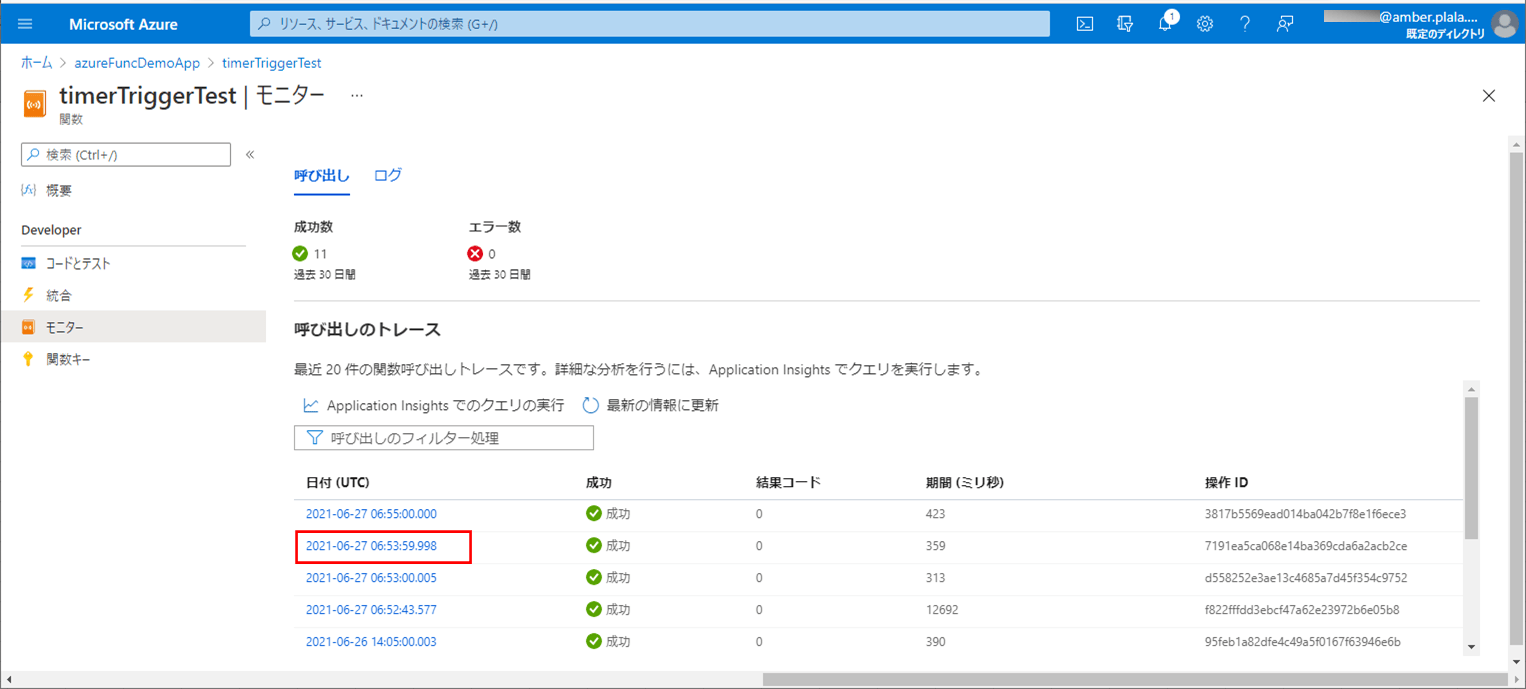
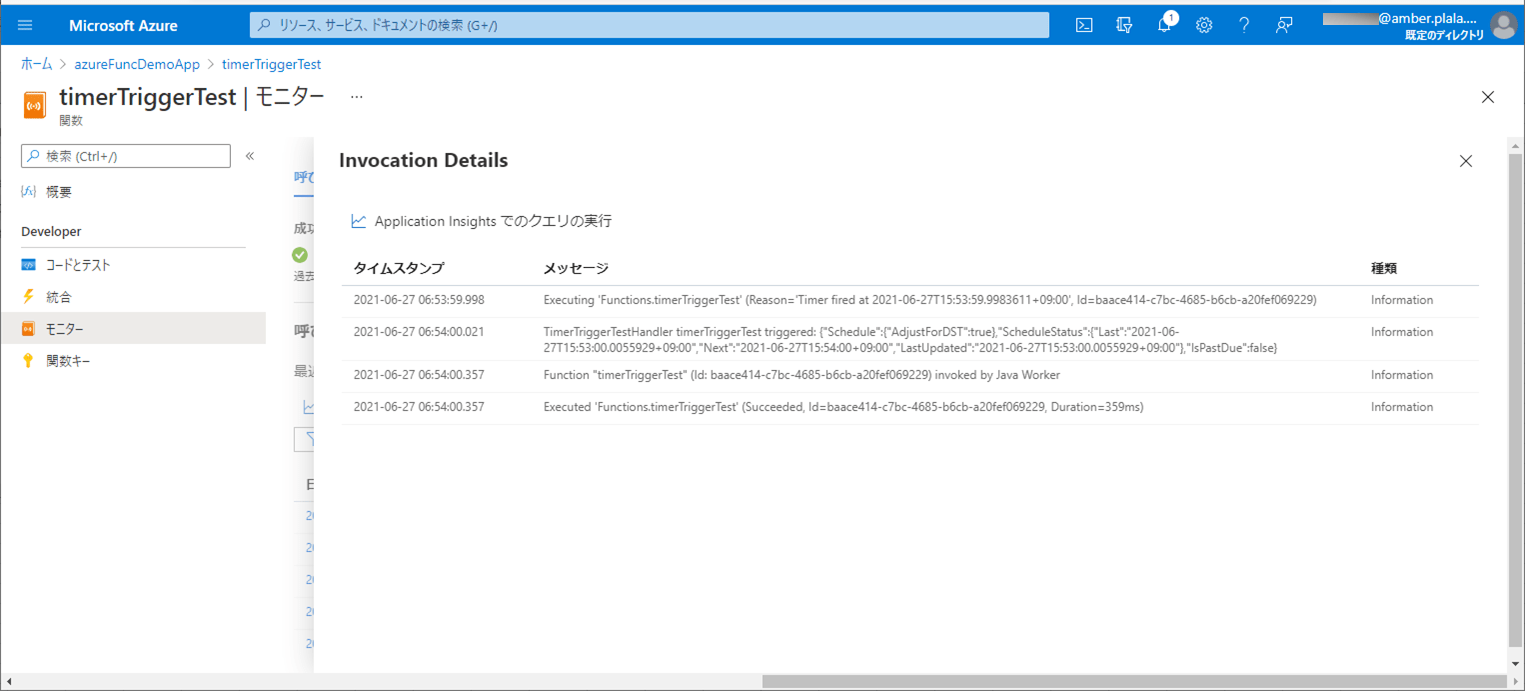
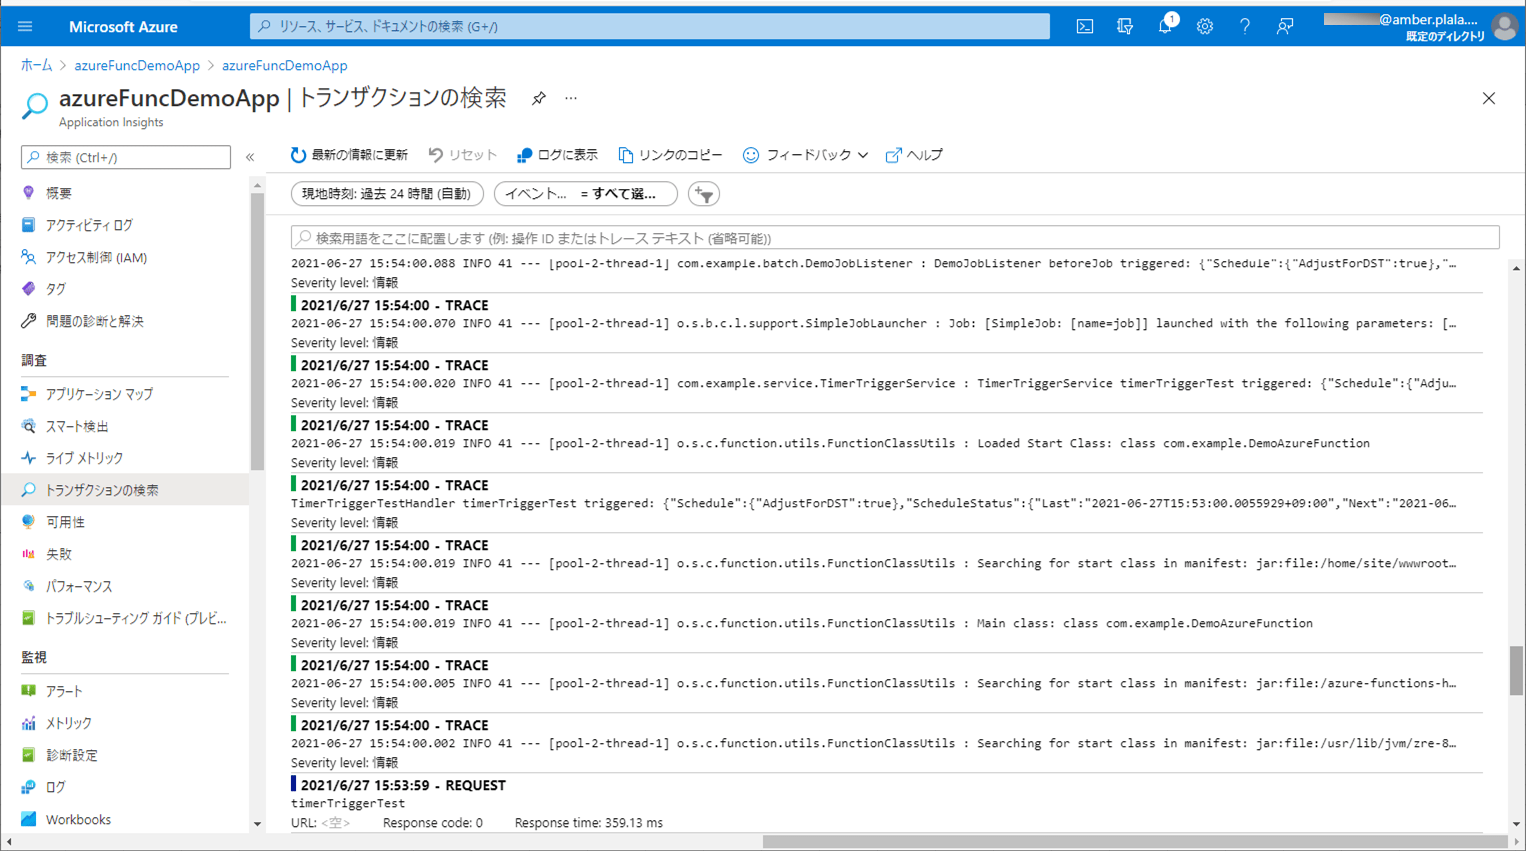
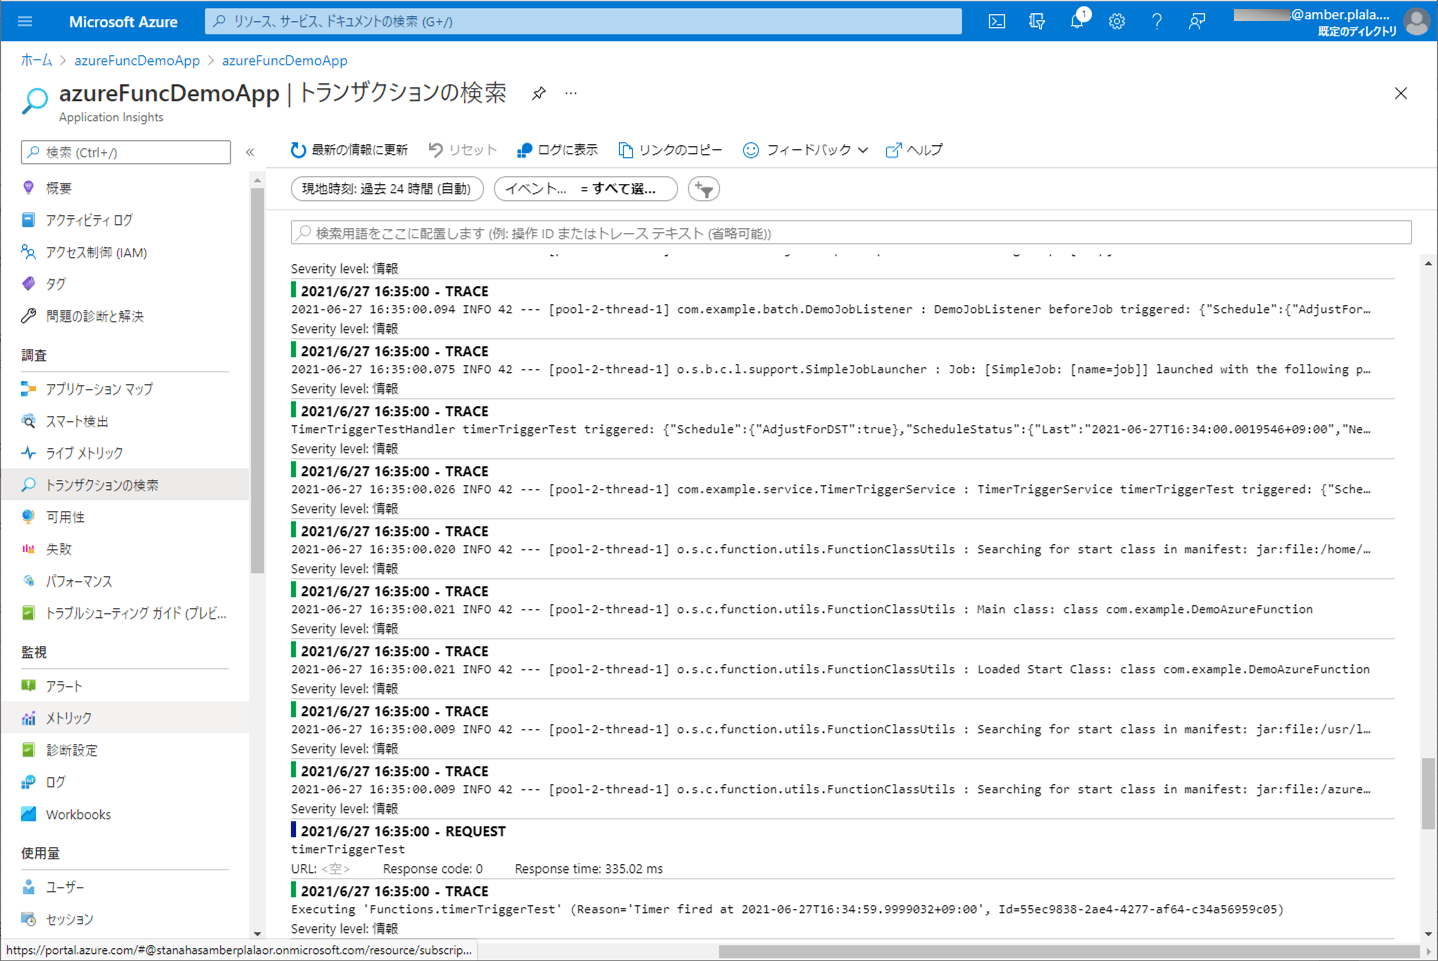
4) ApplicationInsightsでログを確認した結果は、以下の通り。

5) バッチ実行後は、SQLデータベース上のUSER_DATAテーブルに、取り込んだCSVファイルが書き込まれることが確認できる。なお、下記はデータ追加の例であるが、データ更新についても同じように実行できる。

6) 以下の、赤枠でエラーが発生するCSVファイルを、Azure Storage上の取り込み元になる場所に配置する。
7) SQLデータベース上のUSER_DATAテーブルを、以下のように、1件も存在しない状態に変更する。

8) Azureで、CSVファイルをDBに書き込むバッチ処理が実行されたログを確認した結果は、以下の通り。
9) ApplicationInsightsでログを確認した結果は、以下の通りで、赤枠のように、エラーメッセージがログに出力されることが確認できる。
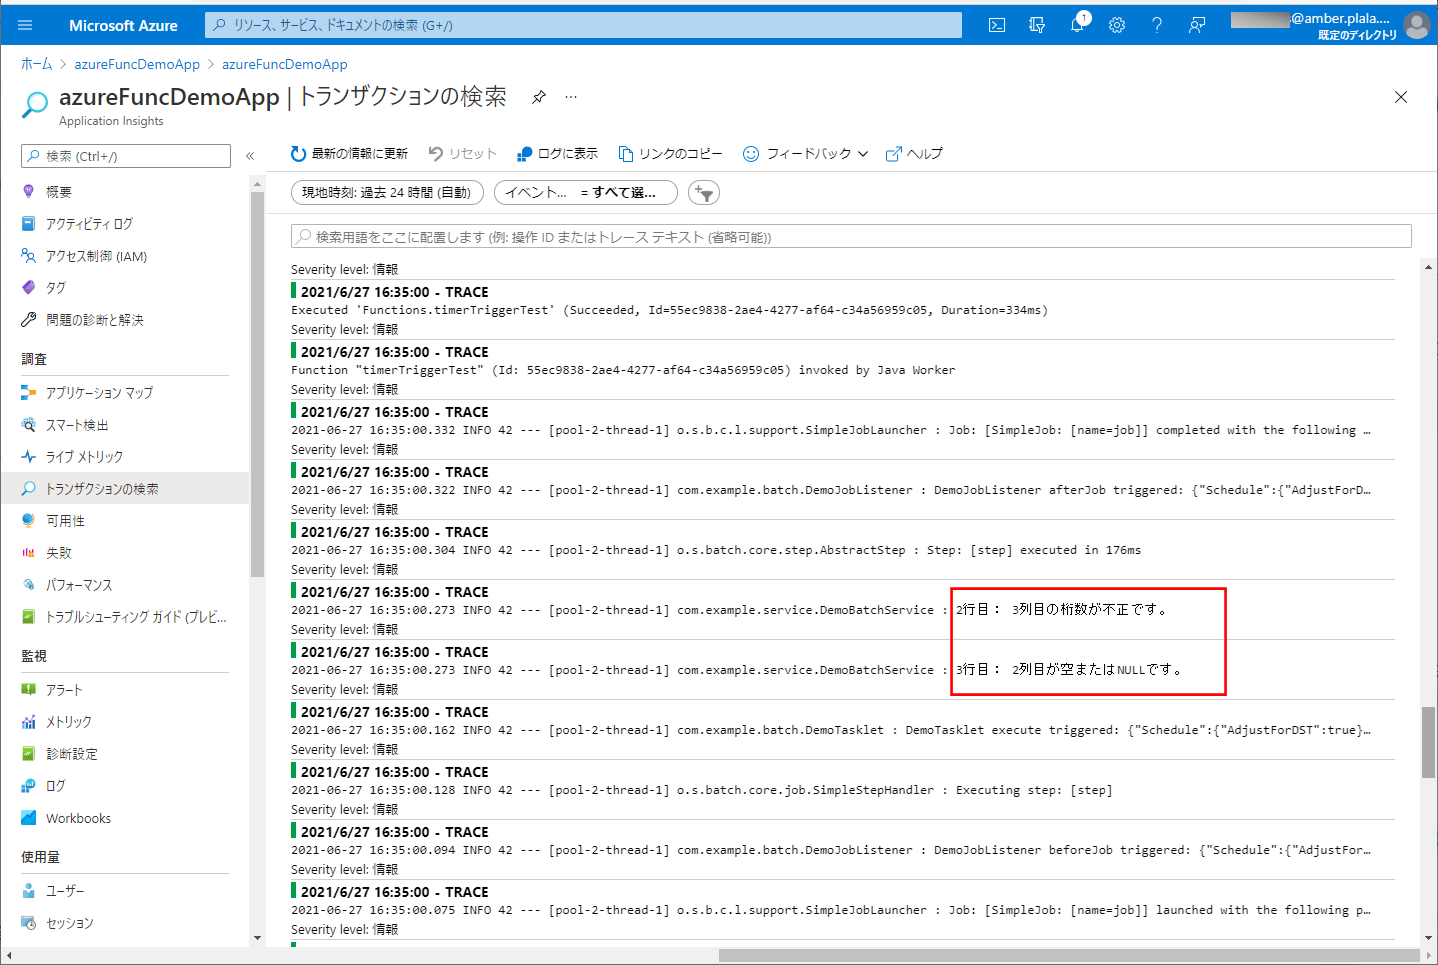
10) バッチ実行後は、SQLデータベース上のUSER_DATAテーブルに、エラーでないid=3のデータのみ取り込まれたことが確認できる。
要点まとめ
- Timer Triggerを利用したAzure Functions内でSpring Batch(Taskletモデル)を利用でき、その中でAzure Storageに配置したCSVファイルを読み取って、そのファイルの内容をSQL Database上のテーブルに書き込む処理を実装できる。