Spring Sessionは、ユーザーのセッション情報を管理するための API と実装を提供するため、これを利用すると、セッションデータをAzure Cache for Redisや他のデータベースに格納することができる。
今回は、Spring Sessionを利用して、前回作成したAzure Cache for Redis内にセッションデータを格納してみたので、そのサンプルプログラムを共有する。
前提条件
下記記事の実装が完了していること。

また、下記記事に従って、Azure Cache for Redisの作成が完了していること。

サンプルプログラムの作成
作成したサンプルプログラム(App Service側)の構成は以下の通り。なお、Azure Functions側のソースコードは修正していない。
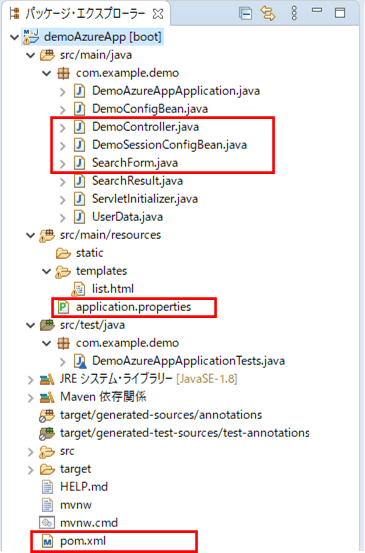
なお、上記の赤枠は、前提条件のプログラムから追加・変更したプログラムである。
pom.xmlの内容は以下の通りで、Spring Session RedisとRedisストア(Lettuce)アダプタを追加している。
<?xml version="1.0" encoding="UTF-8"?>

<project xmlns="http://maven.apache.org/POM/4.0.0" xmlns:xsi="http://www.w3.org/2001/XMLSchema-instance" xsi:schemaLocation="http://maven.apache.org/POM/4.0.0 https://maven.apache.org/xsd/maven-4.0.0.xsd">
  <modelVersion>4.0.0</modelVersion>
  <parent>
    <groupId>org.springframework.boot</groupId>
    <artifactId>spring-boot-starter-parent</artifactId>
    <version>2.4.0</version>
    <relativePath/>
    <!-- lookup parent from repository -->
  </parent>
  <groupId>com.example</groupId>
  <artifactId>demoAzureApp</artifactId>
  <version>0.0.1-SNAPSHOT</version>
  <packaging>war</packaging>
  <name>demoAzureApp</name>
  <description>Demo project for Spring Boot</description>
  <properties>
    <java.version>1.8</java.version>
  </properties>
  <dependencies>
    <dependency>
      <groupId>org.springframework.boot</groupId>
      <artifactId>spring-boot-starter-thymeleaf</artifactId>
    </dependency>
    <dependency>
      <groupId>org.springframework.boot</groupId>
      <artifactId>spring-boot-starter-web</artifactId>
    </dependency>
    <!-- lombokの設定 -->
    <dependency>
      <groupId>org.projectlombok</groupId>
      <artifactId>lombok</artifactId>
      <scope>provided</scope>
    </dependency>
    <!-- Spring Session Redisの設定 -->
    <dependency>
      <groupId>org.springframework.session</groupId>
      <artifactId>spring-session-data-redis</artifactId>
    </dependency>
    <!-- Redisストア(Lettuce)アダプタの設定 -->
    <dependency>
      <groupId>io.lettuce</groupId>
      <artifactId>lettuce-core</artifactId>
    </dependency>
    <dependency>
      <groupId>org.springframework.boot</groupId>
      <artifactId>spring-boot-starter-tomcat</artifactId>
      <scope>provided</scope>
    </dependency>
    <dependency>
      <groupId>org.springframework.boot</groupId>
      <artifactId>spring-boot-starter-test</artifactId>
      <scope>test</scope>
    </dependency>
  </dependencies>
  <build>
    <plugins>
      <plugin>
        <groupId>org.springframework.boot</groupId>
        <artifactId>spring-boot-maven-plugin</artifactId>
      </plugin>
      <plugin>
        <groupId>com.microsoft.azure</groupId>
        <artifactId>azure-webapp-maven-plugin</artifactId>
        <version>1.12.0</version>
        <configuration>
          <schemaVersion>v2</schemaVersion>
          <subscriptionId>(ログインユーザーのサブスクリプションID)</subscriptionId>
          <resourceGroup>azureAppDemo</resourceGroup>
          <appName>azureAppDemoService</appName>
          <pricingTier>B1</pricingTier>
          <region>japaneast</region>
          <appServicePlanName>ASP-azureAppDemo-8679</appServicePlanName>
          <appServicePlanResourceGroup>azureAppDemo</appServicePlanResourceGroup>
          <runtime>
            <os>Linux</os>
            <javaVersion>Java 8</javaVersion>
            <webContainer>Tomcat 8.5</webContainer>
          </runtime>
          <deployment>
            <resources>
              <resource>
                <directory>${project.basedir}/target</directory>
                <includes>
                  <include>*.war</include>
                </includes>
              </resource>
            </resources>
          </deployment>
        </configuration>
      </plugin>
    </plugins>
  </build>
</project>
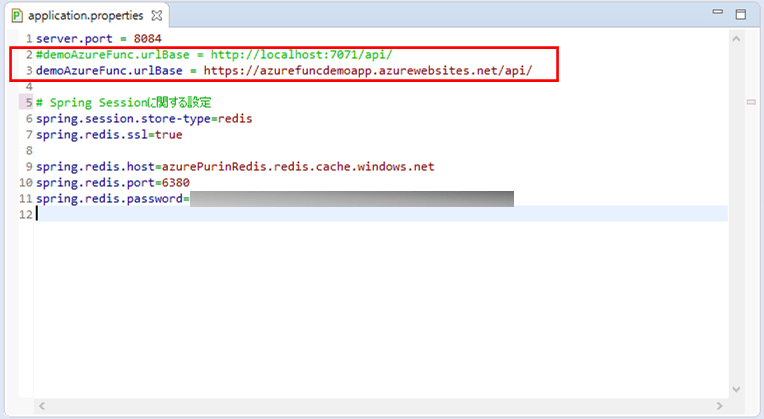
また、application.propertiesの設定は以下の通りで、「spring.session.store-type=redis」という定義と、Azure Cache for Redisへの接続先を追加している。
server.port = 8084
demoAzureFunc.urlBase = http://localhost:7071/api/
#demoAzureFunc.urlBase = https://azurefuncdemoapp.azurewebsites.net/api/

# Spring Sessionに関する設定
spring.session.store-type=redis
spring.redis.ssl=true

spring.redis.host=azurePurinRedis.redis.cache.windows.net
spring.redis.port=6380
spring.redis.password=(Azure Cache for Redisのパスワード)
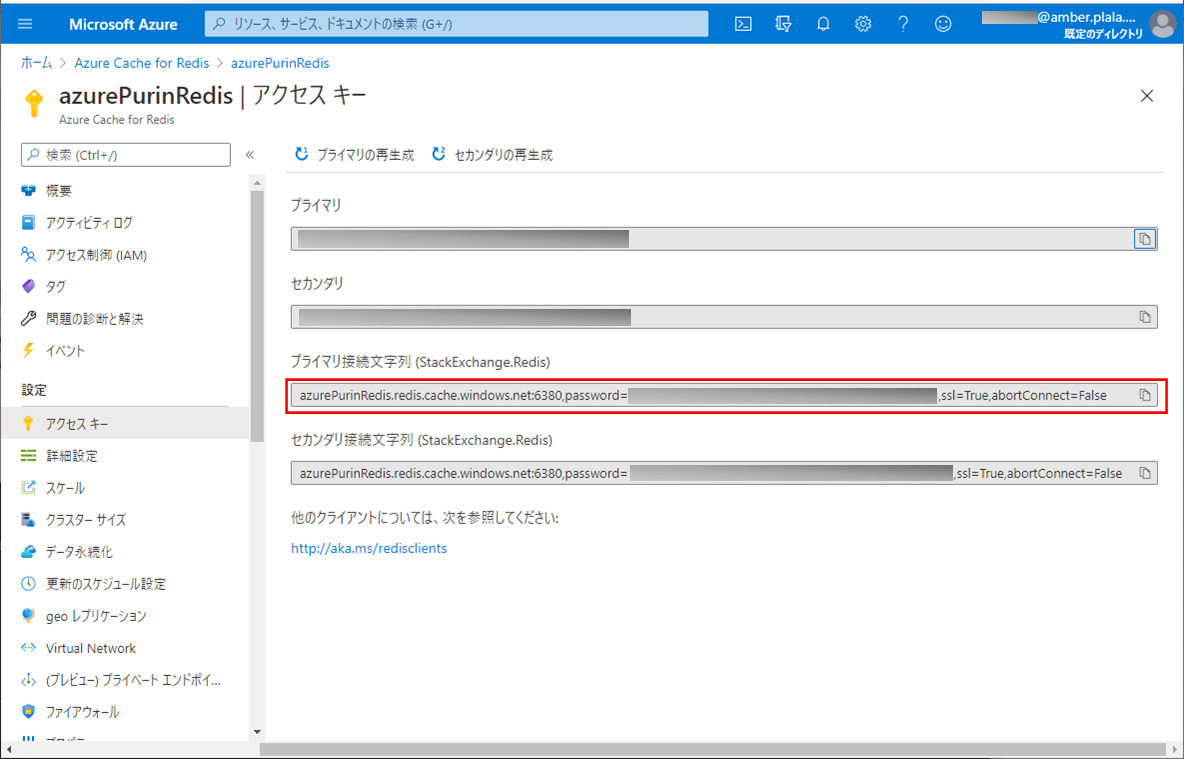
なお、上記接続先は、以下のAzure Portal上のプライマリ接続文字列から確認できる。
また、Spring Sessionの設定は、以下のクラスで設定している。
package com.example.demo;

import org.springframework.beans.factory.annotation.Value;
import org.springframework.context.annotation.Bean;
import org.springframework.context.annotation.Configuration;
import org.springframework.data.redis.connection.RedisStandaloneConfiguration;
import org.springframework.data.redis.connection.lettuce.LettuceClientConfiguration;
import org.springframework.data.redis.connection.lettuce.LettuceConnectionFactory;
import org.springframework.data.redis.serializer.GenericJackson2JsonRedisSerializer;
import org.springframework.data.redis.serializer.RedisSerializer;
import org.springframework.session.data.redis.config.ConfigureRedisAction;
import org.springframework.session.data.redis.config.annotation.web.http.EnableRedisHttpSession;
import org.springframework.session.web.context.AbstractHttpSessionApplicationInitializer;

@Configuration
@EnableRedisHttpSession
public class DemoSessionConfigBean extends AbstractHttpSessionApplicationInitializer {

    /** Azure上のRedisサーバーのホスト名 */
    @Value("${spring.redis.host}")
    private String redisHostName;

    /** Azure上のRedisサーバーのポート番号 */
    @Value("${spring.redis.port}")
    private String redisPort;

    /** Azure上のRedisサーバーのパスワード */
    @Value("${spring.redis.password}")
    private String redisPassword;

    /**
     * Redisへの値の書き込み・読み込み手段を提供するシリアライザを生成する
     * @return Redisへの値の書き込み・読み込み手段を提供するシリアライザ
     */
    @Bean
    public RedisSerializer<Object> springSessionDefaultRedisSerializer() {
        return new GenericJackson2JsonRedisSerializer();
    }

    /**
     * Spring SessionがAzure上のRedisのCONFIGを実行しないようにする
     * @return Spring SessionがAzure上のRedisのCONFIGを実行しない設定
     */
    @Bean
    public static ConfigureRedisAction configureRedisAction() {
        return ConfigureRedisAction.NO_OP;
    }

    /**
     * Redisへの接続方法を生成する
     * @return Redisへの接続方法
     */
    @Bean
    public LettuceConnectionFactory connectionFactory() {
        RedisStandaloneConfiguration redisStandaloneConfiguration
            = new RedisStandaloneConfiguration();
        redisStandaloneConfiguration.setHostName(redisHostName);
        redisStandaloneConfiguration.setPassword(redisPassword);
        redisStandaloneConfiguration.setPort(Integer.parseInt(redisPort));
        LettuceClientConfiguration lettuceClientConfiguration
            = LettuceClientConfiguration.builder().useSsl().build();
        return new LettuceConnectionFactory(
            redisStandaloneConfiguration, lettuceClientConfiguration);
    }
}
さらに、コントローラクラスの内容は以下の通りで、検索条件Formクラスをセッションとして保持するようにしている。
package com.example.demo;

import org.springframework.beans.factory.annotation.Autowired;
import org.springframework.beans.factory.annotation.Value;
import org.springframework.http.HttpEntity;
import org.springframework.http.HttpHeaders;
import org.springframework.http.HttpMethod;
import org.springframework.http.MediaType;
import org.springframework.http.ResponseEntity;
import org.springframework.stereotype.Controller;
import org.springframework.ui.Model;
import org.springframework.util.LinkedMultiValueMap;
import org.springframework.util.MultiValueMap;
import org.springframework.web.bind.annotation.GetMapping;
import org.springframework.web.bind.annotation.ModelAttribute;
import org.springframework.web.bind.annotation.PostMapping;
import org.springframework.web.bind.annotation.SessionAttributes;
import org.springframework.web.client.RestTemplate;

import com.fasterxml.jackson.databind.ObjectMapper;

@Controller
@SessionAttributes(names="searchForm")
public class DemoController {

    /** RestTemplateオブジェクト */
    @Autowired
    private RestTemplate restTemplate;

    /** ObjectMapperオブジェクト */
    @Autowired
    private ObjectMapper objectMapper;

    /** application.propertiesからdemoAzureFunc.urlBaseの値を取得 */
    @Value("${demoAzureFunc.urlBase}")
    private String demoAzureFuncBase;

    /**
     * 検索一覧画面を初期表示する.
     * @param model Modelオブジェクト
     * @return 検索一覧画面
     */
    @GetMapping("/")
    public String index(Model model) {
        SearchForm searchForm = new SearchForm();
        model.addAttribute("searchForm", searchForm);
        return "list";
    }

    /**
     * 検索条件に合うユーザーデータを取得し、一覧に表示する
     * @param searchForm 検索条件Form
     * @param model      Modelオブジェクト
     * @return 検索一覧画面
     */
    @PostMapping("/search")
    public String search(@ModelAttribute("searchForm") SearchForm searchForm
                       , Model model) {
        // Azure FunctionsのgetUserDataList関数を呼び出すためのヘッダー情報を設定する
        HttpHeaders headers = new HttpHeaders();
        headers.setContentType(MediaType.APPLICATION_JSON);

        // Azure FunctionsのgetUserDataList関数を呼び出すための引数を設定する
        MultiValueMap<String, String> map = new LinkedMultiValueMap<>();
        try {
            map.add("searchName", searchForm.getSearchName());
            map.add("searchSex", searchForm.getSearchSex());
        } catch (Exception ex) {
            throw new RuntimeException(ex);
        }
        HttpEntity<MultiValueMap<String, String>> entity
            = new HttpEntity<>(map, headers);

        // Azure FunctionsのgetUserDataList関数を呼び出す
        ResponseEntity<String> response = restTemplate.exchange(
             demoAzureFuncBase + "getUserDataList", HttpMethod.POST,
             entity, String.class);

        // Azure Functionsの呼出結果のユーザーデータ一覧を、検索条件Formに設定する
        try {
            SearchResult searchResult = objectMapper.readValue(
                response.getBody(), SearchResult.class);
            searchForm.setUserDataList(searchResult.getUserDataList());
        } catch (Exception ex) {
            throw new RuntimeException(ex);
        }
        model.addAttribute("searchForm", searchForm);
        return "list";
    }

}
また、検索条件Formクラスの内容は以下の通りで、getSexItemsメソッドの内容をAzure Cache for Redisに格納しないようにするために、@JsonIgnoreアノテーションを付与している。
package com.example.demo;

import java.util.ArrayList;
import java.util.LinkedHashMap;
import java.util.Map;

import com.fasterxml.jackson.annotation.JsonIgnore;

import lombok.Data;

@Data
public class SearchForm {

    /** 検索用名前 */
    private String searchName;

    /** 検索用性別 */
    private String searchSex;

    /** 検索結果リスト */
    private ArrayList<UserData> userDataList = new ArrayList<>();

    /** 性別のMapオブジェクト */
    @JsonIgnore
    public Map<String, String> getSexItems() {
        Map<String, String> sexMap = new LinkedHashMap<String, String>();
        sexMap.put("1", "男");
        sexMap.put("2", "女");
        return sexMap;
    }
}
その他のソースコード内容は、以下のサイトを参照のこと。
https://github.com/purin-it/azure/tree/master/azure-cache-redis-session/demoAzureApp
サンプルプログラムの実行結果
サンプルプログラムの実行結果は、以下の通り。
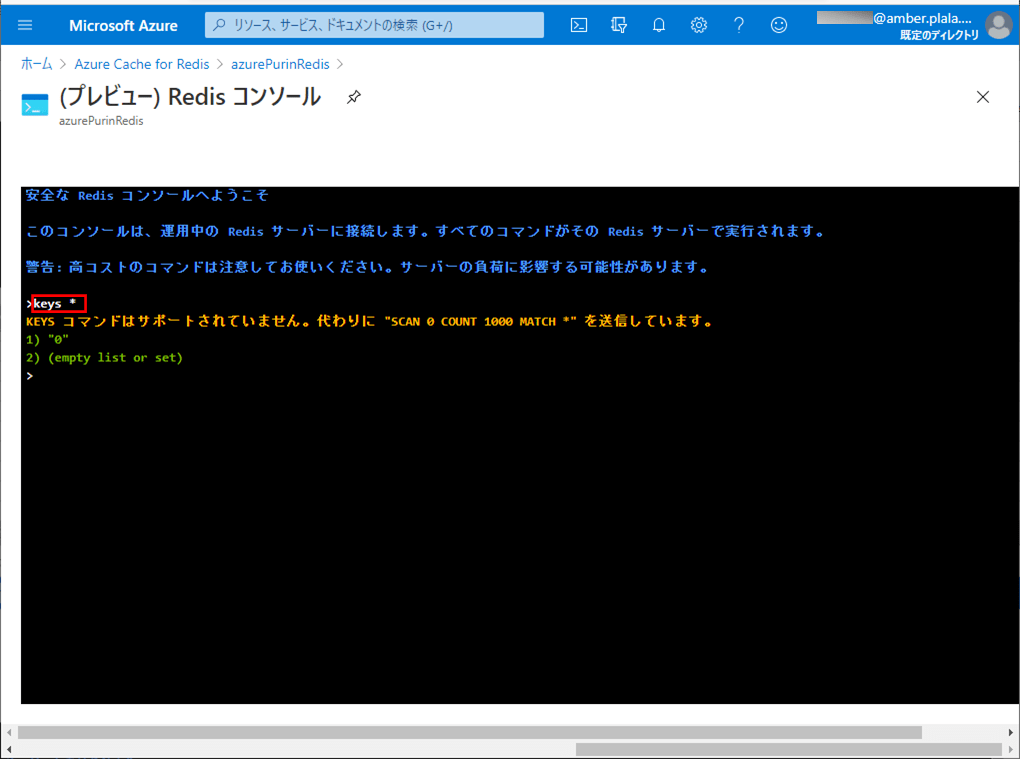
1) Azure Redisをコンソールで「keys *」コマンドを入力すると、何も登録されていないことが確認できる。
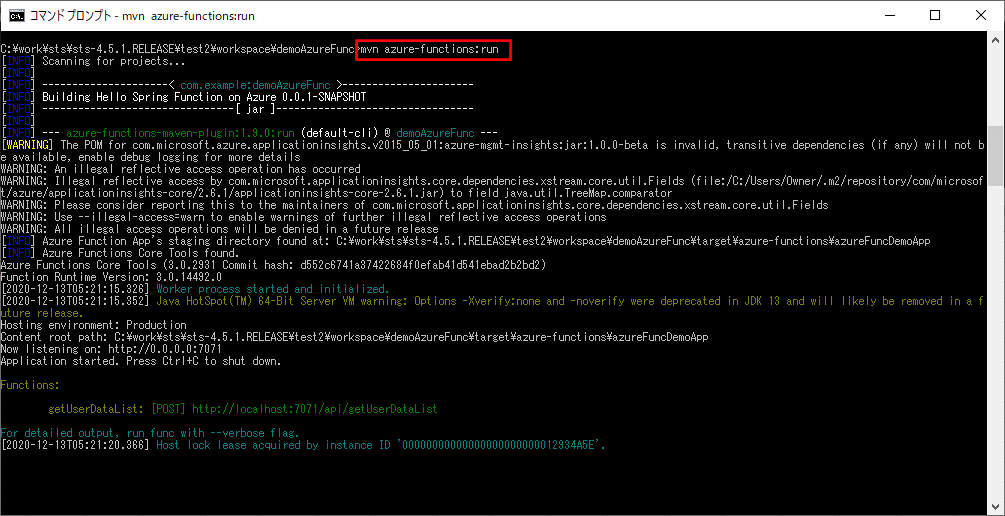
2) ローカル環境でdemoAzureFuncアプリを「mvn azure-functions:run」コマンドで起動する。
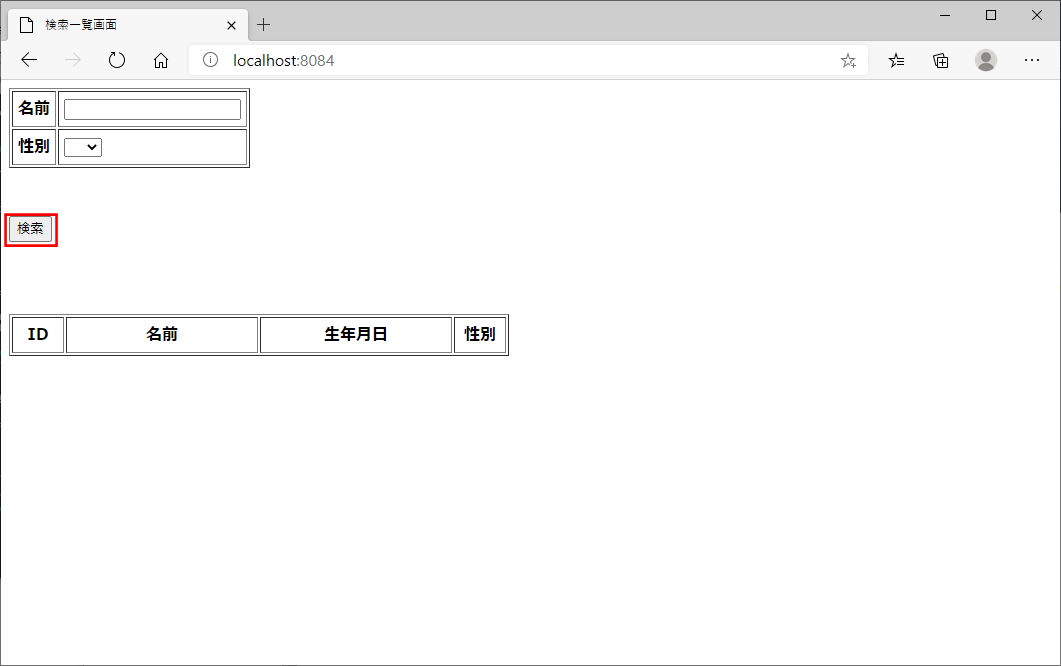
その後、Spring Bootアプリケーションを起動し、「http:// (ホスト名):(ポート番号)」とアクセスすると、以下の画面が表示される。
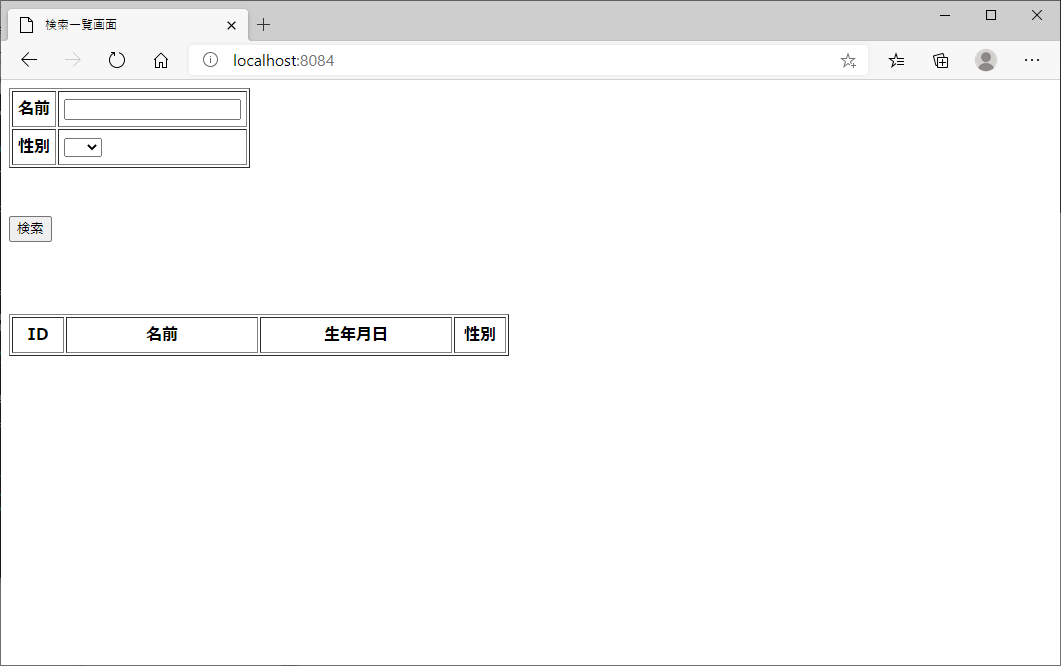
このとき、 Azure Redisをコンソールで「keys *」コマンドを入力すると、Spring Sessionにより作成されたオブジェクトの一覧が表示される。
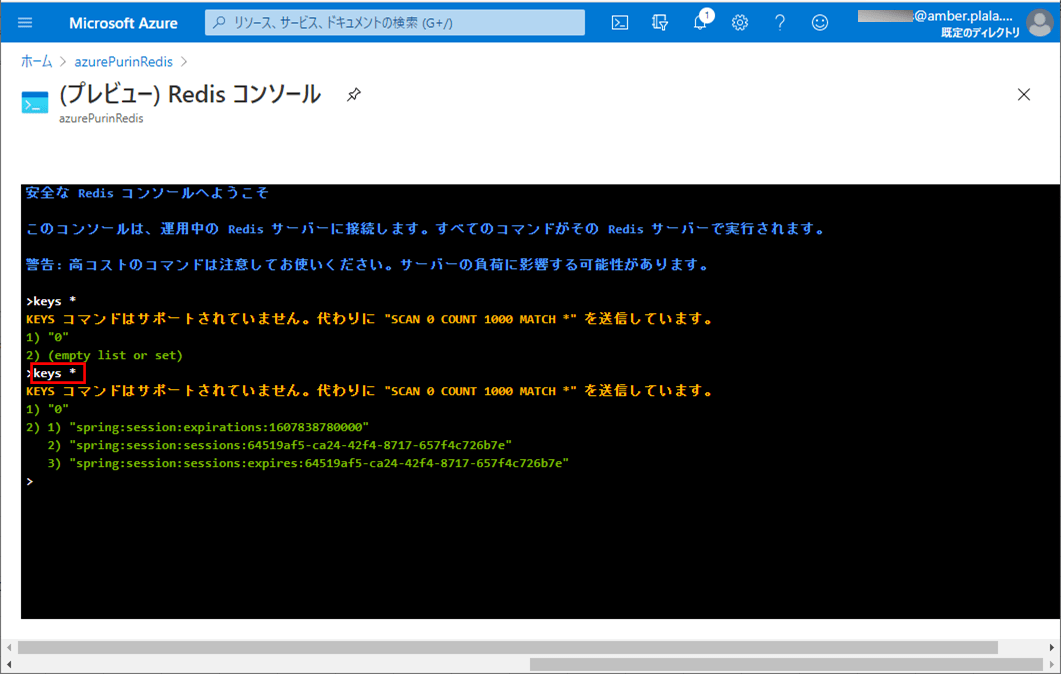
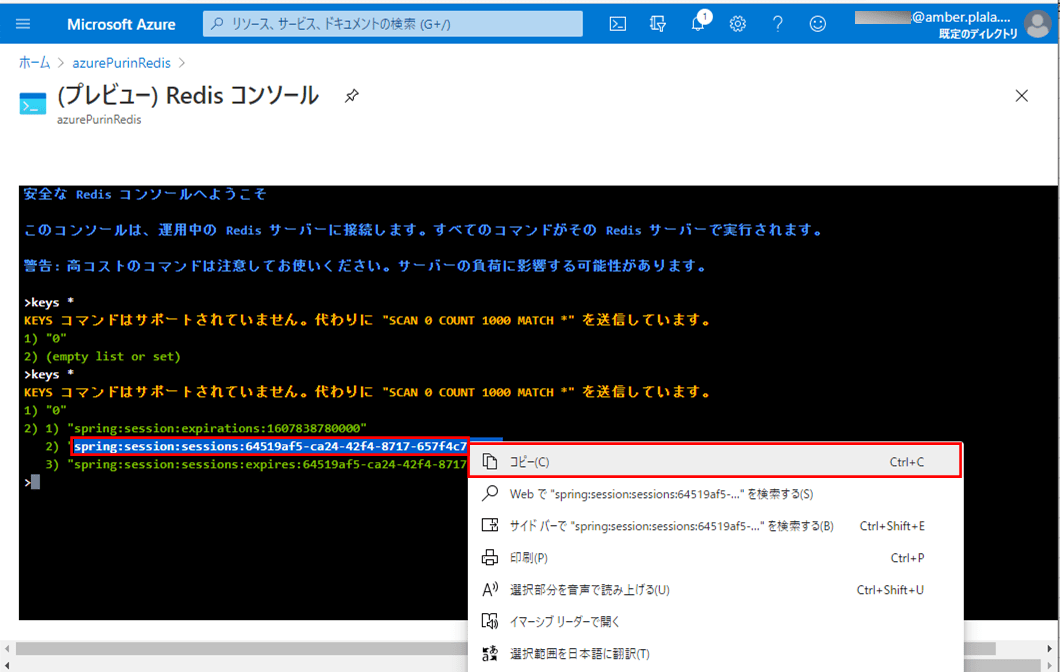
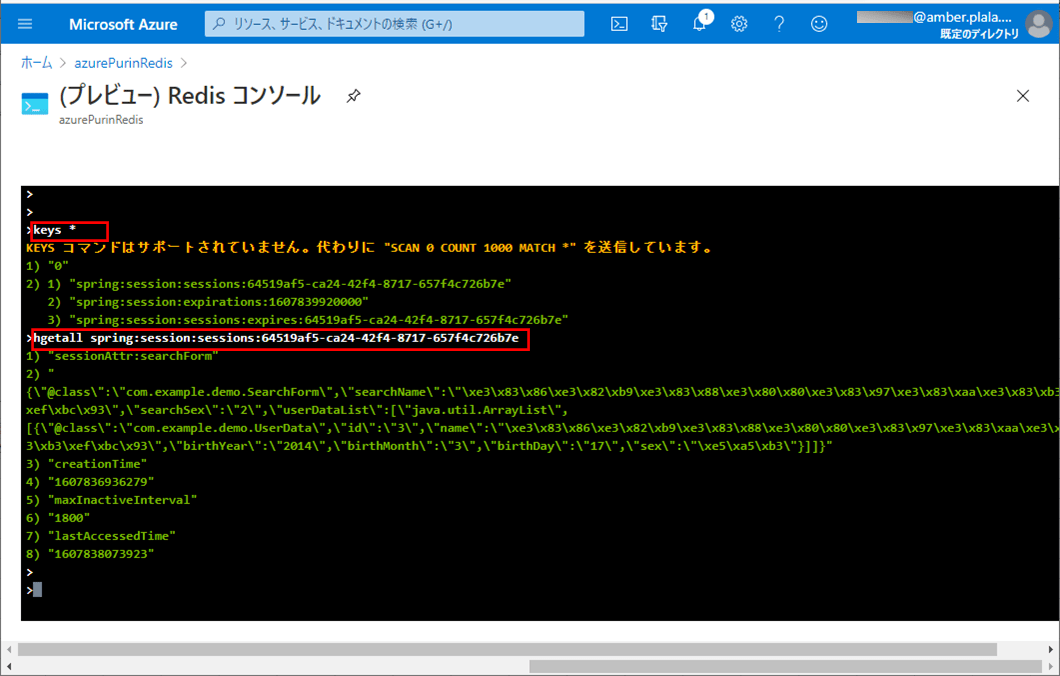
ここで、上記一覧のうち、「expires」を含まない、2)のオブジェクト名を選択し右クリックし、コピーする。なお、コピーした文字列の「spring:session:sessions:」の後の「64519af5-ca24-42f4-8717-657f4c726b7e」は、セッションIDを表している。
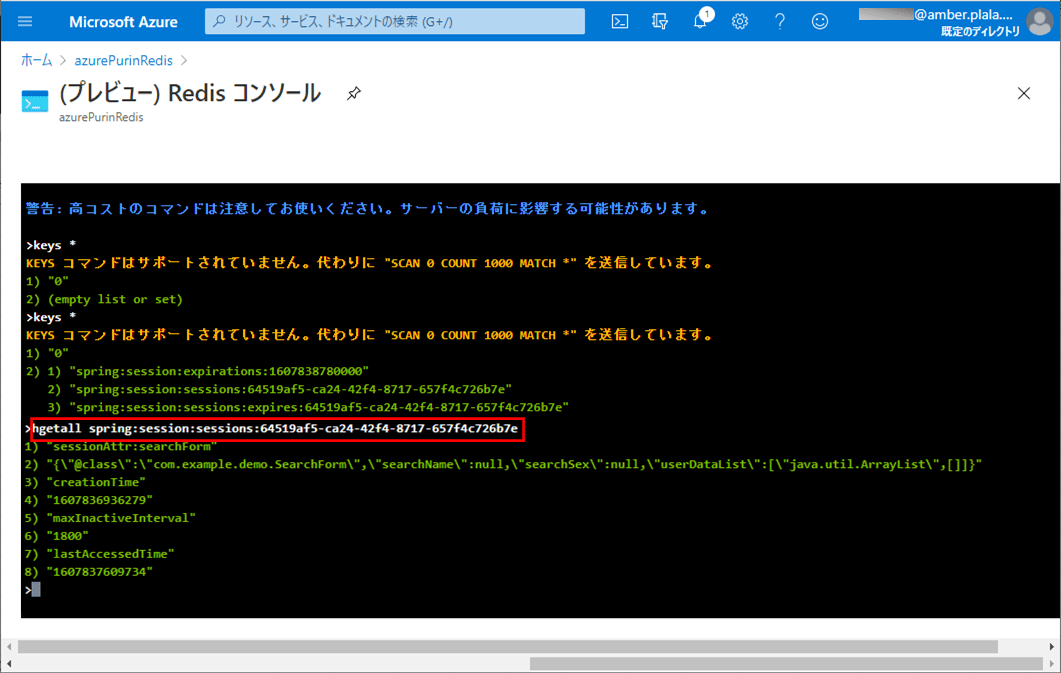
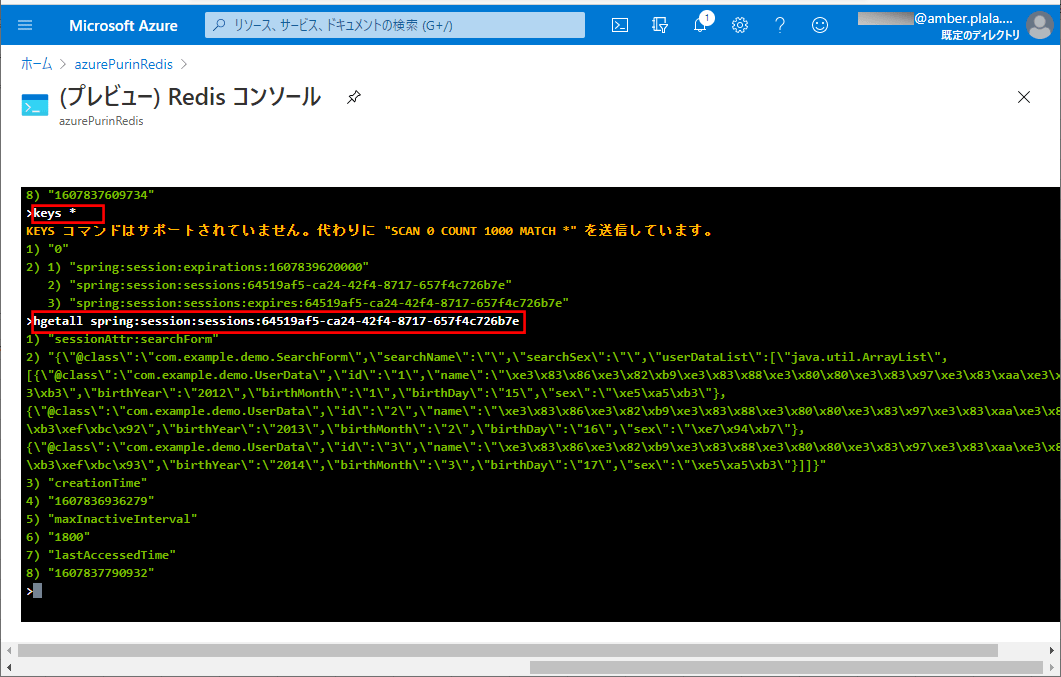
Azure Redisをコンソールで「hgetall (先ほどコピーしたオブジェクト名)」というコマンドを入力すると、以下のように、コピーしたオブジェクト名の中身が表示される。なお、このときのオブジェクト名の貼り付けは、「Ctrl+V」コマンドにより行う。
3) 検索条件に何も指定せず「検索」ボタンを押下すると、USER_DATAテーブルの全データが出力される。
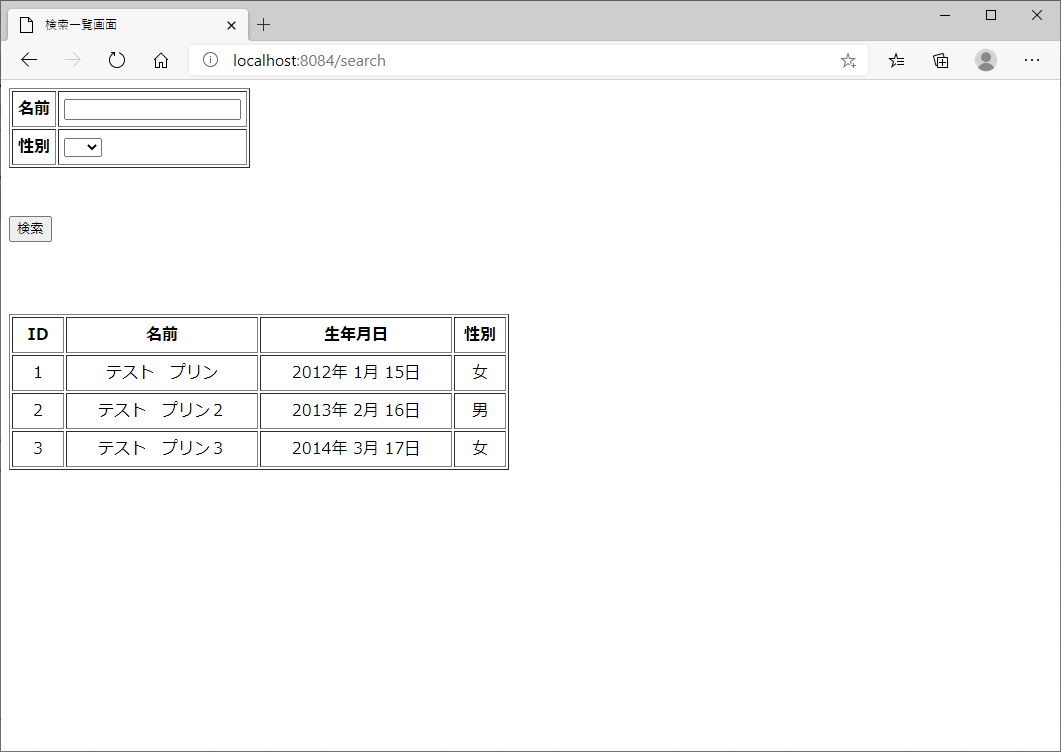
このとき、 Azure Redisをコンソールで「keys *」コマンドを入力後、「hgetall (先ほどコピーしたオブジェクト名)」というコマンドを入力すると、以下のように、コピーしたオブジェクト名の中身が更新されて、userDataListに検索された3レコードが設定されて表示されることが確認できる。
4) 検索条件に「テスト プリン3」、性別に「女」を指定して「検索」ボタンを押下すると、以下のように、条件に合うデータが出力される。
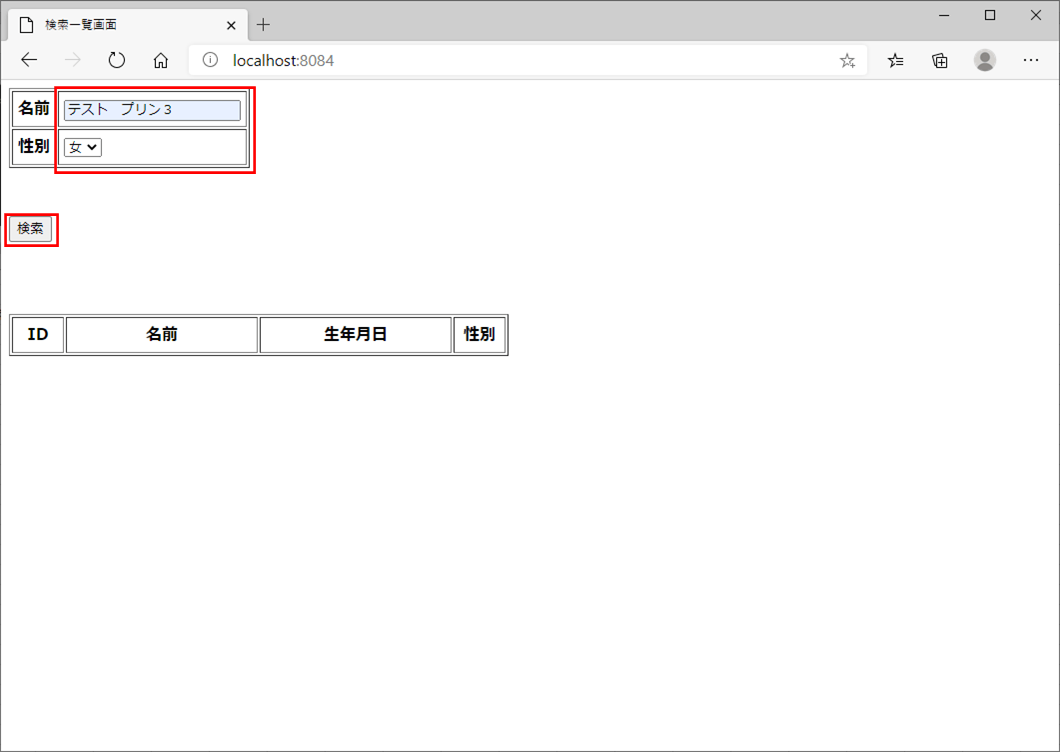
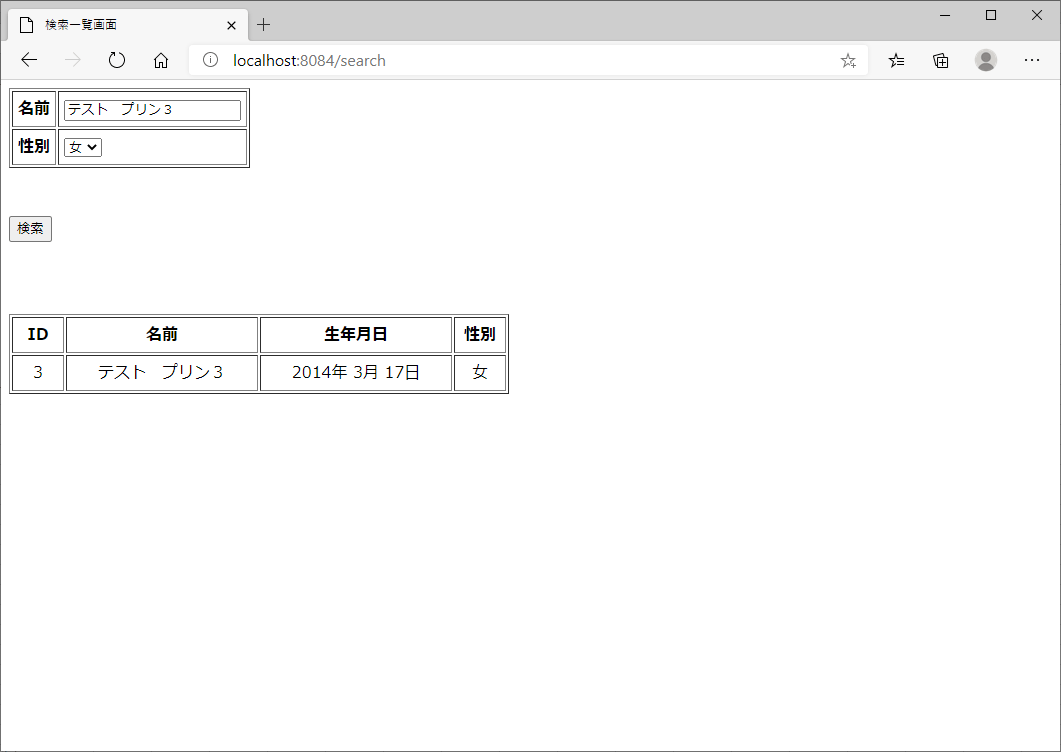
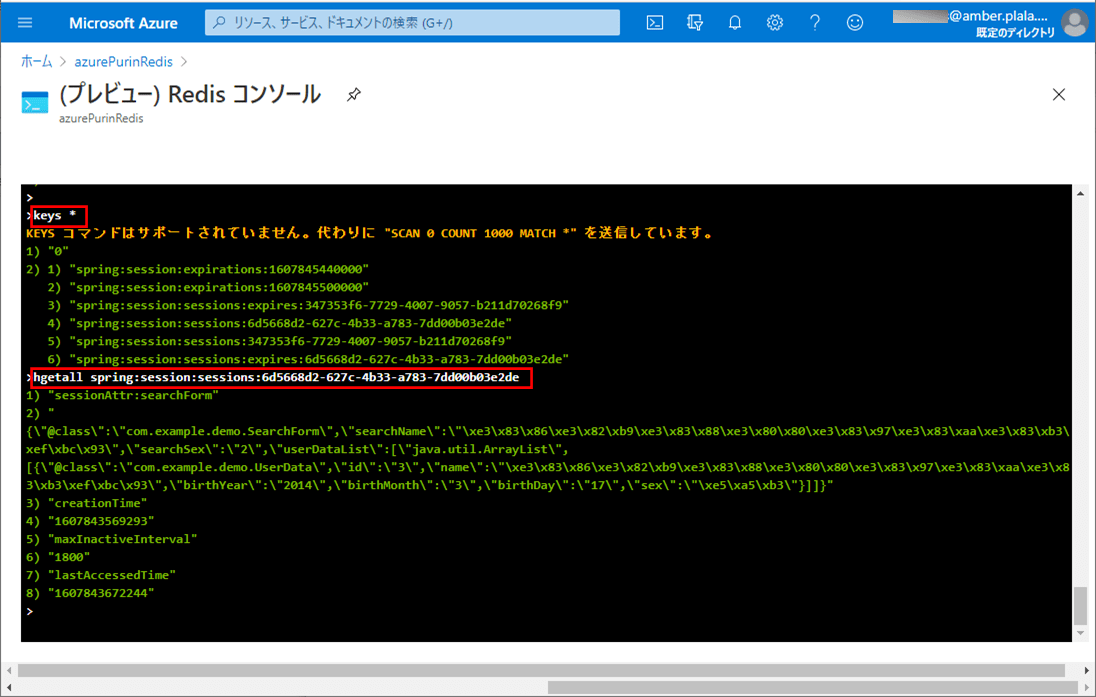
このとき、 Azure Redisをコンソールで「keys *」コマンドを入力後、「hgetall (先ほどコピーしたオブジェクト名)」というコマンドを入力すると、以下のように、コピーしたオブジェクト名の中身が更新されて、searchName, searchSexに検索条件が、userDataListに検索された1レコードが設定されて表示されることが確認できる。
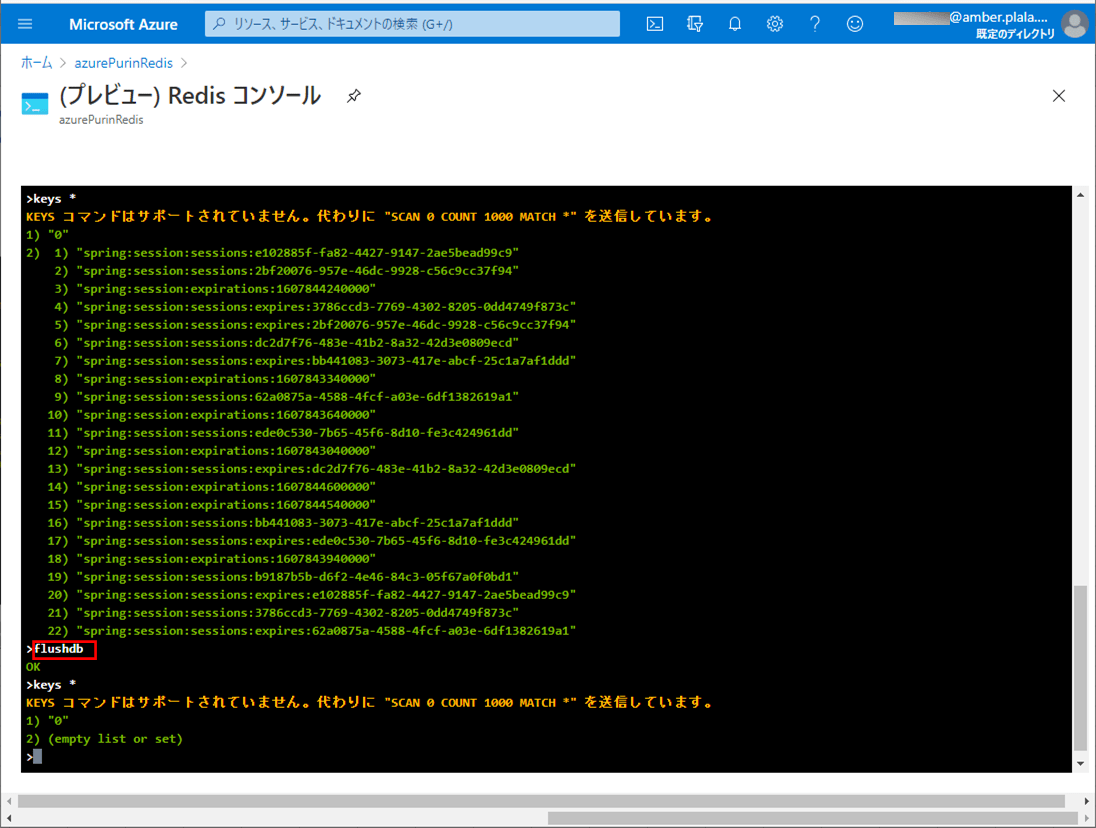
5) 以下のように、「flushdb」コマンドで、Azure Redisオブジェクトのデータが全てクリアされる。
6) ローカル環境でdemoAzureFuncアプリのapplication.propertiesの「demoAzureFunc.urlBase」を以下のように変更する。
その後、以下のように、Azure App Service上にサンプルプログラムをデプロイする。
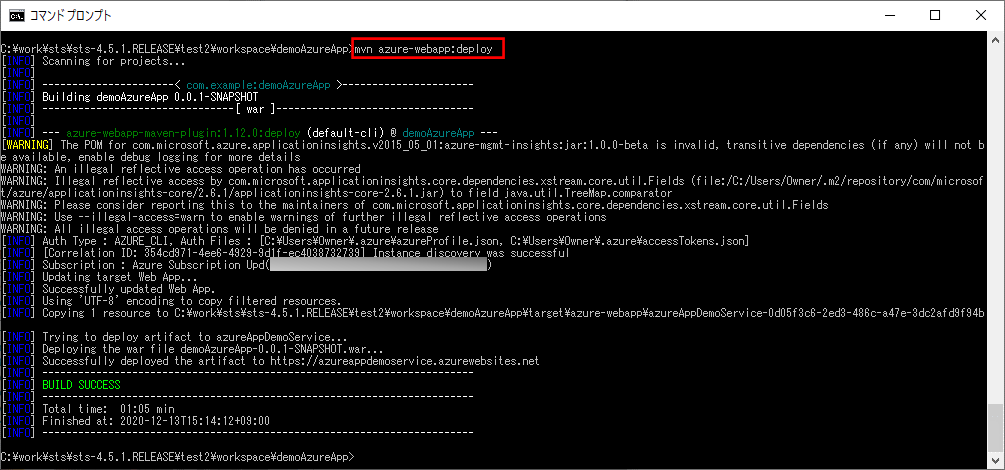
なお、Azure App Serviceにデプロイする過程は、以下の記事の「App ServiceへのSpring Bootを利用したJavaアプリケーションのデプロイ」を参照のこと。

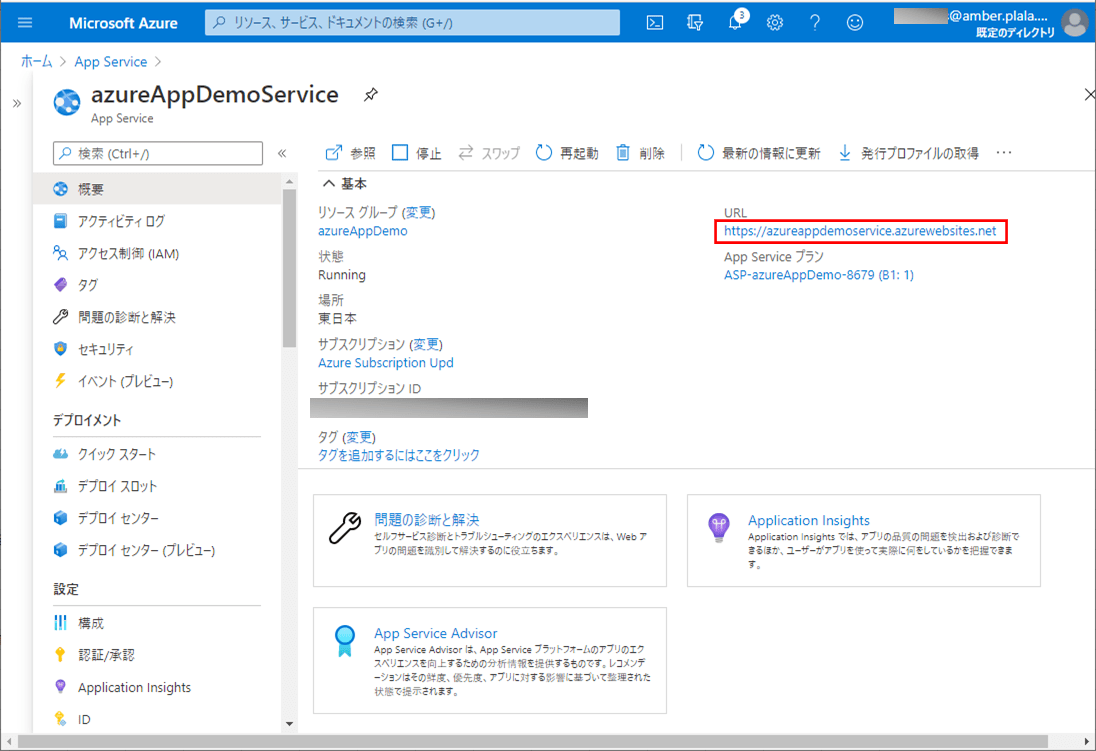
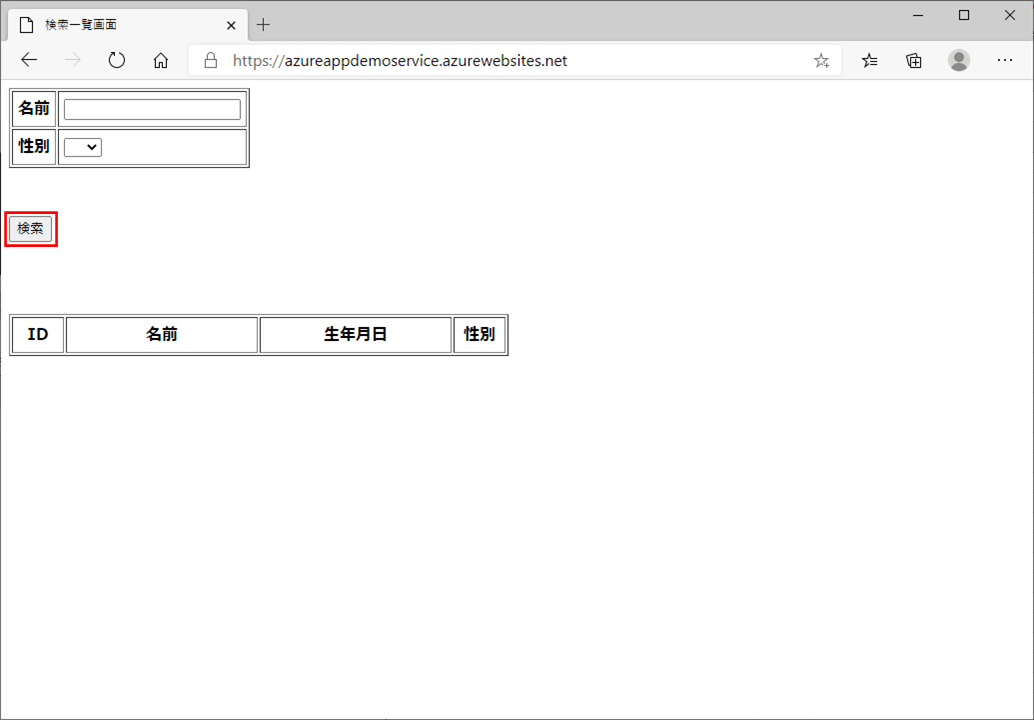
7) その後、「https://azureappdemoservice.azurewebsites.net/」というAzure App ServiceのURLにアクセスすると、以下の画面が表示される。
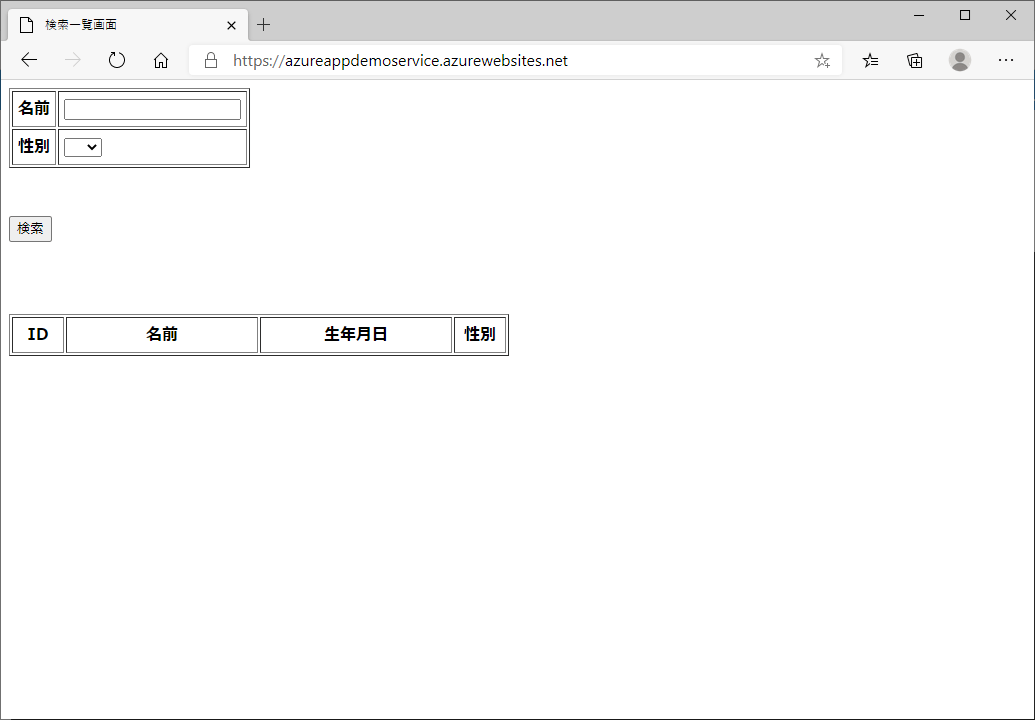
なお、上記URLは、下記Azure App ServiceのURLから確認できる。
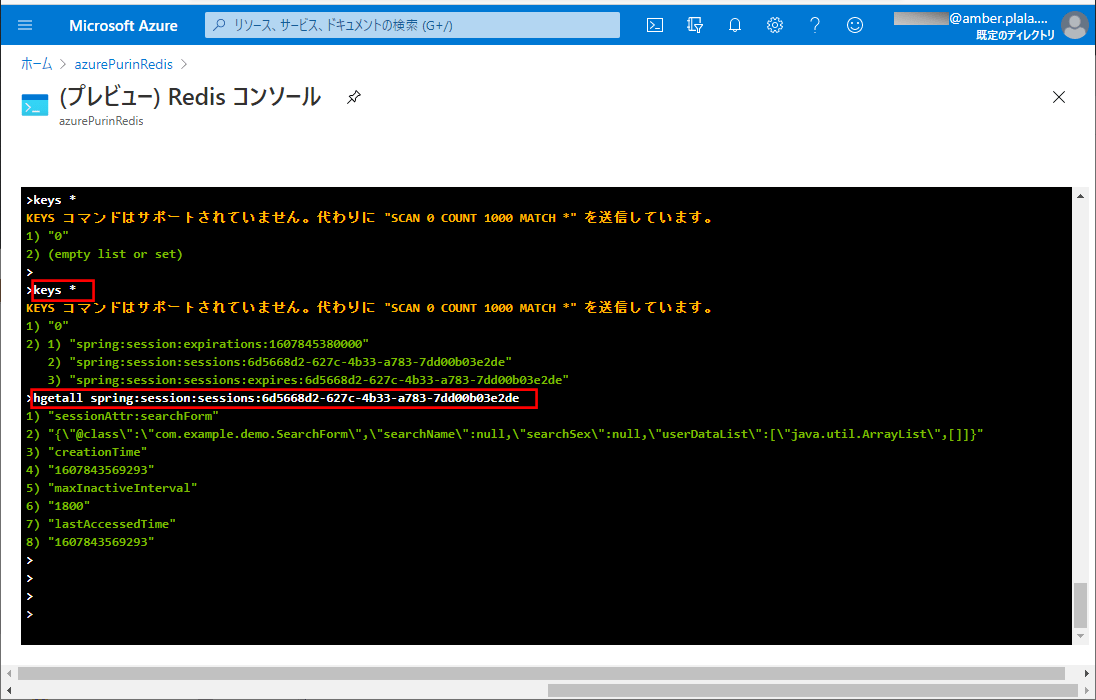
このとき、 Azure Redisをコンソールで「keys *」コマンドを入力後、「hgetall (先ほどコピーしたオブジェクト名)」というコマンドを入力すると、以下のように、コピーしたオブジェクト名の中身が確認できる。
8) 検索条件に何も指定せず「検索」ボタンを押下すると、USER_DATAテーブルの全データが出力される。
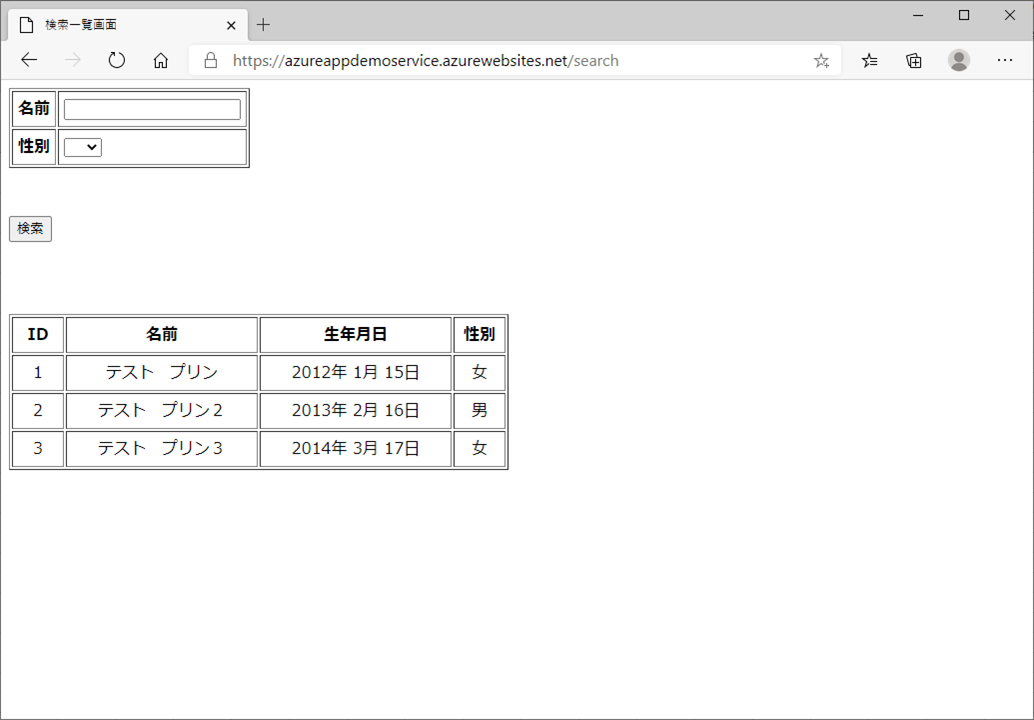
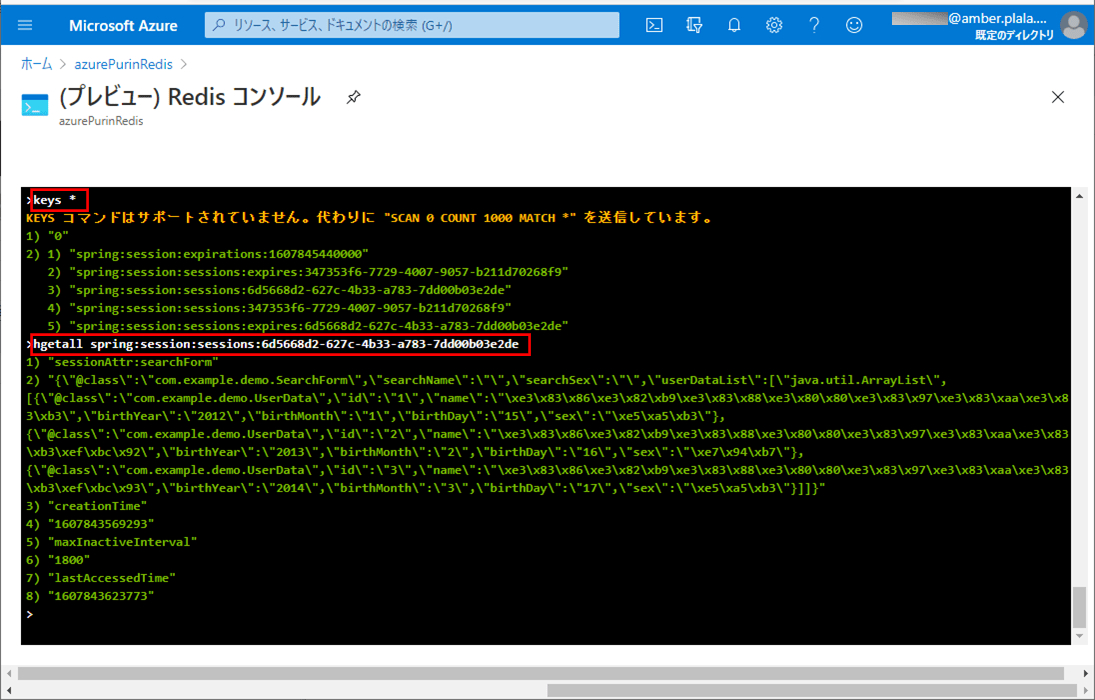
このとき、 Azure Redisをコンソールで「keys *」コマンドを入力後、「hgetall (先ほどコピーしたオブジェクト名)」というコマンドを入力すると、以下のように、コピーしたオブジェクト名の中身が更新されて、userDataListに検索された3レコードが設定されて表示されることが確認できる。
9) 検索条件に「テスト プリン3」、性別に「女」を指定して「検索」ボタンを押下すると、以下のように、条件に合うデータが出力される。
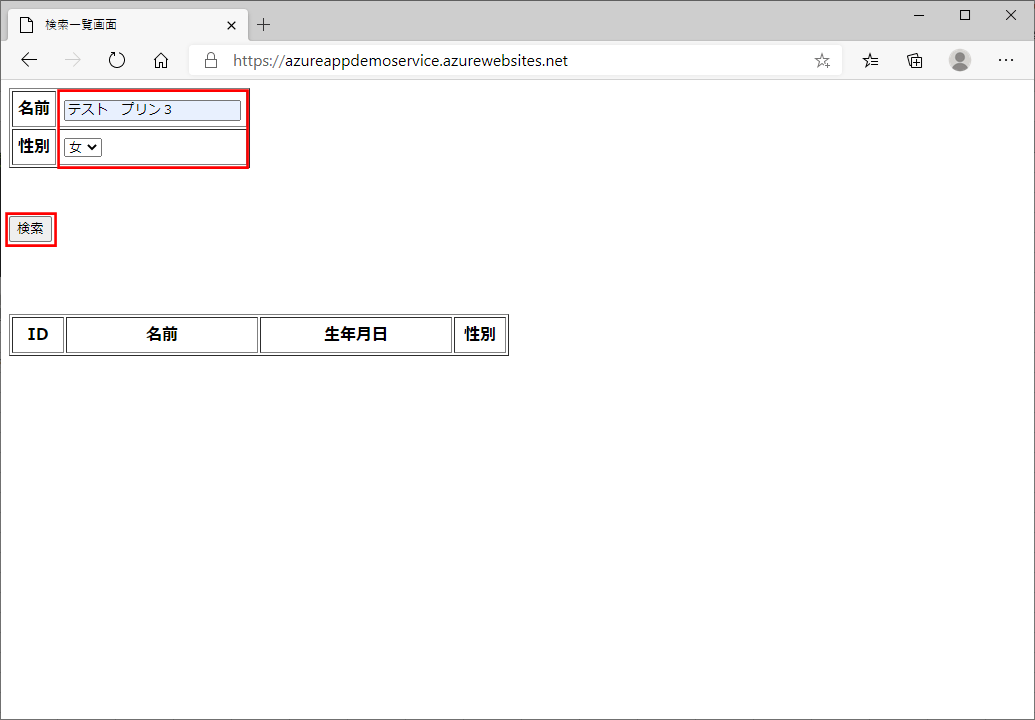
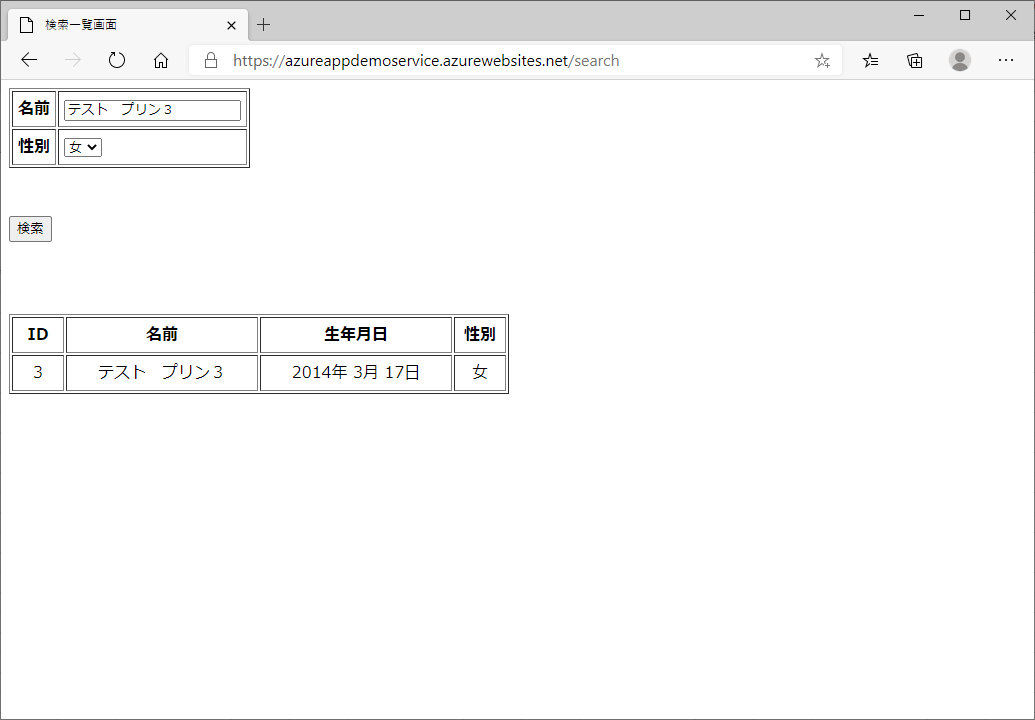
このとき、 Azure Redisをコンソールで「keys *」コマンドを入力後、「hgetall (先ほどコピーしたオブジェクト名)」というコマンドを入力すると、以下のように、コピーしたオブジェクト名の中身が更新されて、searchName, searchSexに検索条件が、userDataListに検索された1レコードが設定されて表示されることが確認できる。
要点まとめ
- Spring Sessionは、ユーザーのセッション情報を管理するための API と実装を提供するため、これを利用すると、セッションデータをAzure Cache for Redisや他のデータベースに格納することができる。
- Azure Cache for Redisにセッションデータを格納するには、Spring Session データ Redis(spring-session-data-redis)を利用し、application.propertiesに「spring.session.store-type=redis」の定義とAzure Cache for Redisへの接続先を追加すると共に、Spring Sessionの設定を行うクラスを追加する。


