Azure Function上のSpring Batch(Chunkモデル)でマルチスレッド設定をしてみた
以前、このブログでAzure FunctionsでSpring BatchのChunkモデルを利用したプログラムを作成したことがあったが、TaskExecutorを利用することで、処理単位(ステップ)をマルチスレッドで動作させることができる。
今回は、TaskExecutorを利用して処理単位(ステップ)をマルチスレッドで動作させてみたので、そのサンプルプログラムを共有する。
前提条件
下記記事のサンプルプログラムを作成済であること。

作成したサンプルプログラムの修正
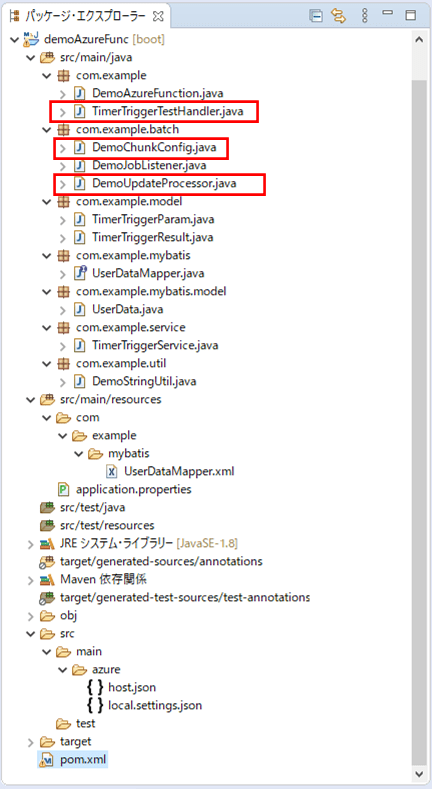
前提条件の記事のサンプルプログラムを、TaskExecutorを利用して処理単位(ステップ)をマルチスレッドで動作できるよう修正する。なお、下記の赤枠は、前提条件のプログラムから変更したプログラムである。
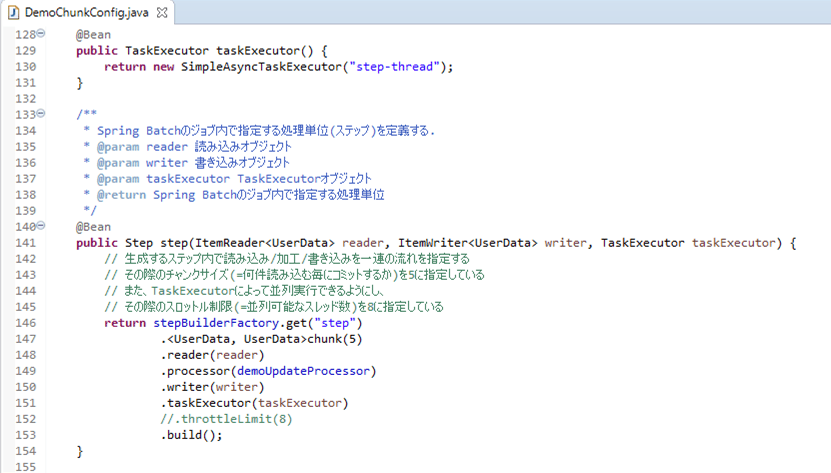
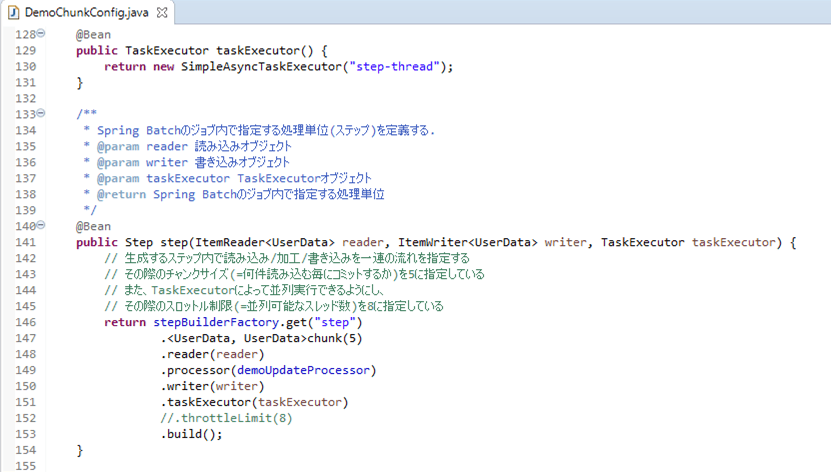
Spring Batchの設定ファイルの内容は以下の通りで、stepメソッド内で、TaskExecutorによって並列実行できるようにしている。
package com.example.batch;

import java.net.MalformedURLException;

import javax.sql.DataSource;

import org.apache.ibatis.session.SqlSessionFactory;
import org.mybatis.spring.batch.MyBatisBatchItemWriter;
import org.mybatis.spring.batch.builder.MyBatisBatchItemWriterBuilder;

import org.springframework.batch.core.Job;
import org.springframework.batch.core.Step;
import org.springframework.batch.core.configuration.annotation.EnableBatchProcessing;
import org.springframework.batch.core.configuration.annotation.JobBuilderFactory;
import org.springframework.batch.core.configuration.annotation.StepBuilderFactory;
import org.springframework.batch.core.launch.support.RunIdIncrementer;
import org.springframework.batch.item.ItemReader;
import org.springframework.batch.item.ItemWriter;
import org.springframework.batch.item.file.FlatFileItemReader;
import org.springframework.batch.item.file.mapping.BeanWrapperFieldSetMapper;
import org.springframework.batch.item.file.mapping.DefaultLineMapper;
import org.springframework.batch.item.file.transform.DelimitedLineTokenizer;
import org.springframework.beans.factory.annotation.Value;
import org.springframework.context.annotation.Bean;
import org.springframework.context.annotation.Configuration;
import org.springframework.core.io.UrlResource;
import org.springframework.core.task.SimpleAsyncTaskExecutor;
import org.springframework.core.task.TaskExecutor;

import com.azure.storage.blob.BlobServiceClient;
import com.azure.storage.blob.BlobServiceClientBuilder;
import com.example.mybatis.model.UserData;
import com.example.util.DemoStringUtil;

import lombok.RequiredArgsConstructor;

@Configuration
@EnableBatchProcessing
@RequiredArgsConstructor
public class DemoChunkConfig {

    public final JobBuilderFactory jobBuilderFactory;

    public final StepBuilderFactory stepBuilderFactory;

    public final SqlSessionFactory sqlSessionFactory;

    private final DemoUpdateProcessor demoUpdateProcessor;

    /** Azure Storageのアカウント名 */
    @Value("${azure.storage.accountName}")
    private String storageAccountName;

    /** Azure Storageへのアクセスキー */
    @Value("${azure.storage.accessKey}")
    private String storageAccessKey;

    /** Azure StorageのBlobコンテナー名 */
    @Value("${azure.storage.containerName}")
    private String storageContainerName;

    /**
     * BlobStorageからファイルを読み込む.
     * @return 読み込みオブジェクト
     */
    @Bean
    public FlatFileItemReader<UserData> reader() {
        FlatFileItemReader<UserData> reader = new FlatFileItemReader<UserData>();
        try {
            // Blobストレージへの接続文字列
            String storageConnectionString = "DefaultEndpointsProtocol=https;"
                    + "AccountName=" + storageAccountName
                    + ";" + "AccountKey=" + storageAccessKey + ";";
            // Blobサービスクライアントの生成
            BlobServiceClient blobServiceClient = new BlobServiceClientBuilder()
                    .connectionString(storageConnectionString).buildClient();
            // BlobサービスクライアントからSASを生成
            String sas = DemoStringUtil.getServiceSasUriForBlob(blobServiceClient);
            // BlobStorageからファイル(user_data.csv)を読み込む際のURLをreaderに設定
            String url = blobServiceClient.getAccountUrl() + "/"
                    + storageContainerName + "/user_data.csv"
                    + "?" + sas;
            reader.setResource(new UrlResource(url));
        } catch (MalformedURLException ex) {
            throw new RuntimeException(ex);
        }

        // ファイルを読み込む際の文字コード
        reader.setEncoding("UTF-8");
        // 1行目を読み飛ばす
        reader.setLinesToSkip(1);
        // ファイルから読み込んだデータをUserDataオブジェクトに格納
        reader.setLineMapper(new DefaultLineMapper<UserData>() {
            {
                setLineTokenizer(new DelimitedLineTokenizer() {
                    {
                        setNames(new String[] { "id", "name", "birth_year"
                                , "birth_month", "birth_day", "sex", "memo" });
                    }
                });
                setFieldSetMapper(new BeanWrapperFieldSetMapper<UserData>() {
                    {
                        setTargetType(UserData.class);
                    }
                });
            }
        });
        return reader;
    }

    /**
     * 読み込んだファイルのデータを、DBに書き込む.
     * @param dataSource データソース
     * @return 書き込みオブジェクト
     */
    @Bean
    public MyBatisBatchItemWriter<UserData> writer(DataSource dataSource) {
        return new MyBatisBatchItemWriterBuilder<UserData>()
                .sqlSessionFactory(sqlSessionFactory)
                .statementId("com.example.mybatis.UserDataMapper.upsert")
                .build();
    }

    /**
     * Spring Batchのジョブを並列実行するためのTaskExecutorを定義する.
     * @return TaskExecutorオブジェクト
     */
    @Bean
    public TaskExecutor taskExecutor() {
        return new SimpleAsyncTaskExecutor("step-thread");
    }

    /**
     * Spring Batchのジョブ内で指定する処理単位(ステップ)を定義する.
     * @param reader 読み込みオブジェクト
     * @param writer 書き込みオブジェクト
     * @param taskExecutor TaskExecutorオブジェクト
     * @return Spring Batchのジョブ内で指定する処理単位
     */
    @Bean
    public Step step(ItemReader<UserData> reader
            , ItemWriter<UserData> writer, TaskExecutor taskExecutor) {
        // 生成するステップ内で読み込み/加工/書き込みを一連の流れを指定する
        // その際のチャンクサイズ(=何件読み込む毎にコミットするか)を5に指定している
        // また、TaskExecutorによって並列実行できるようにし、
        // その際のスロットル制限(=並列可能なスレッド数)を8に指定している
        return stepBuilderFactory.get("step")
                .<UserData, UserData>chunk(5)
                .reader(reader)
                .processor(demoUpdateProcessor)
                .writer(writer)
                .taskExecutor(taskExecutor)
                .throttleLimit(8)
                .build();
    }

    /**
     * Spring Batchのジョブを定義する.
     * @param jobListener 実行前後の処理(リスナ)
     * @param step 実行するステップ
     * @return Spring Batchのジョブ
     */
    @Bean
    public Job updateUserData(DemoJobListener jobListener, Step step) {
        // 生成するジョブ内で、実行前後の処理(リスナ)と処理単位(ステップ)を指定する
        return jobBuilderFactory
                .get("updateUserData")
                .incrementer(new RunIdIncrementer())
                .listener(jobListener)
                .flow(step)
                .end()
                .build();
    }
}
その他、マルチスレッドの動作をログで確認するために、データ加工するクラスのprocessメソッドの先頭の方に、ログ出力する処理を追加している。
package com.example.batch;

import org.apache.commons.lang3.StringUtils;
import org.slf4j.Logger;
import org.slf4j.LoggerFactory;
import org.springframework.batch.item.ItemProcessor;
import org.springframework.stereotype.Component;

import com.example.mybatis.model.UserData;
import com.example.util.DemoStringUtil;

@Component
public class DemoUpdateProcessor implements ItemProcessor<UserData, UserData> {

    /* Spring Bootでログ出力するためのLogbackのクラスを生成 */
    private static final Logger LOGGER
        = LoggerFactory.getLogger(DemoUpdateProcessor.class);

    /**
     * 読み込んだデータの加工を行う.
     * ここでは、読み込んだデータのチェックを行い、
     * エラーがあればNULLを、エラーがなければ引数の値をそのまま返す.
     */
    @Override
    public UserData process(UserData item) throws Exception {
        String itemId = item.getId();
        LOGGER.info("読み込んだデータの加工を行います。ID=" + itemId);

        // 1列目が空またはNULLの場合はエラー
        if (StringUtils.isEmpty(itemId)) {
            LOGGER.info("1列目が空またはNULLです。");
            return null;
        }
        // 1列目が数値以外の場合はエラー
        if (!StringUtils.isNumeric(itemId)) {
            LOGGER.info("1列目が数値以外です。" + " 該当のid=" + itemId);
            return null;
        }
        // 1列目の桁数が不正な場合はエラー
        if (itemId.length() > 6) {
            LOGGER.info("1列目の桁数が不正です。" + " 該当のid=" + itemId);
            return null;
        }

        // 2列目が空またはNULLの場合はエラー
        if (StringUtils.isEmpty(item.getName())) {
            LOGGER.info("2列目が空またはNULLです。" + " 該当のid=" + itemId);
            return null;
        }
        // 2列目の桁数が不正な場合はエラー
        if (item.getName().length() > 40) {
            LOGGER.info("2列目の桁数が不正です。" + " 該当のid=" + itemId);
            return null;
        }

        // 3列目が空またはNULLの場合はエラー
        if (StringUtils.isEmpty(item.getBirth_year())) {
            LOGGER.info("3列目が空またはNULLです。" + " 該当のid=" + itemId);
            return null;
        }
        // 3列目が数値以外の場合はエラー
        if (!StringUtils.isNumeric(item.getBirth_year())) {
            LOGGER.info("3列目が数値以外です。" + " 該当のid=" + itemId);
            return null;
        }
        // 3列目の桁数が不正な場合はエラー
        if (item.getBirth_year().length() > 4) {
            LOGGER.info("3列目の桁数が不正です。" + " 該当のid=" + itemId);
            return null;
        }

        // 4列目が空またはNULLの場合はエラー
        if (StringUtils.isEmpty(item.getBirth_month())) {
            LOGGER.info("4列目が空またはNULLです。" + " 該当のid=" + itemId);
            return null;
        }
        // 4列目が数値以外の場合はエラー
        if (!StringUtils.isNumeric(item.getBirth_month())) {
            LOGGER.info("4列目が数値以外です。" + " 該当のid=" + itemId);
            return null;
        }
        // 4列目の桁数が不正な場合はエラー
        if (item.getBirth_month().length() > 4) {
            LOGGER.info("4列目の桁数が不正です。" + " 該当のid=" + itemId);
            return null;
        }

        // 5列目が空またはNULLの場合はエラー
        if (StringUtils.isEmpty(item.getBirth_day())) {
            LOGGER.info("5列目が空またはNULLです。" + " 該当のid=" + itemId);
            return null;
        }
        // 5列目が数値以外の場合はエラー
        if (!StringUtils.isNumeric(item.getBirth_day())) {
            LOGGER.info("5列目が数値以外です。"+ " 該当のid=" + itemId);
            return null;
        }
        // 5列目の桁数が不正な場合はエラー
        if (item.getBirth_day().length() > 2) {
            LOGGER.info(" 5列目の桁数が不正です。"+ " 該当のid=" + itemId);
            return null;
        }

        // 3列目・4列目・5列目から生成される日付が不正であればエラー
        String birthDay = item.getBirth_year()
                + DemoStringUtil.addZero(item.getBirth_month())
                + DemoStringUtil.addZero(item.getBirth_day());
        if (!DemoStringUtil.isCorrectDate(birthDay, "uuuuMMdd")) {
            LOGGER.info("3~5列目の日付が不正です。"+ " 該当のid=" + itemId);
            return null;
        }

        // 6列目が1,2以外の場合はエラー
        if (!("1".equals(item.getSex())) && !("2".equals(item.getSex()))) {
            LOGGER.info("6列目の性別が不正です。"+ " 該当のid=" + itemId);
            return null;
        }

        // 7列目の桁数が不正な場合はエラー
        if (!StringUtils.isEmpty(item.getMemo()) && item.getMemo().length() > 1024) {
            LOGGER.info("7列目の桁数が不正です。"+ " 該当のid=" + itemId);
            return null;
        }

        return item;
    }

}
また、CSV取込に一定時間かかった場合も動作検証できるよう、10分毎にTimerTriggerイベントが発生するよう修正している。
package com.example;

import org.springframework.cloud.function.adapter.azure.FunctionInvoker;

import com.example.model.TimerTriggerParam;
import com.example.model.TimerTriggerResult;
import com.microsoft.azure.functions.ExecutionContext;
import com.microsoft.azure.functions.annotation.FunctionName;
import com.microsoft.azure.functions.annotation.TimerTrigger;

public class TimerTriggerTestHandler
    extends FunctionInvoker<TimerTriggerParam, TimerTriggerResult>{

    /**
     * TimerTriggerによって、DemoAzureFunctionクラスのtimerTriggerTestメソッドを呼び出す.
     * @param timerInfo TimerTriggerイベント情報
     * @param context コンテキストオブジェクト
     */
    // 「schedule = "0 */10 * * * *"」で、10分毎にTimerTriggerイベントが発生するようになっている
    @FunctionName("timerTriggerTest")
    public void timerTriggerTest(@TimerTrigger(name = "timerTriggerTest"
          , schedule = "0 */10 * * * *") String timerInfo,
            ExecutionContext context) {
        context.getLogger().info(
            "TimerTriggerTestHandler timerTriggerTest triggered: " + timerInfo);

        TimerTriggerParam param = new TimerTriggerParam();
        param.setTimerInfo(timerInfo);

        handleRequest(param, context);
    }

}
その他のソースコード内容は、以下のサイトを参照のこと。
https://github.com/purin-it/azure/tree/master/azure-functions-chunk-multi-thread/demoAzureFunc
サンプルプログラムの実行結果
サンプルプログラムの実行結果は、以下の通り。
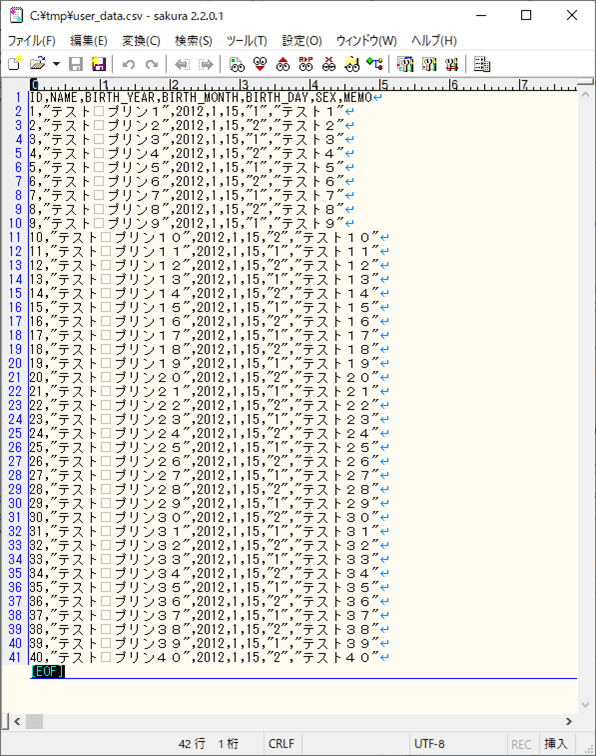
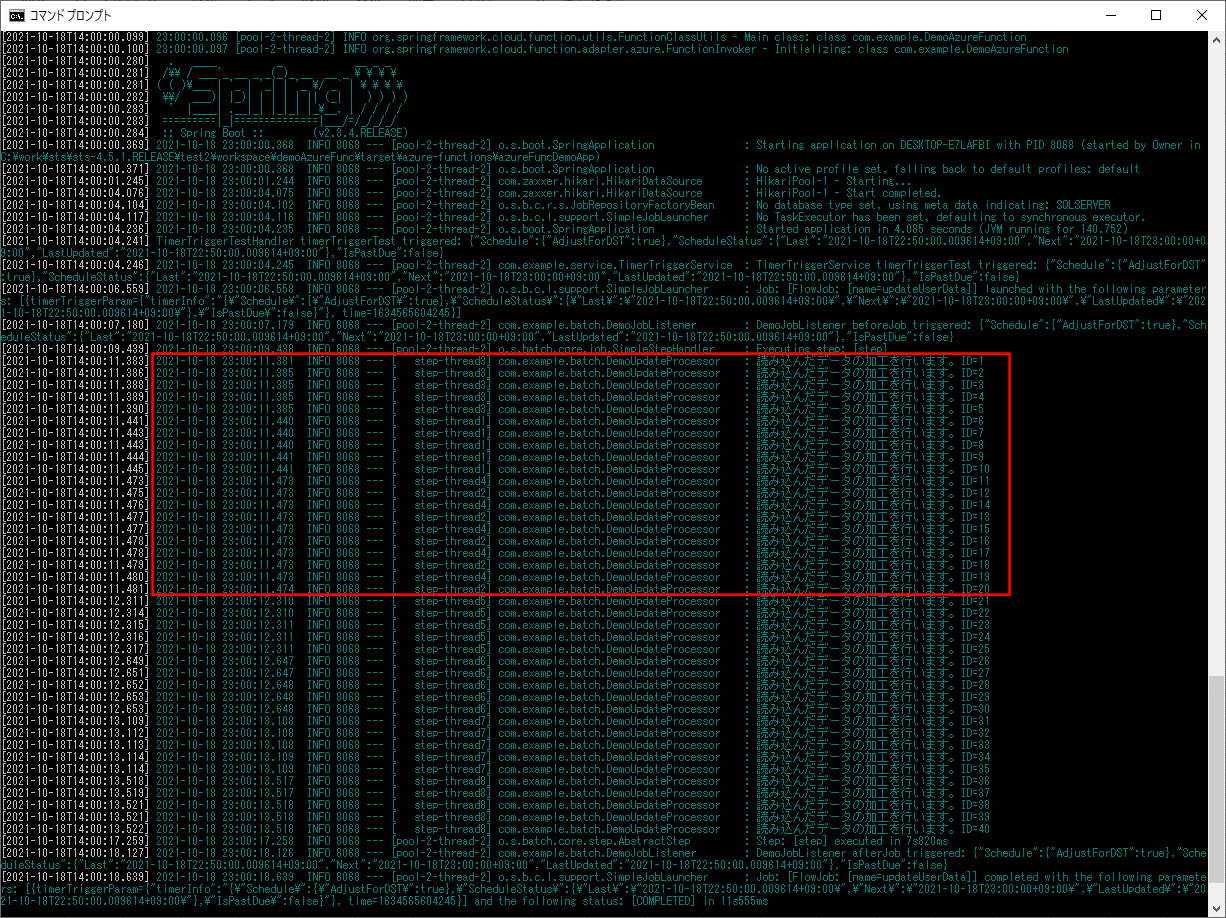
1) 以下のデータ数=40件のデータを取り込んだ場合のログ出力内容を確認する。
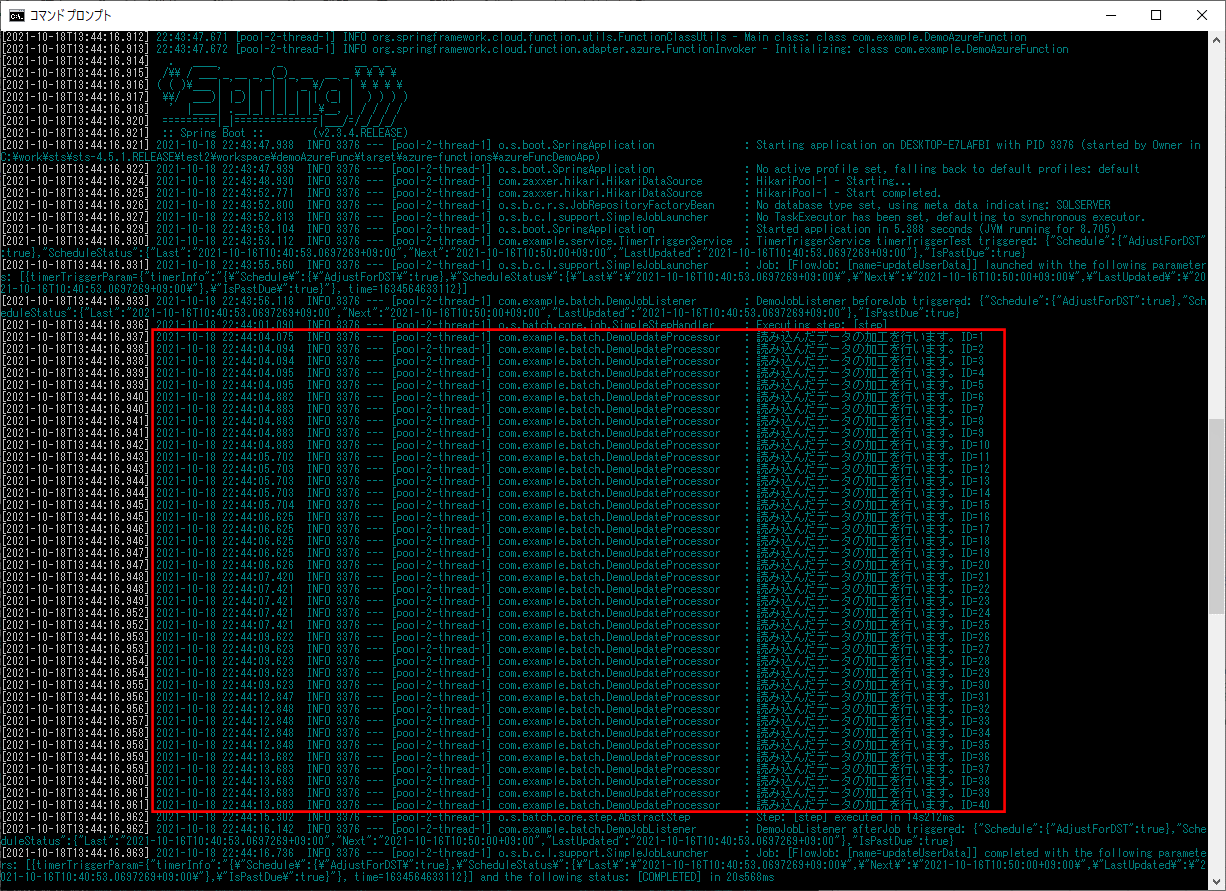
1-1) 以下のように、DemoChunkConfig.javaのTaskExecutorに関する記述をコメントアウトした場合

ログ出力結果は以下の通りで、赤枠部分で、1スレッドのみ起動していることが確認できる。
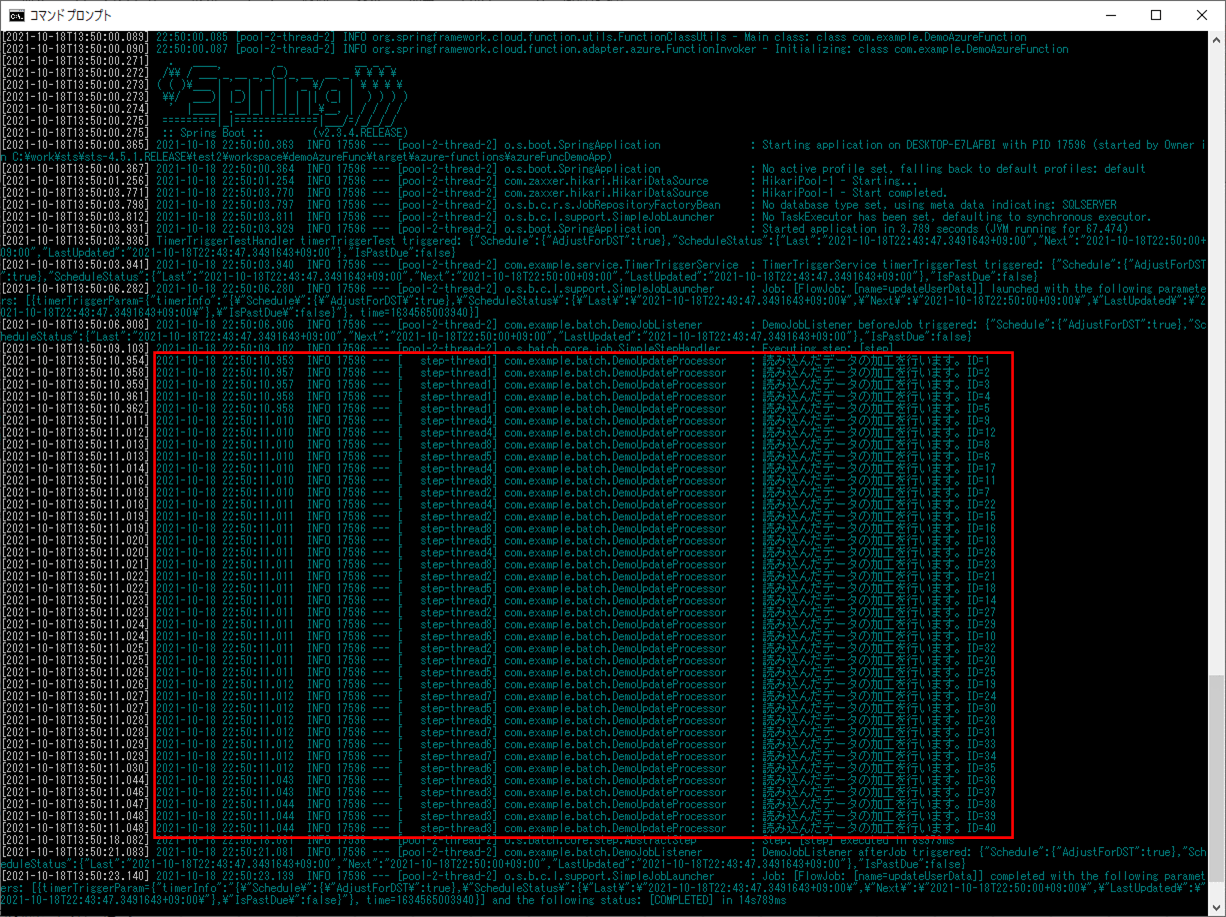
1-2) 以下のように、DemoChunkConfig.javaのTaskExecutorに関する記述のコメントアウトを全て外した場合

ログ出力結果は以下の通りで、赤枠部分で、8スレッドが起動していることが確認できる。
1-3) 以下のように、DemoChunkConfig.javaのTaskExecutorの記述を残し、throttleLimit(スロットル制限)の記述をコメントアウトした場合
ログ出力結果は以下の通りで、赤枠部分で、4スレッドが最初に起動していることが確認できる。
なお、throttleLimit(スロットル制限)を指定しなかった場合のデフォルト値が4であることについては、以下のサイトを参照のこと。
https://spring.pleiades.io/spring-batch/docs/current/reference/html/scalability.html#multithreadedStep
2) 以下のデータ数=1000件のデータを取り込んだ場合のログ出力内容を確認する。
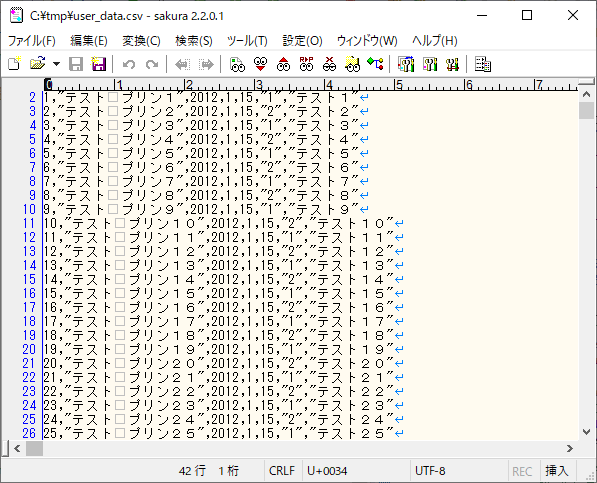
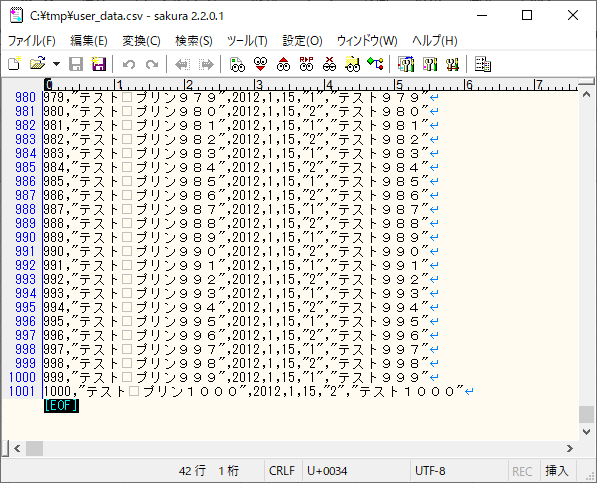
なお、1000件のデータは、以下の記事のプログラムを利用して作成している。

また、データ加工を行うDemoUpdateProcessor.javaのprocessメソッドの先頭のログ出力処理をコメントアウトして確認するものとする。
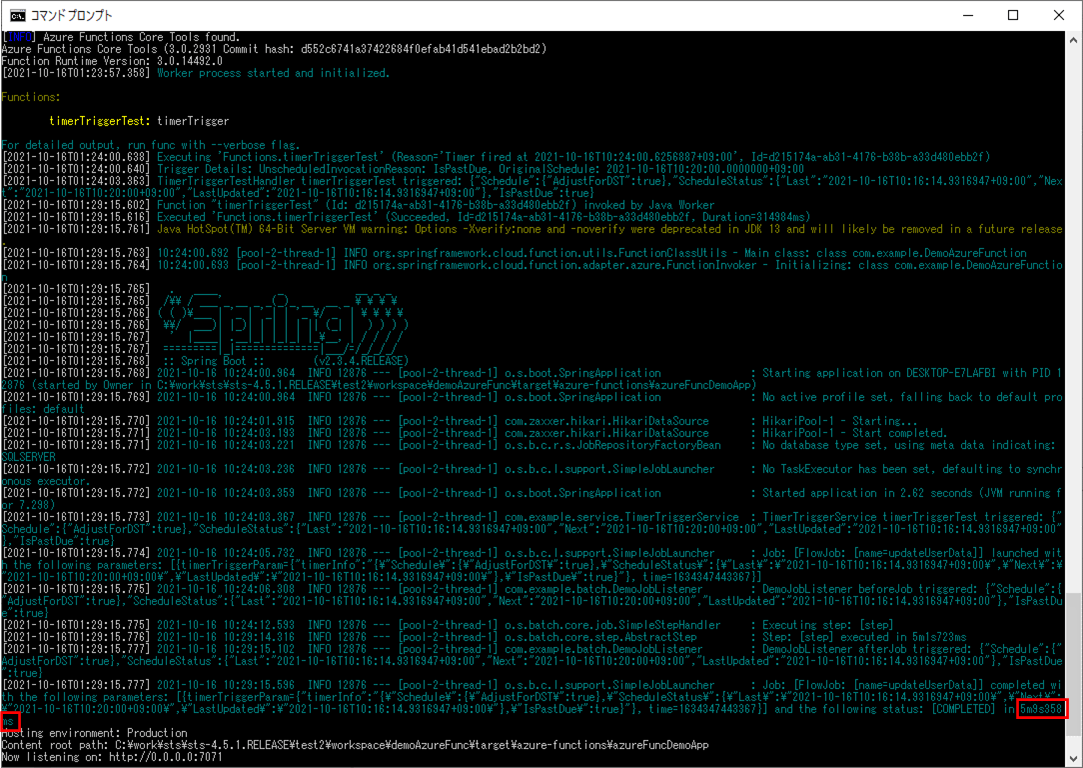
2-1) 以下のように、DemoChunkConfig.javaのTaskExecutorに関する記述をコメントアウトした場合
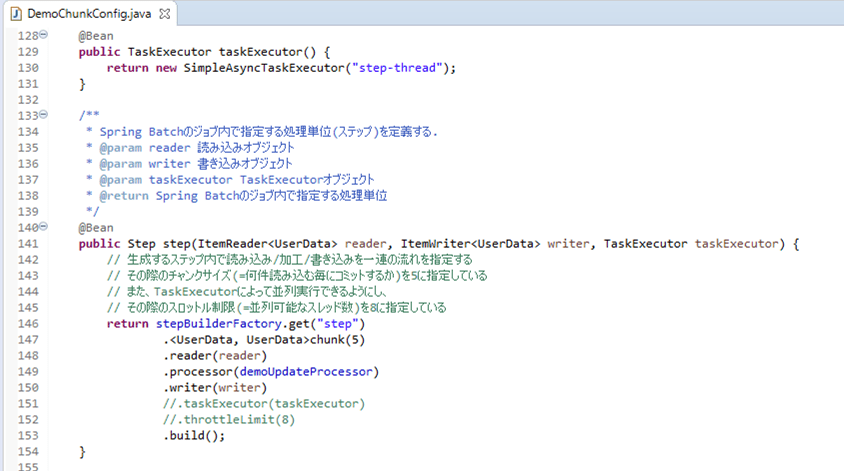
ログ出力結果は以下の通りで、赤枠部分で実行時間が5分9秒358ミリ秒であることが確認できる。
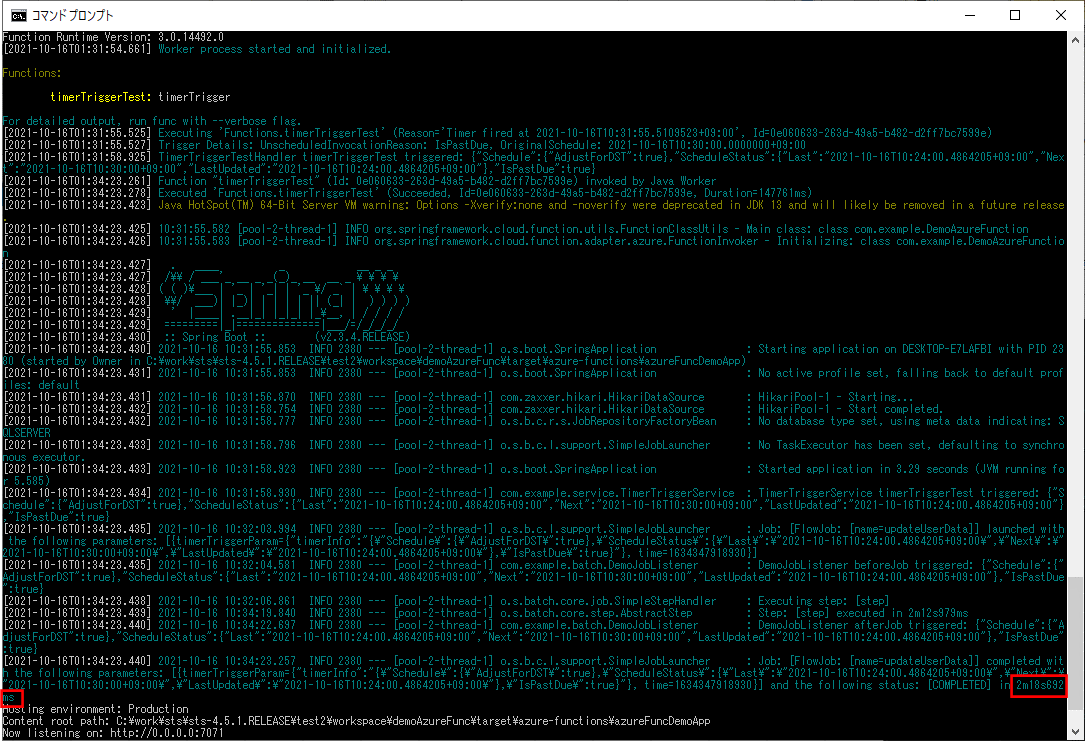
2-2) 以下のように、DemoChunkConfig.javaのTaskExecutorに関する記述のコメントアウトを全て外した場合
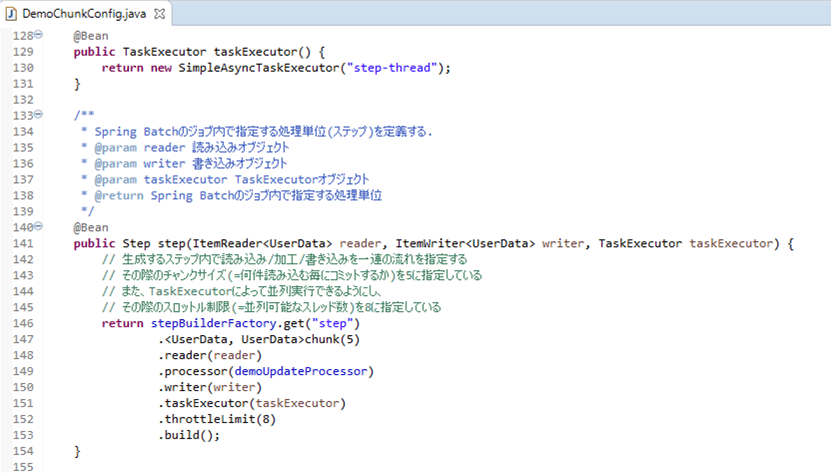
ログ出力結果は以下の通りで、赤枠部分で実行時間が2分18秒692ミリ秒で、TaskExecutorを使わなかった場合より早く処理が終わることが確認できる。
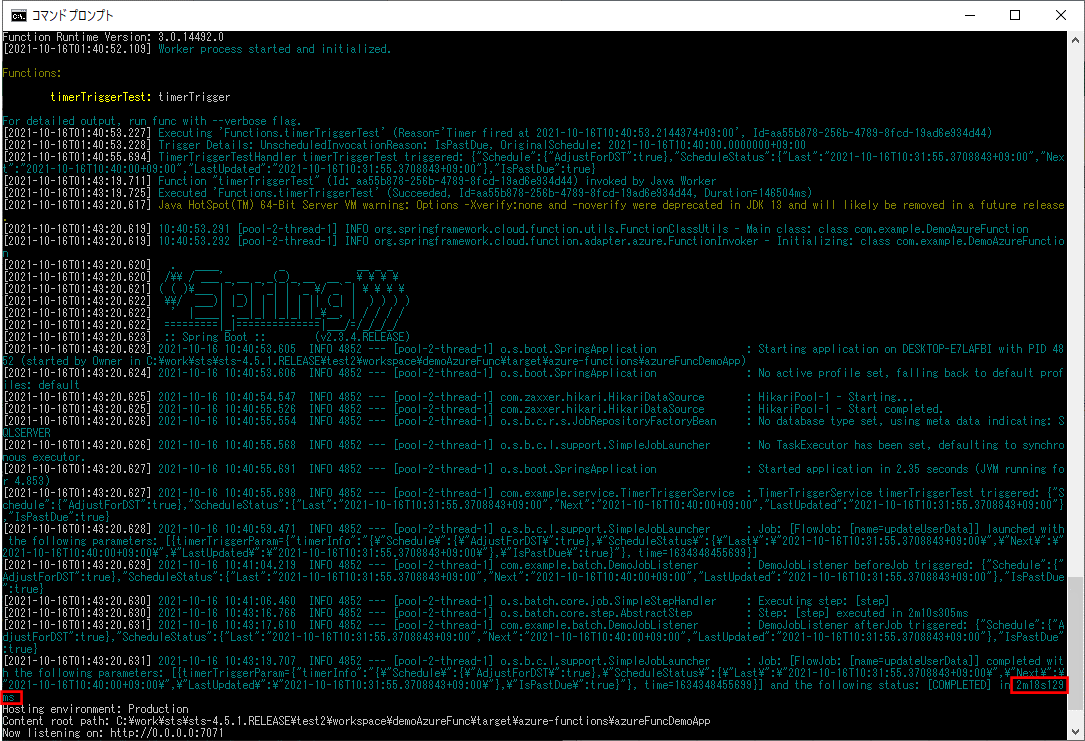
2-3) 以下のように、DemoChunkConfig.javaのTaskExecutorの記述を残し、throttleLimit(スロットル制限)の記述をコメントアウトした場合
ログ出力結果は以下の通りで、赤枠部分で実行時間が2分18秒129ミリ秒で、こちらも、TaskExecutorを使わなかった場合より早く処理が終わることが確認できる。
要点まとめ
- Spring BatchのChunkモデルを利用したプログラムにおいては、TaskExecutorを利用することで、処理単位(ステップ)をマルチスレッドで動作させることができるため、処理時間が短くなる。