異なるドメインをもつ複数のAzure App Service間でデータ共有してみた
セッションデータをAzure Cache for Redisに格納するJavaアプリケーションを、複数のAzure App Serviceそれぞれに配置し、複数のAzure App Serviceが異なるドメインをもつ場合、セッションデータを互いに共有することはできない。
今回は、Spring Bootを利用したJavaアプリケーションを、異なるドメインをもつ複数のAzure App Serviceに配置し、互いにデータ共有してみたので、そのサンプルプログラムを共有する。
前提条件
以下の記事のAzure Cache for Redisの作成が完了していること。

また、以下の記事の手順で、Azure App Serviceを2つ作成し、Spring Bootを利用したJavaアプリケーションのデプロイが完了していること。


作成したサンプルプログラムの内容
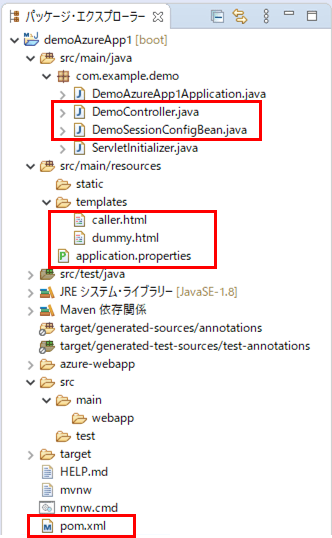
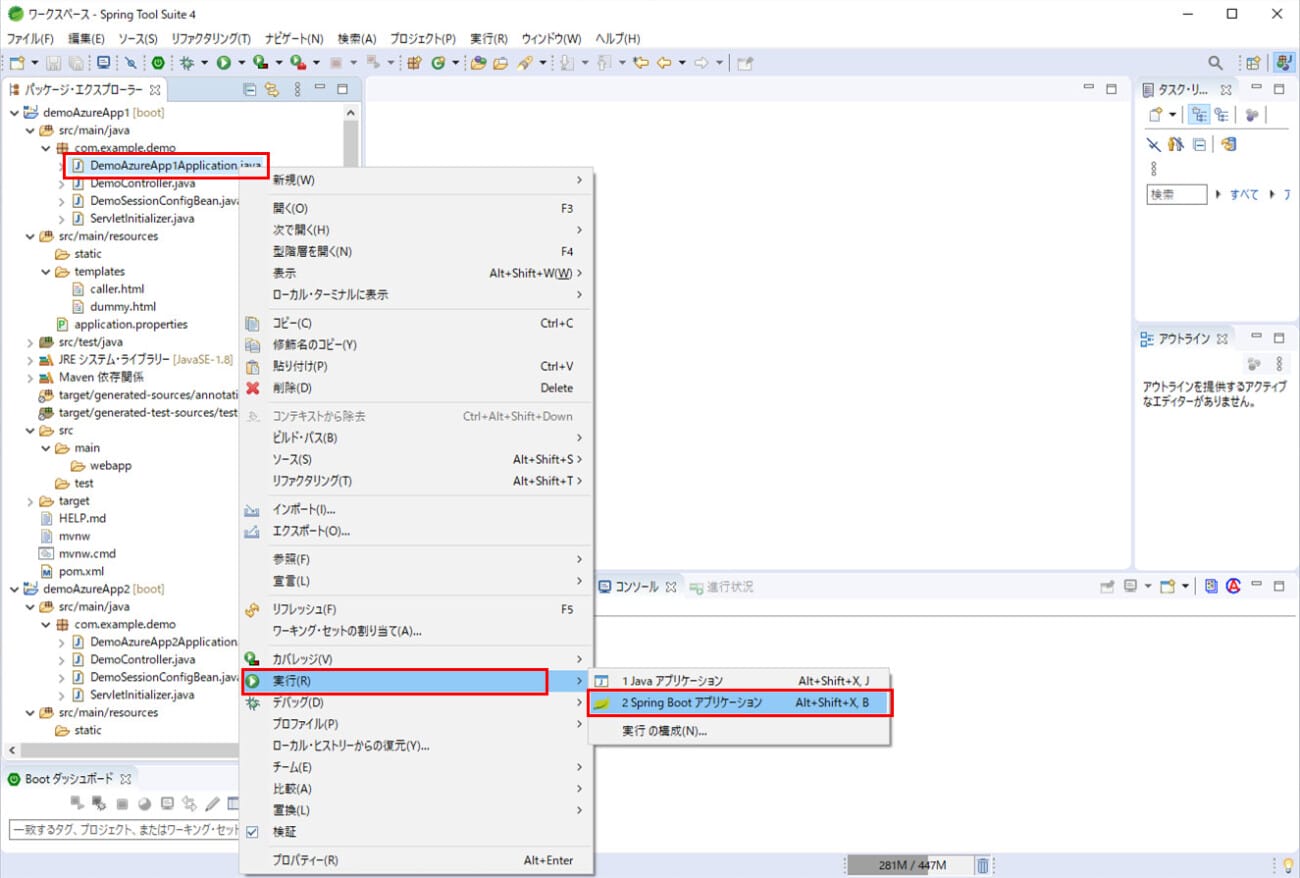
作成したサンプルプログラム(呼び出し元のApp Service)の構成は、以下の通り。なお、下記の赤枠のプログラムについては、後述する。
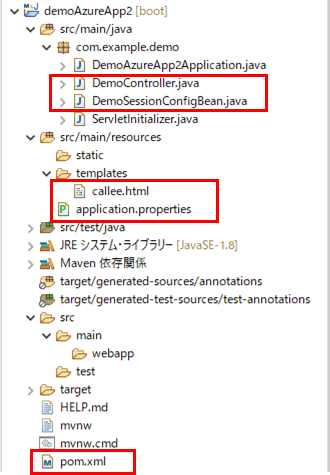
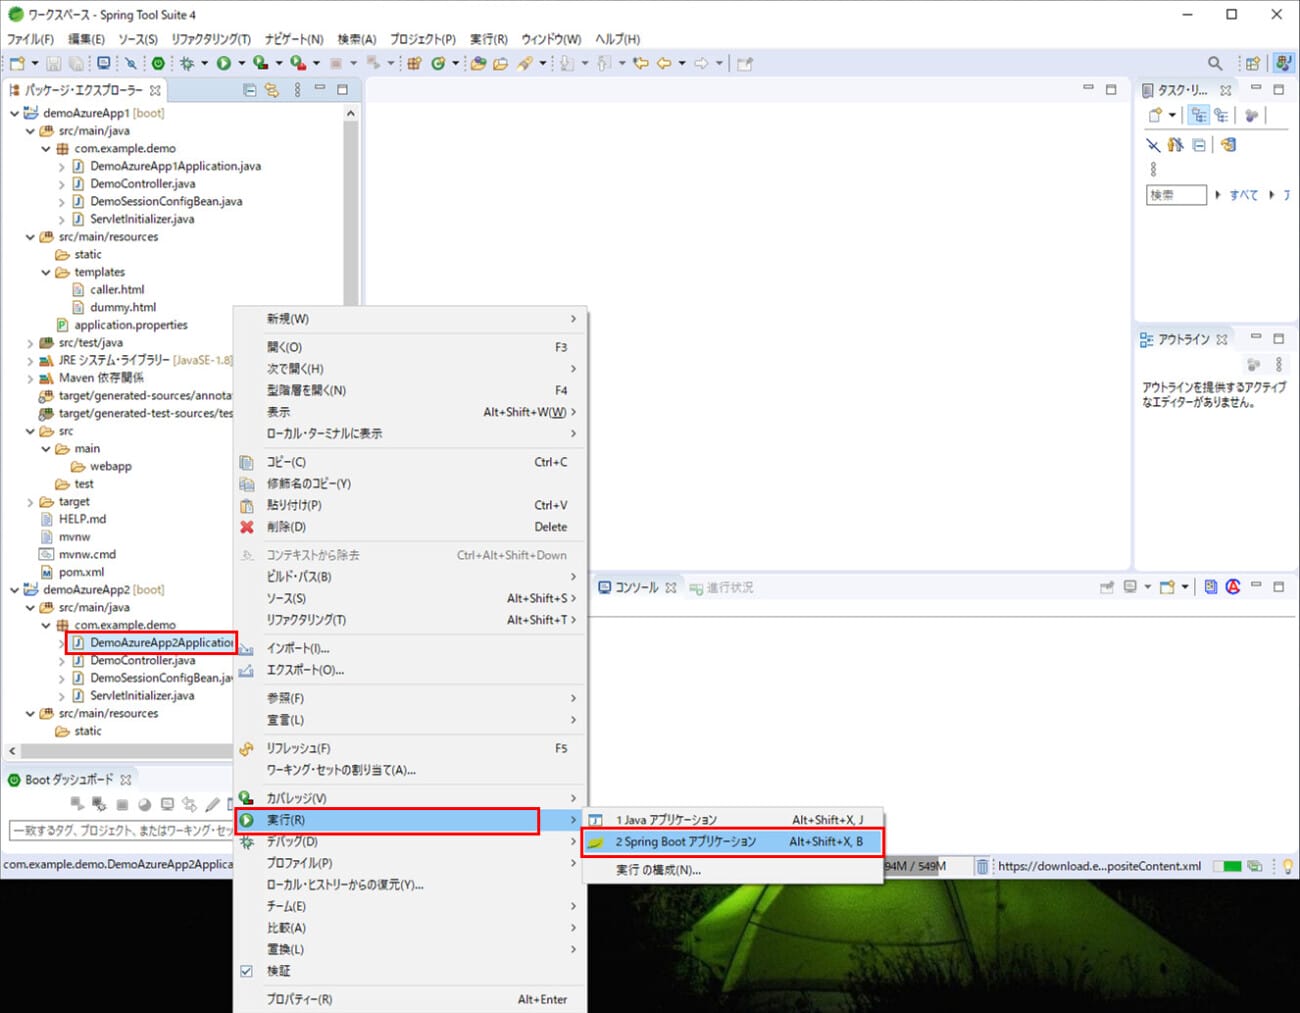
また、作成したサンプルプログラム(呼び出し先のApp Service)の構成は、以下の通り。なお、下記の赤枠のプログラムについては、後述する。
呼出元・呼出先のpom.xmlの内容は以下の通りで、Azure Cache for Redisを利用するためのライブラリを追加している。
<?xml version="1.0" encoding="UTF-8"?>

<project xmlns="http://maven.apache.org/POM/4.0.0" xmlns:xsi="http://www.w3.org/2001/XMLSchema-instance" xsi:schemaLocation="http://maven.apache.org/POM/4.0.0 https://maven.apache.org/xsd/maven-4.0.0.xsd">
  <modelVersion>4.0.0</modelVersion>
  <parent>
    <groupId>org.springframework.boot</groupId>
    <artifactId>spring-boot-starter-parent</artifactId>
    <version>2.4.0</version>
    <relativePath/>
    <!-- lookup parent from repository -->
  </parent>
  <groupId>com.example</groupId>
  <artifactId>demoAzureApp</artifactId>
  <version>0.0.1-SNAPSHOT</version>
  <packaging>war</packaging>
  <name>demoAzureApp</name>
  <description>Demo project for Spring Boot</description>
  <properties>
    <java.version>1.8</java.version>
  </properties>
  <dependencies>
    <dependency>
      <groupId>org.springframework.boot</groupId>
      <artifactId>spring-boot-starter-thymeleaf</artifactId>
    </dependency>
    <dependency>
      <groupId>org.springframework.boot</groupId>
      <artifactId>spring-boot-starter-web</artifactId>
    </dependency>
    <!-- Spring Session Redisの設定 -->
    <dependency>
      <groupId>org.springframework.session</groupId>
      <artifactId>spring-session-data-redis</artifactId>
    </dependency>
    <!-- Redisストア(Lettuce)アダプタの設定 -->
    <dependency>
      <groupId>io.lettuce</groupId>
      <artifactId>lettuce-core</artifactId>
    </dependency>
    <dependency>
      <groupId>org.springframework.boot</groupId>
      <artifactId>spring-boot-starter-tomcat</artifactId>
      <scope>provided</scope>
    </dependency>
    <dependency>
      <groupId>org.springframework.boot</groupId>
      <artifactId>spring-boot-starter-test</artifactId>
      <scope>test</scope>
    </dependency>
  </dependencies>
  <build>
    <plugins>
      <plugin>
        <groupId>org.springframework.boot</groupId>
        <artifactId>spring-boot-maven-plugin</artifactId>
      </plugin>
      <plugin>
        <groupId>com.microsoft.azure</groupId>
        <artifactId>azure-webapp-maven-plugin</artifactId>
        <version>1.12.0</version>
        <configuration>
          <schemaVersion>v2</schemaVersion>
          <subscriptionId>(ログインユーザーのサブスクリプションID)</subscriptionId>
          <resourceGroup>azureAppDemo</resourceGroup>
          <appName>(Azure App Serviceの名前)</appName>
          <pricingTier>B1</pricingTier>
          <region>japaneast</region>
          <appServicePlanName>ASP-azureAppDemo-8679</appServicePlanName>
          <appServicePlanResourceGroup>azureAppDemo</appServicePlanResourceGroup>
          <runtime>
            <os>Linux</os>
            <javaVersion>Java 8</javaVersion>
            <webContainer>Tomcat 8.5</webContainer>
          </runtime>
          <deployment>
            <resources>
              <resource>
                <directory>${project.basedir}/target</directory>
                <includes>
                  <include>*.war</include>
                </includes>
              </resource>
            </resources>
          </deployment>
        </configuration>
      </plugin>
    </plugins>
  </build>
</project>
また、呼出元・呼出先のapplication.propertiesの内容は以下の通りで、ローカル環境で動かす際のポート番号・呼出先画面のURL・Azure Cache for Redisの接続先設定を追加している。
server.port = 8084

# 呼出先画面のURL
demoAzureApp2.urlBase = http://localhost:8085/
#demoAzureApp2.urlBase = https://azureappdemoservice2.azurewebsites.net/

# Spring Sessionに関する設定
spring.session.store-type=redis
spring.redis.ssl=true

spring.redis.host=azurePurinRedis.redis.cache.windows.net
spring.redis.port=6380
spring.redis.password=(Azure Cache for Redisのパスワード)
server.port = 8085

# Spring Sessionに関する設定
spring.session.store-type=redis
spring.redis.ssl=true

spring.redis.host=azurePurinRedis.redis.cache.windows.net
spring.redis.port=6380
spring.redis.password=(Azure Cache for Redisのパスワード)
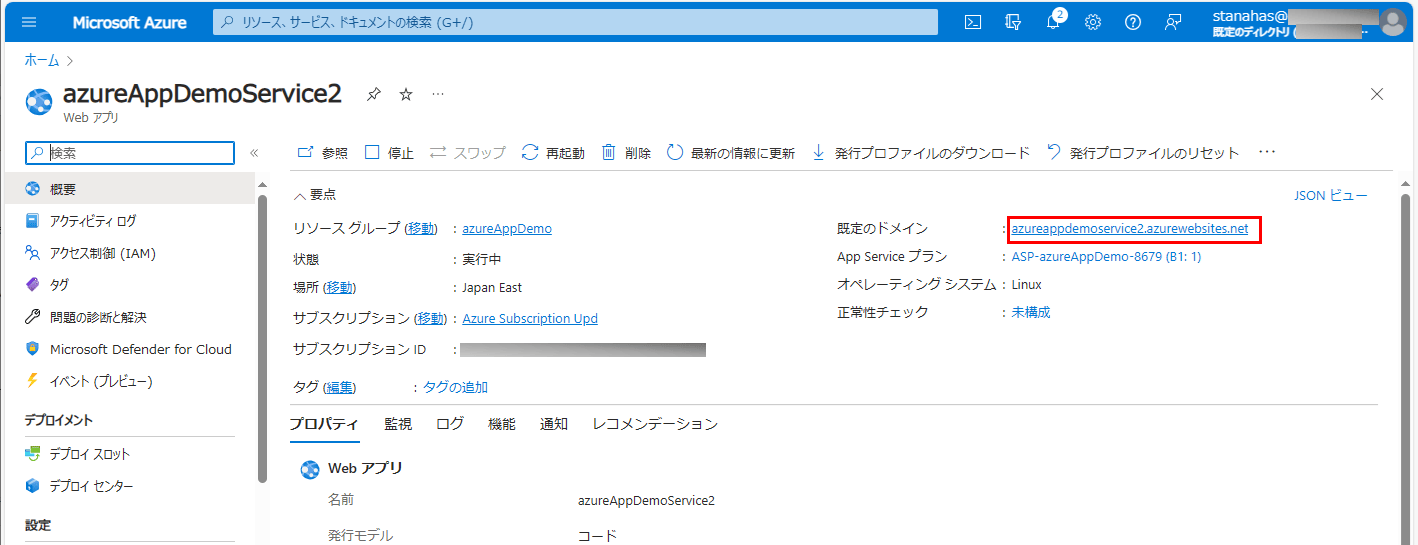
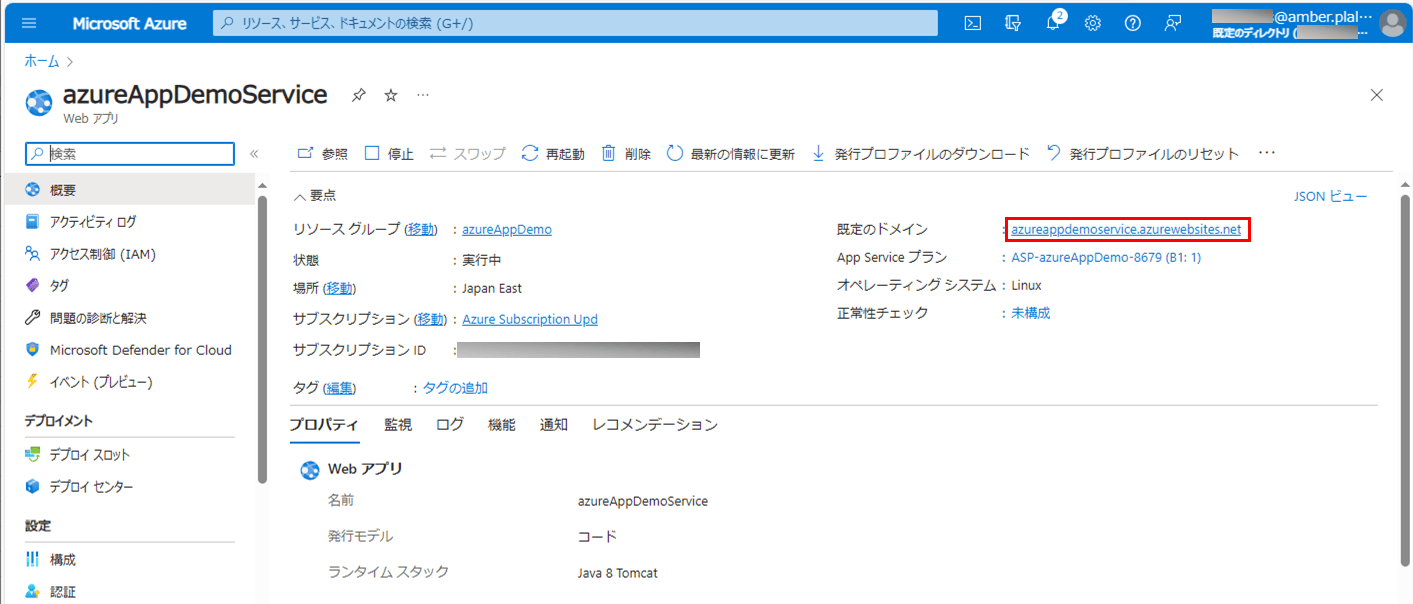
なお、Azure環境上での呼出先画面のURLは、以下のAzure Portal上の既定のドメインから確認できる。
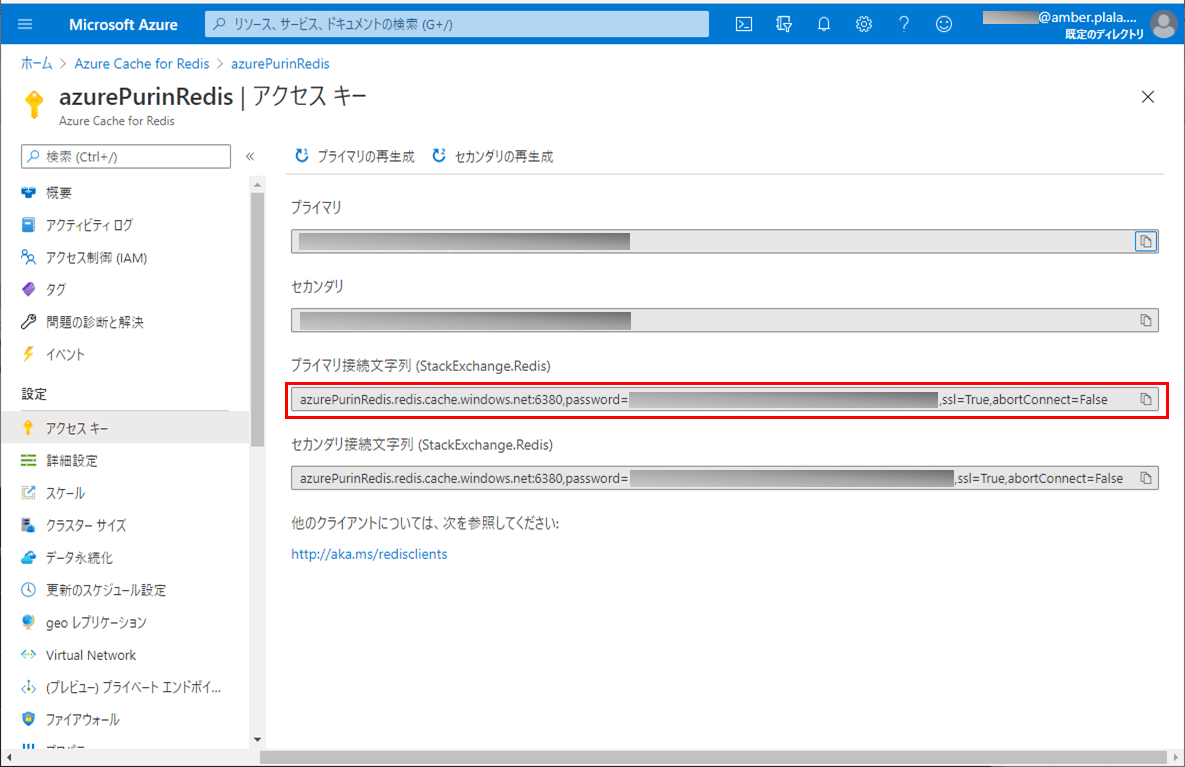
また、Azure Cache for Redisの接続先は、以下のAzure Portal上のプライマリ接続文字列から確認できる。
さらに、呼出元・呼出先のセッション設定を行うクラスは以下の通りで、Azure Cache for Redisを利用するための設定を行っている。
package com.example.demo;

import org.springframework.beans.factory.annotation.Value;
import org.springframework.context.annotation.Bean;
import org.springframework.context.annotation.Configuration;
import org.springframework.data.redis.connection.RedisStandaloneConfiguration;
import org.springframework.data.redis.connection.lettuce.LettuceClientConfiguration;
import org.springframework.data.redis.connection.lettuce.LettuceConnectionFactory;
import org.springframework.data.redis.serializer.GenericJackson2JsonRedisSerializer;
import org.springframework.data.redis.serializer.RedisSerializer;
import org.springframework.session.data.redis.config.ConfigureRedisAction;
import org.springframework.session.data.redis.config.annotation.web.http.EnableRedisHttpSession;
import org.springframework.session.web.context.AbstractHttpSessionApplicationInitializer;

@Configuration
@EnableRedisHttpSession
public class DemoSessionConfigBean extends AbstractHttpSessionApplicationInitializer {

  /** Azure上のRedisサーバーのホスト名 */
  @Value("${spring.redis.host}")
  private String redisHostName;

  /** Azure上のRedisサーバーのポート番号 */
  @Value("${spring.redis.port}")
  private String redisPort;

  /** Azure上のRedisサーバーのパスワード */
  @Value("${spring.redis.password}")
  private String redisPassword;

  /**
   * Redisへの値の書き込み・読み込み手段を提供するシリアライザを生成する
   * @return Redisへの値の書き込み・読み込み手段を提供するシリアライザ
   */
  @Bean
    public RedisSerializer<Object> springSessionDefaultRedisSerializer() {
        return new GenericJackson2JsonRedisSerializer();
    }

  /**
   * Spring SessionがAzure上のRedisのCONFIGを実行しないようにする
   * @return Spring SessionがAzure上のRedisのCONFIGを実行しない設定
   */
    @Bean
    public static ConfigureRedisAction configureRedisAction() {
        return ConfigureRedisAction.NO_OP;
    }

    /**
     * Redisへの接続方法を生成する
     * @return Redisへの接続方法
     */
    @Bean
    public LettuceConnectionFactory connectionFactory() {
        RedisStandaloneConfiguration redisStandaloneConfiguration
            = new RedisStandaloneConfiguration();
        redisStandaloneConfiguration.setHostName(redisHostName);
        redisStandaloneConfiguration.setPassword(redisPassword);
        redisStandaloneConfiguration.setPort(Integer.parseInt(redisPort));
        LettuceClientConfiguration lettuceClientConfiguration
            = LettuceClientConfiguration.builder().useSsl().build();
        return new LettuceConnectionFactory(
           redisStandaloneConfiguration, lettuceClientConfiguration);
    }
}
また、呼出元のコントローラクラス・HTMLファイルの内容は以下の通りで、呼出元画面の表示処理と、呼出元画面から呼出先画面を開く処理を追加している。
<!DOCTYPE html>
<html lang="ja" xmlns:th="http://www.thymeleaf.org">
<head>
  <meta charset="UTF-8">
  <title>呼出元画面</title>
  <script>
    function openWin(formName){
      let form = document.forms[formName];
      if(!form){
        alert('指定したフォームが取得できませんでした');
        return;
      }
      let win = window.open('about:blank', formName);
      form.target = formName;
      form.submit();
      win.focus();
    }
  </script>
</head>
<body>
  <p>これは呼出元画面です。</p>
  <form th:action="@{/showCallee}" method="POST" name="formPost">
         呼出先画面に渡す値: <input type="text" name="addSession" th:value="${data}" />
    <input type="button" value="呼出先画面を表示" onclick="openWin('formPost');" />
  </form>
</body>
</html>
package com.example.demo;
import javax.servlet.http.HttpSession;
import org.springframework.beans.factory.annotation.Value;
import org.springframework.stereotype.Controller;
import org.springframework.ui.Model;
import org.springframework.web.bind.annotation.GetMapping;
import org.springframework.web.bind.annotation.PostMapping;
import org.springframework.web.bind.annotation.RequestParam;
@Controller
public class DemoController {
/** application.propertiesからdemoAzureFunc.urlBaseの値を取得 */
@Value("${demoAzureApp2.urlBase}")
private String demoAzureApp2Base;
/**
* 呼出元画面を表示する.
* @return 呼出元画面
*/
@GetMapping("/")
public String index() {
return "caller";
}
/**
* 引数dataの値をセッションに格納し、呼出先画面を開くためのダミー画面に遷移
* @param data テキストのデータ
* @param model Modelオブジェクト
* @param session Httpセッション
* @return ダミー画面
*/
@PostMapping("/showCallee")
public String showCallee(@RequestParam("addSession")String data
, Model model, HttpSession session) {
// セッションへの格納処理
session.setAttribute("addSession", data);
// 呼出先(calleeUrl),次画面に渡すパラメータ(addParam)を設定し、ダミー画面に遷移
model.addAttribute("calleeUrl", demoAzureApp2Base);
model.addAttribute("addParam", data);
return "dummy";
}
}<!DOCTYPE html>
<html lang="ja" xmlns:th="http://www.thymeleaf.org">
<head>
<meta charset="UTF-8">
<title>ダミー画面</title>
<script th:inline="javascript">
window.addEventListener("load", function() {
// DemoControllerクラスのshowCalleeメソッド内で設定したcalleeUrl,addParamの値を取得
const calleeUrl = /*[[${calleeUrl}]]*/"calleeUrl";
const addParam = /*[[${addParam}]]*/"addParam";
// demoAzureApp2プロジェクトの初期表示画面に遷移
window.location.href = calleeUrl + "?addParam=" + addParam;
});
</script>
</head>
<body>
<p>これはダミー画面です。次画面に遷移中です。</p>
</body>
</html>さらに、呼出先のコントローラクラス・HTMLファイルの内容は以下の通りで、呼出先画面を表示する処理を追加している。
package com.example.demo;

import javax.servlet.http.HttpSession;

import org.springframework.stereotype.Controller;
import org.springframework.ui.Model;
import org.springframework.web.bind.annotation.GetMapping;
import org.springframework.web.bind.annotation.RequestParam;

@Controller
public class DemoController {

  /**
   * 呼出先画面を表示する.
   * @param model Modelオブジェクト
   * @param session Httpセッション
   * @return 呼出先画面
   */
  @GetMapping("/")
  public String index(@RequestParam("addParam")String paramData
      , Model model, HttpSession session) {
    // セッションからのデータを取得
    String sessionData = (String)session.getAttribute("addSession");

    // セッションからのデータを取得とリクエストパラメータの値を、画面に表示
    model.addAttribute("sessionData", sessionData);
    model.addAttribute("paramData", paramData);
    return "callee";
  }

}
<!DOCTYPE html>
<html lang="ja" xmlns:th="http://www.thymeleaf.org">
<head>
<meta charset="UTF-8">
<title>呼出先画面</title>
</head>
<body>
<p>これは呼出先画面です。呼出元画面から渡された値は以下です。</p>
セッションで取得した値→『<span th:text="${sessionData}">ここに設定</span>』<br/>
リクエストパラメータから取得した値→『<span th:text="${paramData}">ここに設定</span>』<br/>
</body>
</html>その他のソースコード内容は、以下のサイトを参照のこと。
https://github.com/purin-it/azure/tree/master/azure-multi-app-service/demoAzureApp1
https://github.com/purin-it/azure/tree/master/azure-multi-app-service/demoAzureApp2

サンプルプログラムの実行結果(ローカル環境)
ローカル環境でサンプルプログラムの実行した結果は、以下の通り。
1) 呼出元・呼出先のapplication.propertiesの設定を、ローカル環境用に変更する。
server.port = 8084

# 呼出先画面のURL
demoAzureApp2.urlBase = http://localhost:8085/
#demoAzureApp2.urlBase = https://azureappdemoservice2.azurewebsites.net/

# Spring Sessionに関する設定
spring.session.store-type=redis
spring.redis.ssl=true

spring.redis.host=azurePurinRedis.redis.cache.windows.net
spring.redis.port=6380
spring.redis.password=(Azure Cache for Redisのパスワード)
server.port = 8085

# Spring Sessionに関する設定
spring.session.store-type=redis
spring.redis.ssl=true

spring.redis.host=azurePurinRedis.redis.cache.windows.net
spring.redis.port=6380
spring.redis.password=(Azure Cache for Redisのパスワード)
2) 呼出元・呼出先のSpring Bootアプリケーションをそれぞれ起動する。
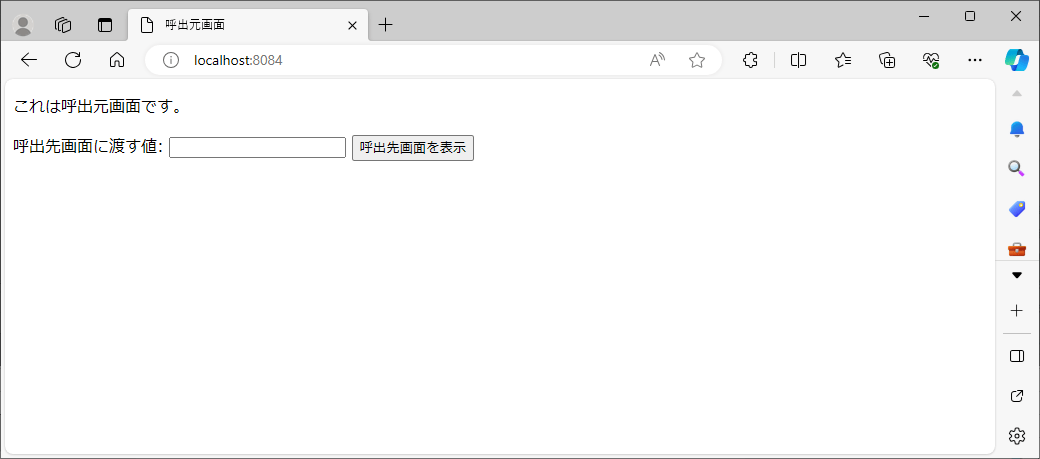
3)「http://localhost:(呼出元画面のポート番号)/」とアクセスすると、以下のように、呼出元画面が表示されることが確認できる。
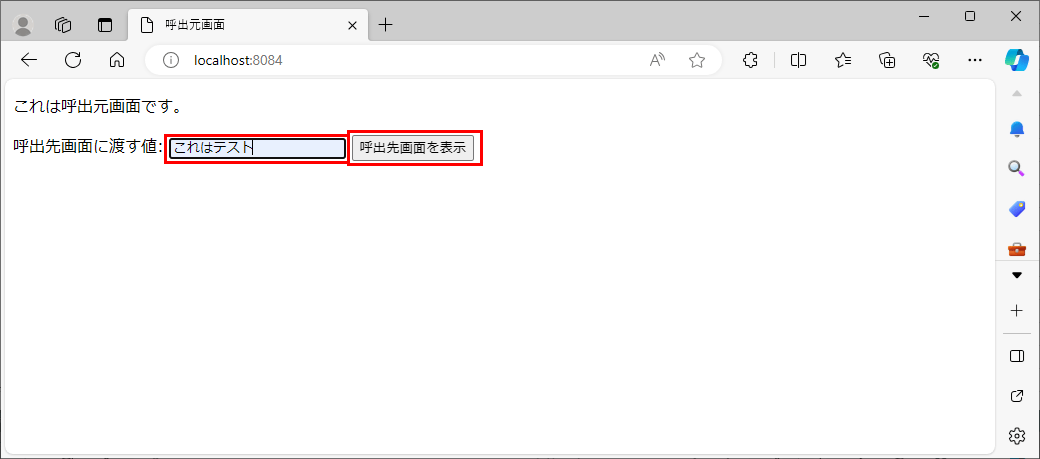
4) 呼出先画面に渡す値を指定し「呼出先画面を表示」ボタンを押下すると、以下のように、呼出先画面が表示され、呼出先画面に渡す値が表示されることが確認できる。
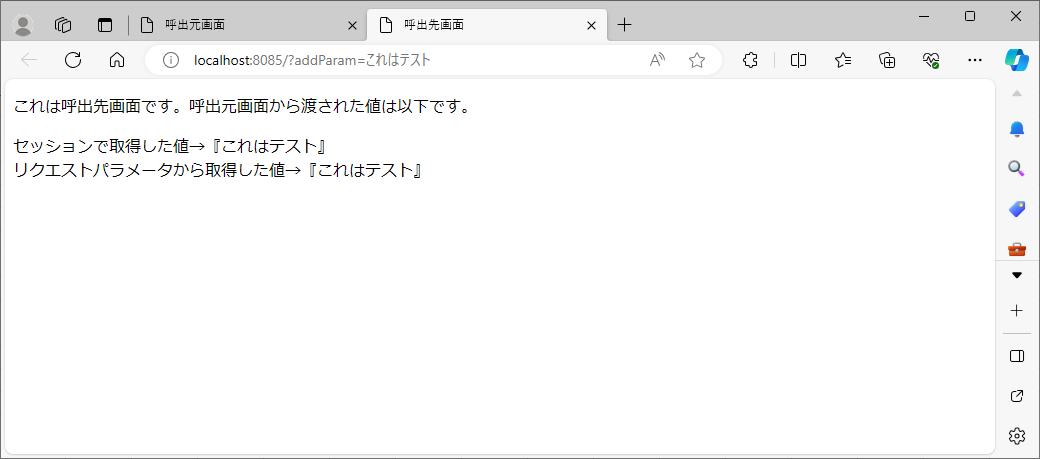
5) このときのセッションの値をAzure Cache for Redisで確認した結果は以下の通りで、呼出先画面に渡す値がセッションに格納されていることが確認できる。
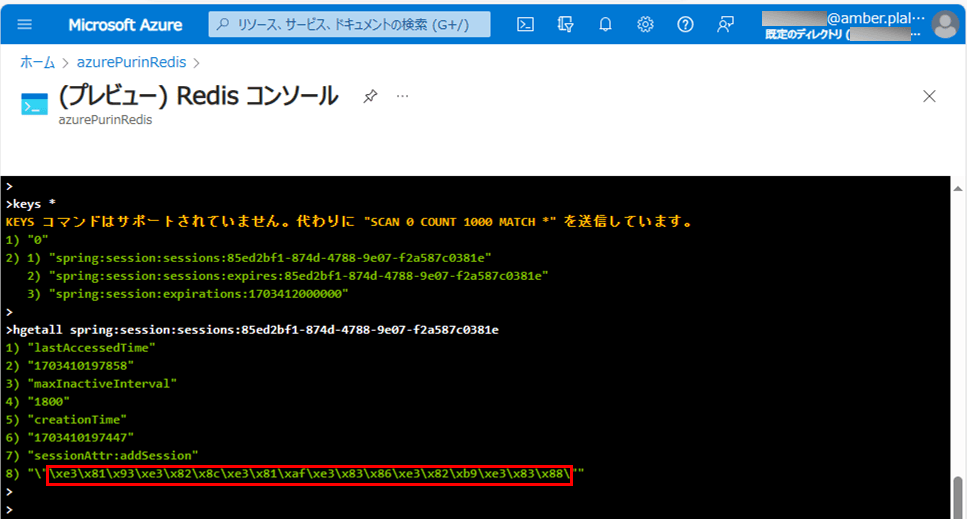
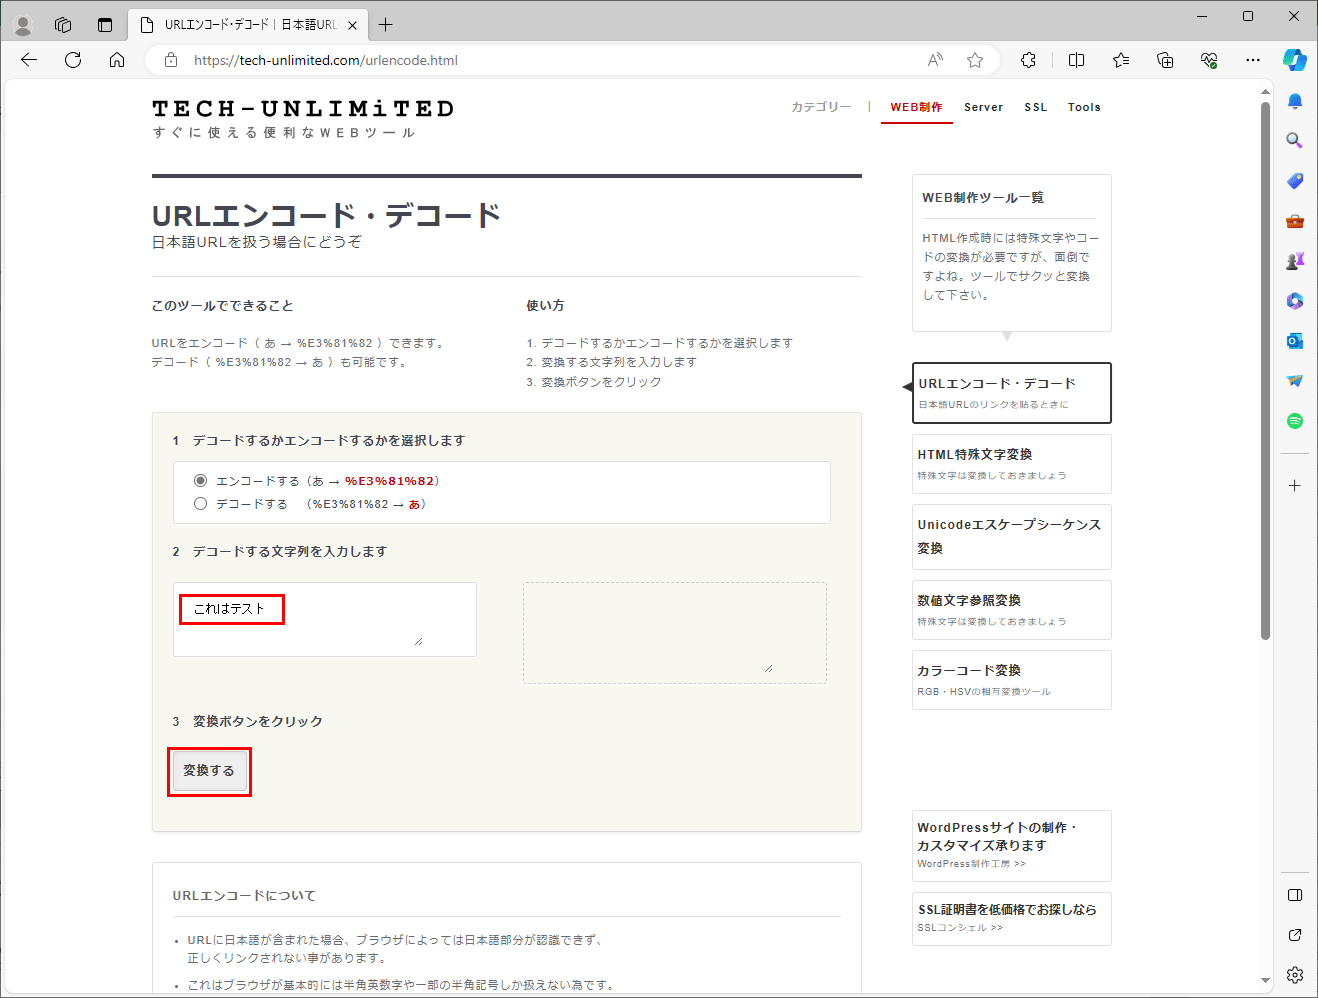
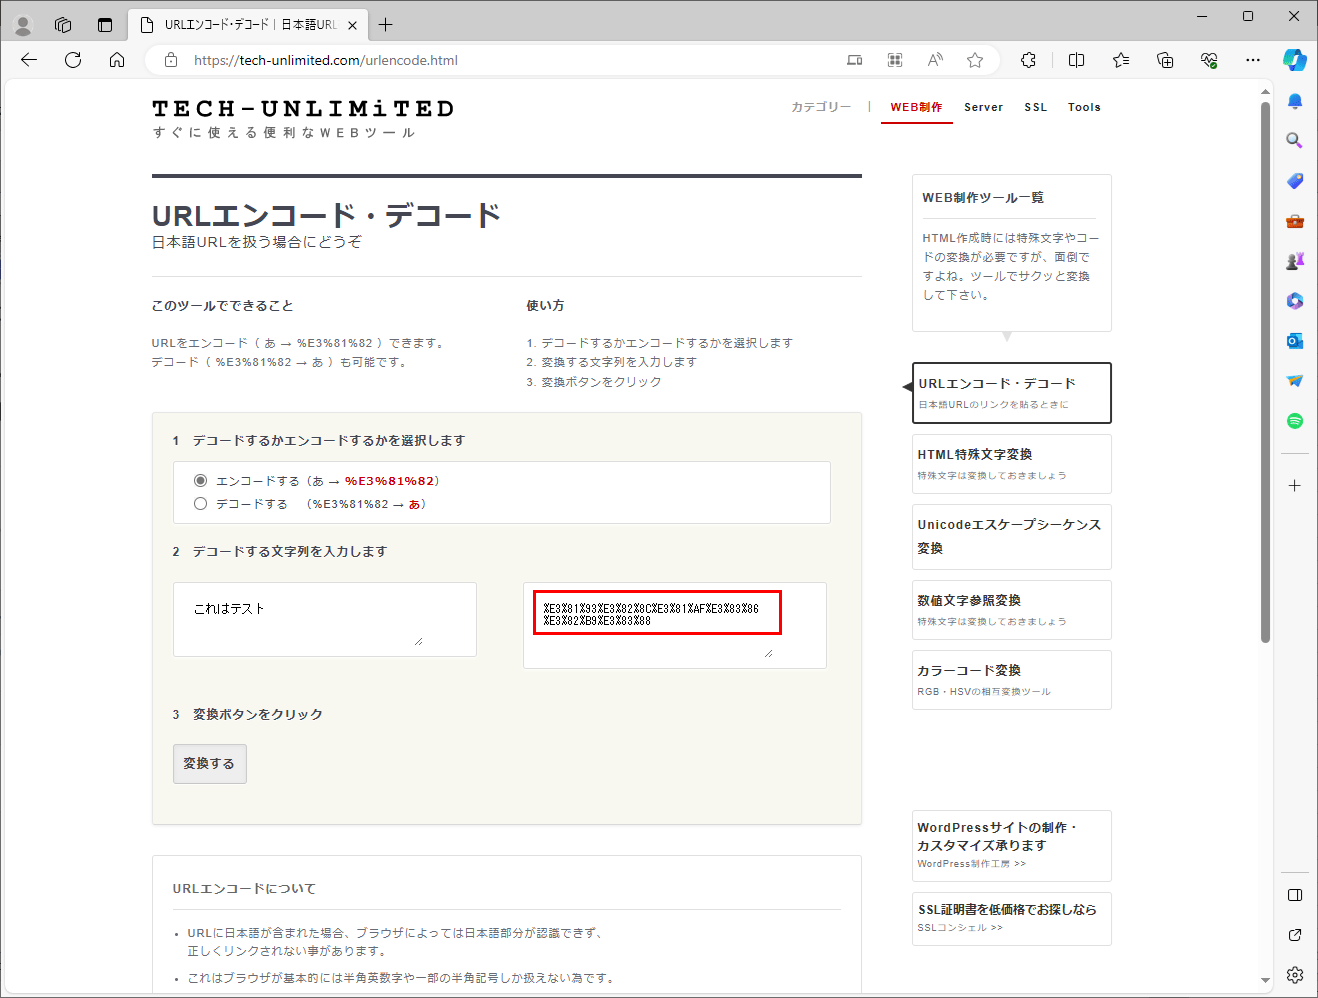
ちなみに、上記赤枠部分には、「これはテスト」をURLエンコードした結果が設定されていることが確認できる。なお、URLエンコードした結果の確認は、例えば以下のサイトで確認できる。
https://tech-unlimited.com/urlencode.html

サンプルプログラムの実行結果(Azure環境)
Azure環境でサンプルプログラムの実行した結果は、以下の通り。
1) 呼出元・呼出先のapplication.propertiesの設定を、Azure環境用に変更する。
#server.port = 8084

# 呼出先画面のURL
#demoAzureApp2.urlBase = http://localhost:8085/
demoAzureApp2.urlBase = https://azureappdemoservice2.azurewebsites.net/

# Spring Sessionに関する設定
spring.session.store-type=redis
spring.redis.ssl=true

spring.redis.host=azurePurinRedis.redis.cache.windows.net
spring.redis.port=6380
spring.redis.password=(Azure Cache for Redisのパスワード)
#server.port = 8085

# Spring Sessionに関する設定
spring.session.store-type=redis
spring.redis.ssl=true

spring.redis.host=azurePurinRedis.redis.cache.windows.net
spring.redis.port=6380
spring.redis.password=(Azure Cache for Redisのパスワード)
2) 以下のサイトの「App ServiceへのSpring Bootを利用したJavaアプリケーションのデプロイ」に記載した手順に従って、Azure App Service(2つ)それぞれに、呼出元・呼出先のJavaアプリケーションを配置する。
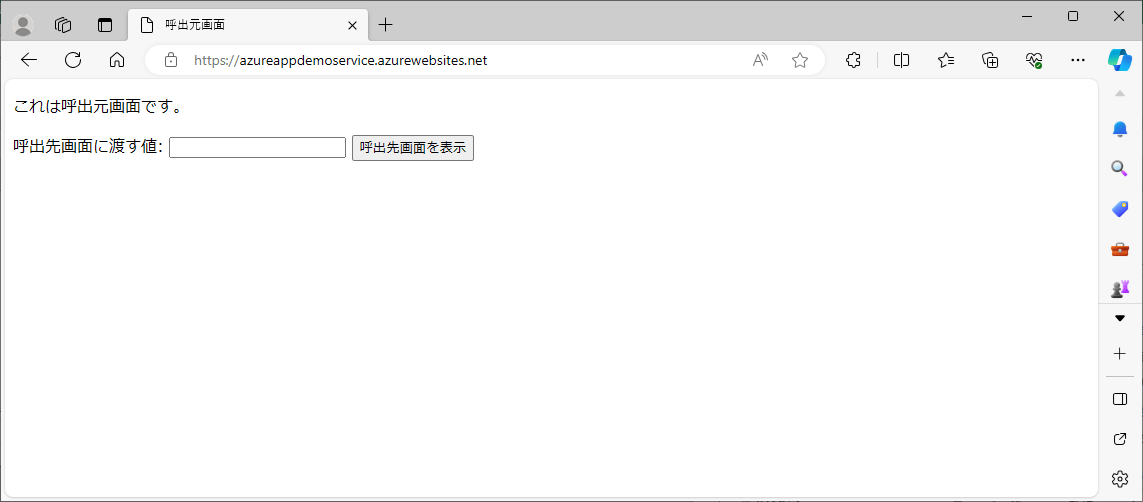
3) 呼出元のApp Service概要の「既定のドメイン」のURLにアクセスすると、以下のように、呼出元画面が表示されることが確認できる。
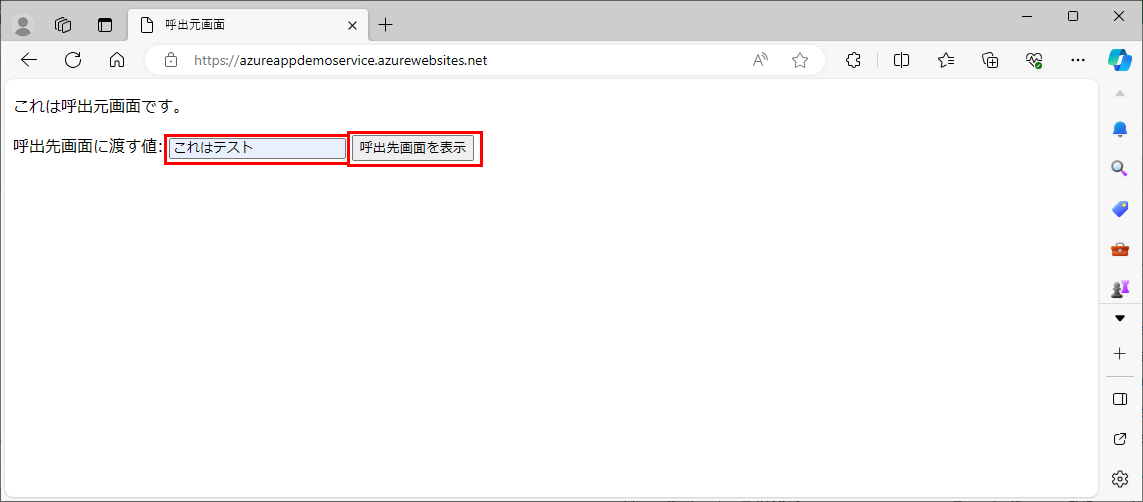
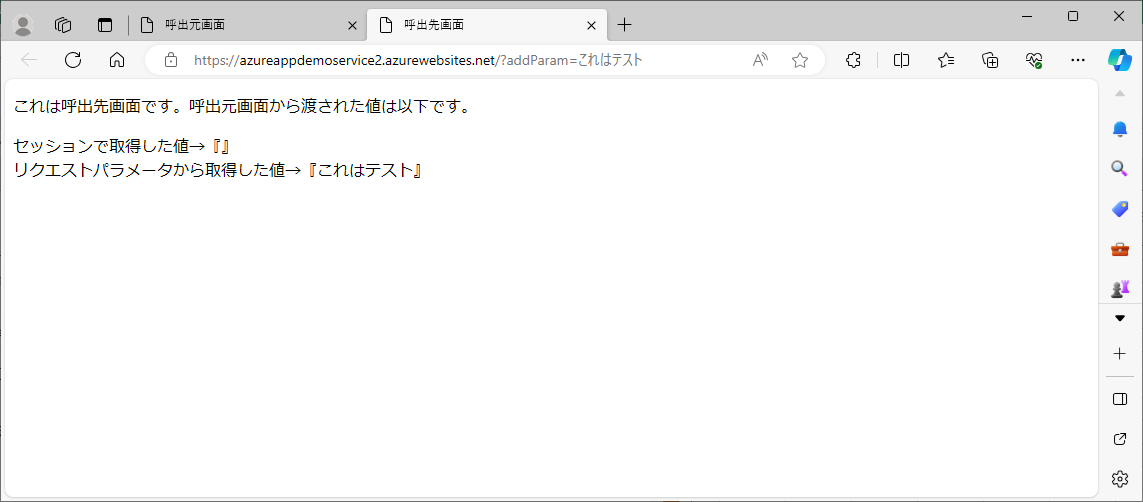
4) 呼出先画面に渡す値を指定し「呼出先画面を表示」ボタンを押下すると、以下のように、呼出先画面が表示されるが、表示される値が「リクエストパラメータから取得した値」のみとなる。
5) このときのセッションの値をAzure Cache for Redisで確認した結果は以下の通りで、セッション情報が、下記赤枠2つに分かれて格納されていることが確認できる。
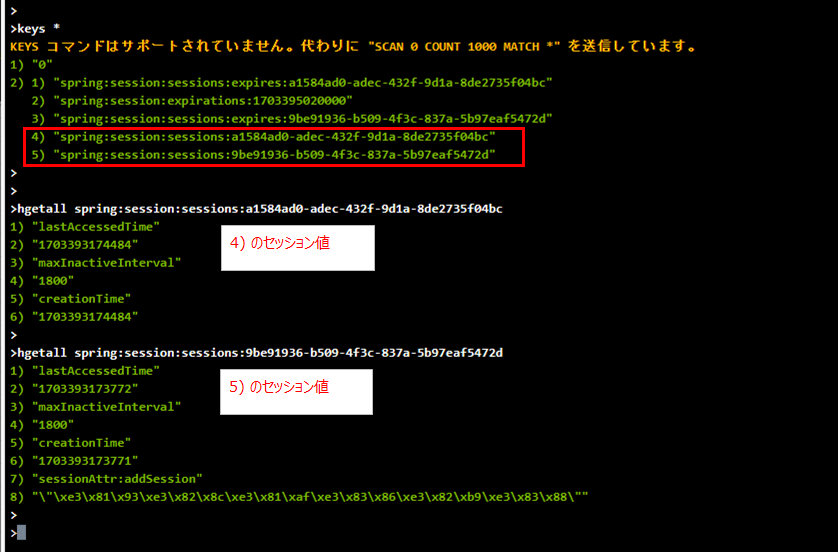
この実行結果で、セッション情報が2つに分かれて格納されるのは、呼出元・呼出先でドメインが違うためである。このサンプルプログラムの場合、呼出元のドメインは「azureappdemoservice.azurewebsites.net」、呼出先のドメインは「azureappdemoservice2.azurewebsites.net」となっている。
なお、異なるドメイン間でセッション情報を共有できないことの詳細は、以下のサイトを参照のこと。
https://teratail.com/questions/48496
2024/1/7 追記
以下の記事に記載の通り、複数のAzure App Serviceに、(メインドメインが同一の)サブドメインをもつカスタムドメインを設定すれば、セッションデータを互いに共有することができる。

要点まとめ
- セッションデータをAzure Cache for Redisに格納するJavaアプリケーションを、複数のAzure App Serviceそれぞれに配置し、複数のAzure App Serviceが異なるドメインをもつ場合は、それぞれ別ドメインになるため、セッションデータを互いに共有することはできない。