Spring BootのAPI通信でRestTemplateクラスを利用するが、その際に、接続タイムアウト時間と読み取りタイムアウト時間を設定することができる。今回は、以前作成したAPI通信のプログラムにタイムアウト時間を設定してみたので、共有する。
なお、接続タイムアウト時間・読み取りタイムアウト時間については、以下のサイトを参照のこと。
https://hacknote.jp/archives/25508/
前提条件
下記記事の実装が完了していること。

サンプルプログラム(クライアント側)の作成
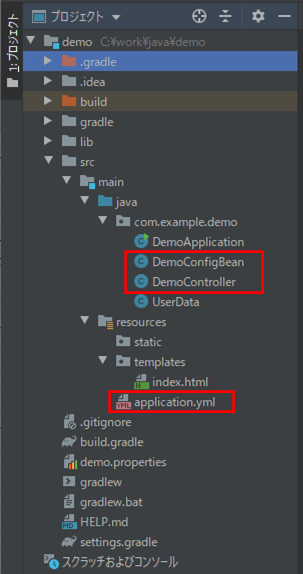
作成したサンプルプログラム(クライアント側)の構成は以下の通り。

なお、上記の赤枠は、前提条件のプログラムから追加/変更したプログラムである。
application.ymlの内容は以下の通りで、接続タイムアウト(秒)、読み取りタイムアウト(秒)の設定を追加している。
# ポート番号:8084で起動
server:
  port: 8084
# 暗号化項目を設定
encrypt:
  algorithm: AES
  charset: utf-8
  key: 1234567890abcdef
# 接続タイムアウト(秒)、読み取りタイムアウト(秒)を設定
timeout:
  connect: 10
  read: 18
また、RestTemplateクラスを定義しているConfigBeanクラスの内容は以下の通りで、接続タイムアウト(秒)、読み取りタイムアウト(秒)を設定した後でRestTemplateクラスを生成している。
package com.example.demo;

import org.springframework.beans.factory.annotation.Value;
import org.springframework.boot.web.client.RestTemplateBuilder;
import org.springframework.context.annotation.Bean;
import org.springframework.context.annotation.Configuration;
import org.springframework.web.client.RestTemplate;

import java.time.Duration;

@Configuration
public class DemoConfigBean {

    /**
     * 接続タイムアウト
     */
    @Value("${timeout.connect}")
    private String timeoutConnect;

    /**
     * 読み取りタイムアウト
     */
    @Value("${timeout.read}")
    private String timeoutRead;

    /**
     * RestTemplateオブジェクトを作成する
     * @return RestTemplateオブジェクト
     */
    @Bean
    public RestTemplate getRestTemplate(){
        // 接続タイムアウト、読み取りタイムアウトを設定しRestTemplateオブジェクトを返却
        RestTemplate template = new RestTemplateBuilder()
            .setConnectTimeout(Duration.ofSeconds(Integer.parseInt(timeoutConnect)))
            .setReadTimeout(Duration.ofSeconds(Integer.parseInt(timeoutRead)))
            .build();
        return template;
    }
}
さらに、Controllerクラスの内容は以下の通りで、タイムアウトの設定とは特に関係ないが、ユーザーデータリストをAPIで取得する際にPOST通信を利用するよう修正している。
package com.example.demo;

import org.apache.commons.codec.binary.Base64;
import org.springframework.beans.factory.annotation.Autowired;
import org.springframework.beans.factory.annotation.Value;
import org.springframework.core.ParameterizedTypeReference;
import org.springframework.http.HttpMethod;
import org.springframework.http.ResponseEntity;
import org.springframework.stereotype.Controller;
import org.springframework.ui.Model;
import org.springframework.util.StringUtils;
import org.springframework.web.bind.annotation.GetMapping;
import org.springframework.web.client.RestTemplate;
import javax.crypto.Cipher;
import javax.crypto.spec.SecretKeySpec;
import java.util.List;

@Controller
public class DemoController {

    /**
     * 暗号化アルゴリズム
     */
    @Value("${encrypt.algorithm}")
    private String encryptAlgorithm;

    /**
     * 暗号化時に利用する文字コード
     */
    @Value("${encrypt.charset}")
    private String encryptCharset;

    /**
     * 暗号化時に利用する秘密鍵
     */
    @Value("${encrypt.key}")
    private String encrypyKey;

    /**
     * RestTemplateオブジェクト
     */
    @Autowired
    private RestTemplate restTemplate;

    /**
     * ユーザーデータを取得し、初期表示画面に遷移する
     * @param model Modelオブジェクト
     * @return 初期表示画面へのパス
     */
    @GetMapping("/")
    public String index(Model model){
        // ユーザーデータリストをAPIで取得する
        ResponseEntity<List<UserData>> response = restTemplate.exchange(
                "http://localhost:8085/getUserDataList", HttpMethod.POST,
                null, new ParameterizedTypeReference<List<UserData>>() {});
        List<UserData> userDataList = response.getBody();
        // 各ユーザーデータを編集し、Modelに設定する
        for(UserData userData : userDataList){
            // 名前・メモ・性別・生年月日を復号化
            userData.setName(decrypt(userData.getName()));
            userData.setMemo(decrypt(userData.getMemo()));
            userData.setSex(decrypt(userData.getSex()));
        }
        model.addAttribute("userDataList", userDataList);
        return "index";
    }

    /**
     * 引数の文字列を復号化する
     * @param data 任意の文字列
     * @return 復号化後の文字列
     */
    private String decrypt(String data){
        if(StringUtils.isEmpty(data)){
            return "";
        }
        String retVal = null;
        try {
            // 引数の文字列をBase64へデコード
            byte[] byteText = Base64.decodeBase64(data);
            // 暗号化キーオブジェクトを生成
            SecretKeySpec key = new SecretKeySpec(
                    encrypyKey.getBytes(encryptCharset), encryptAlgorithm);
            // Cipherオブジェクトを生成し、暗号化キーオブジェクトで初期化
            // 暗号化キーは、鍵長を16バイト・24バイト・32バイトのいずれかに設定する必要がある
            Cipher cipher = Cipher.getInstance(encryptAlgorithm);
            cipher.init(Cipher.DECRYPT_MODE, key);
            // 引数の文字列を復号化
            byte[] byteResult = cipher.doFinal(byteText);
            // 復号化後の文字列を返却
            retVal = new String(byteResult, encryptCharset);
        } catch (Exception e) {
            e.printStackTrace();
        }
        return retVal;
    }
}
その他のソースコード内容は、以下のサイトを参照のこと。
https://github.com/purin-it/java/tree/master/spring-boot-api-timeout/demo
サンプルプログラム(サーバー側)の作成
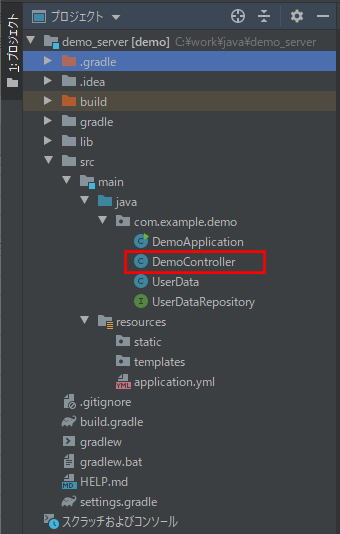
作成したサンプルプログラム(サーバー側)の構成は以下の通り。

なお、上記の赤枠は、前提条件のプログラムから追加/変更したプログラムである。
コントローラクラスの内容は以下の通りで、getUserDataListメソッドのアノテーションを@PostMappingアノテーションにすると共に、UserDataテーブルのリストを返却するよう修正している。
package com.example.demo;

import org.apache.commons.codec.binary.Base64;
import org.springframework.beans.factory.annotation.Autowired;
import org.springframework.beans.factory.annotation.Value;
import org.springframework.data.domain.Sort;

import org.springframework.util.StringUtils;
import org.springframework.web.bind.annotation.PostMapping;
import org.springframework.web.bind.annotation.RestController;

import javax.crypto.Cipher;
import javax.crypto.spec.SecretKeySpec;
import java.util.List;

import static org.springframework.data.domain.Sort.Direction.ASC;

@RestController
public class DemoController {

    /**
     * 暗号化アルゴリズム
     */
    @Value("${encrypt.algorithm}")
    private String encryptAlgorithm;

    /**
     * 暗号化時に利用する文字コード
     */
    @Value("${encrypt.charset}")
    private String encryptCharset;

    /**
     * 暗号化時に利用する秘密鍵
     */
    @Value("${encrypt.key}")
    private String encrypyKey;

    /**
     * ユーザーデータテーブル(user_data)へアクセスするリポジトリ
     */
    @Autowired
    private UserDataRepository repository;

    /**
     * ユーザーデータを全件取得する
     * @return ユーザーデータリスト
     */
    @PostMapping("/getUserDataList")
    public List<UserData> getUserDataList(){
        List<UserData> userDataList = repository.findAll(new Sort(ASC, "id"));
        // ユーザーデータが取得できなかった場合は、null値を返す
        if(userDataList == null || userDataList.size() == 0){
            return null;
        }
        for(UserData userData : userDataList){
            // 性別を表示用(男,女)に変換
            userData.setSex("1".equals(userData.getSex()) ? "男" : "女");
            // 名前・メモ・性別を暗号化
            userData.setName(encrypt(userData.getName()));
            userData.setMemo(encrypt(userData.getMemo()));
            userData.setSex(encrypt(userData.getSex()));
        }
        // 取得したユーザーデータを返却
        return userDataList;
    }

    /**
     * 引数の文字列を暗号化する
     * @param data 任意の文字列
     * @return 暗号化後の文字列
     */
    private String encrypt(String data) {
        if(StringUtils.isEmpty(data)){
            return "";
        }
        String retVal = null;
        try {
            // 暗号化キーオブジェクトを生成
            SecretKeySpec key = new SecretKeySpec(
                    encrypyKey.getBytes(encryptCharset), encryptAlgorithm);
            // Cipherオブジェクトを生成し、暗号化キーオブジェクトで初期化
            // 暗号化キーは、鍵長を16バイト・24バイト・32バイトのいずれかに設定する必要がある
            Cipher cipher = Cipher.getInstance(encryptAlgorithm);
            cipher.init(Cipher.ENCRYPT_MODE, key);
            // 引数の文字列を暗号化
            byte[] byteResult = cipher.doFinal(data.getBytes(encryptCharset));
            // Base64へエンコードし、暗号化文字列を返却
            retVal = Base64.encodeBase64String(byteResult);
        } catch (Exception e) {
            e.printStackTrace();
        }
        return retVal;
    }

}
その他のソースコード内容は、以下のサイトを参照のこと。
https://github.com/purin-it/java/tree/master/spring-boot-api-timeout/demo_server
サンプルプログラムの実行結果
サンプルプログラムの実行結果は、以下の記事の「http:// (ホスト名):8084」とアクセスした場合と同じ実行結果となる。

要点まとめ
- RestTemplateクラスを生成してAPI通信を行う際に、接続タイムアウト時間(秒)と読み取りタイムアウト時間(秒)を設定することができる。


