PRGパターンの「PRG」は「Post&Redirect&Get」の略で、Postした後でリダイレクトして画面表示するパターンのことをいう。PRGパターンを利用すると、ブラウザを再度読み込んだ場合に再度サブミット処理が実行されるのを防ぐことができる。
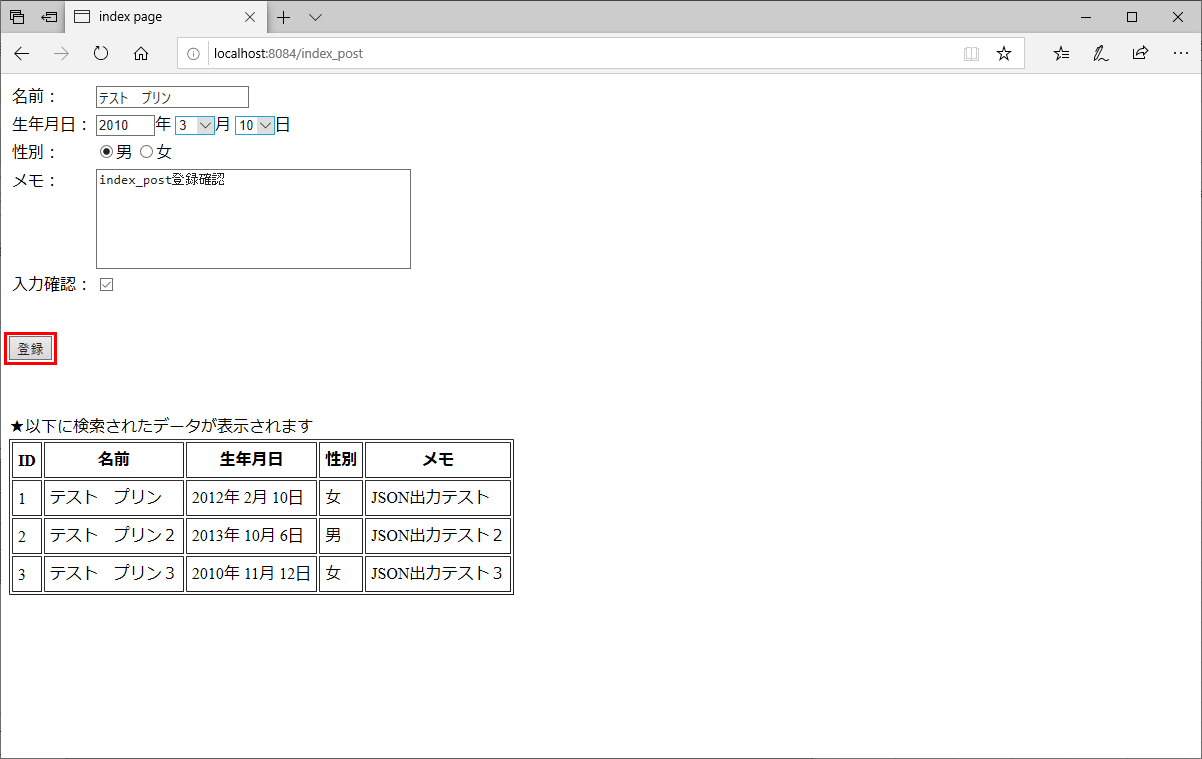
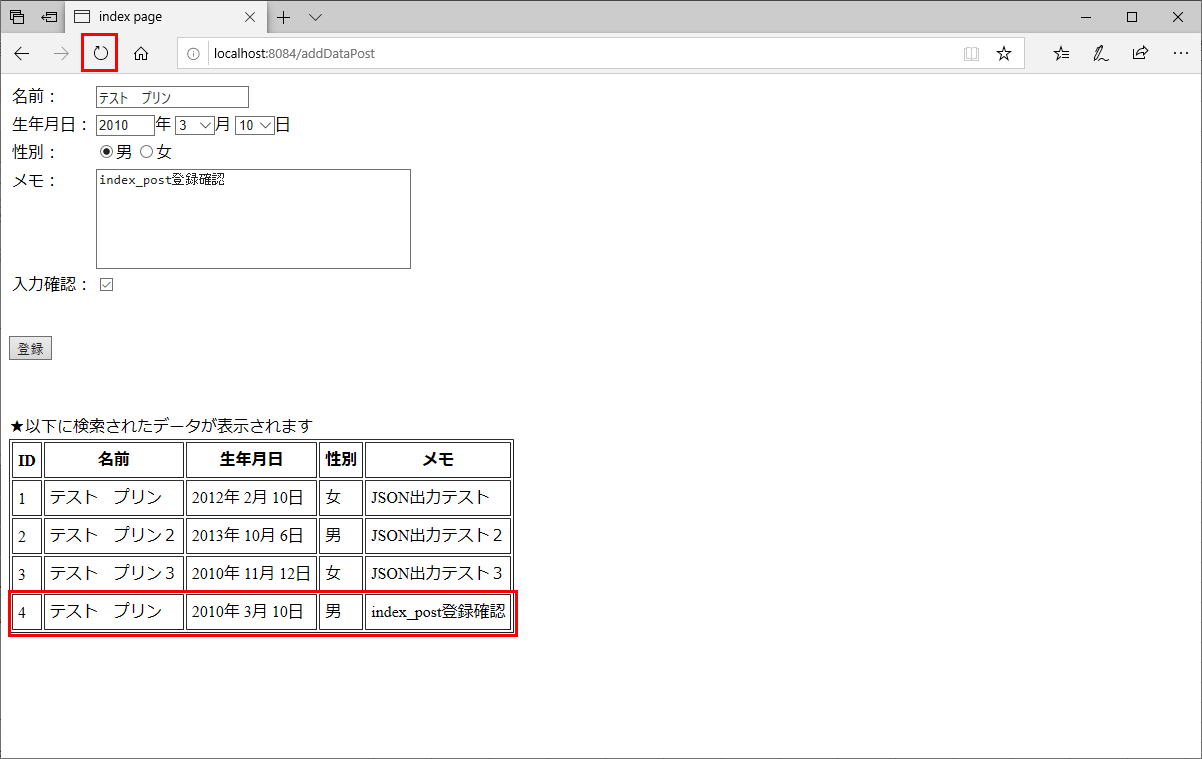
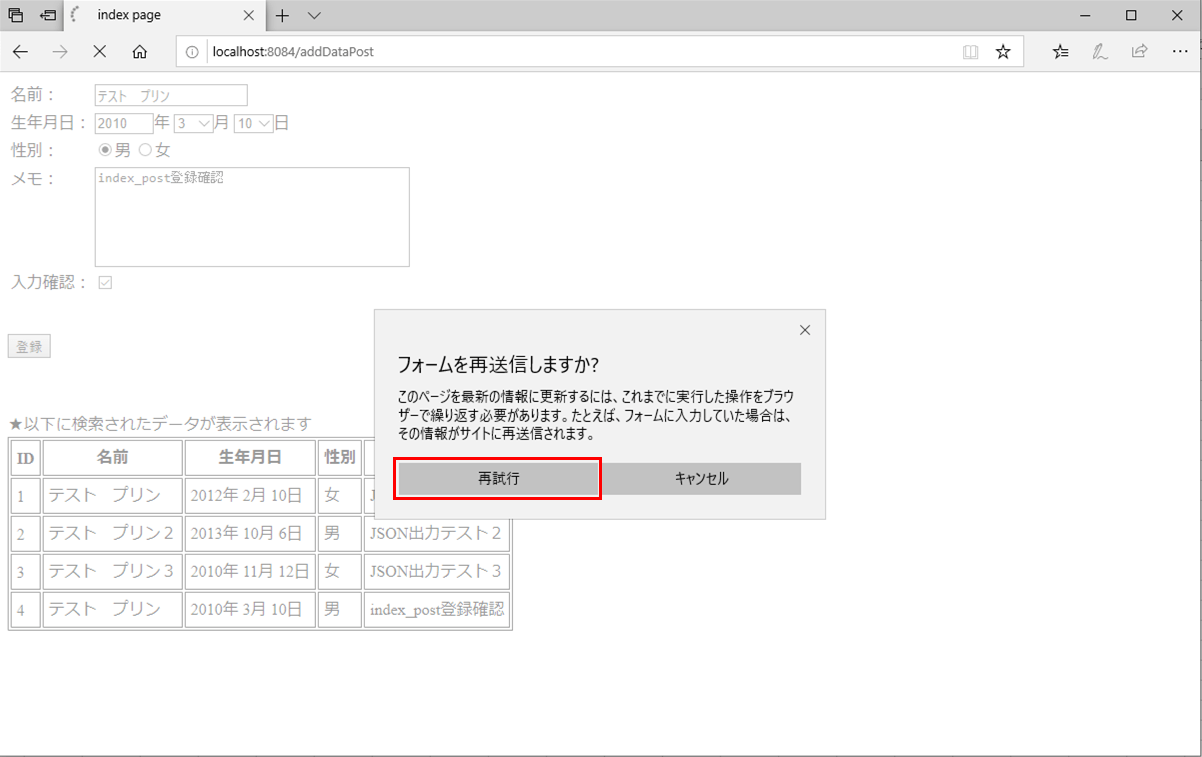
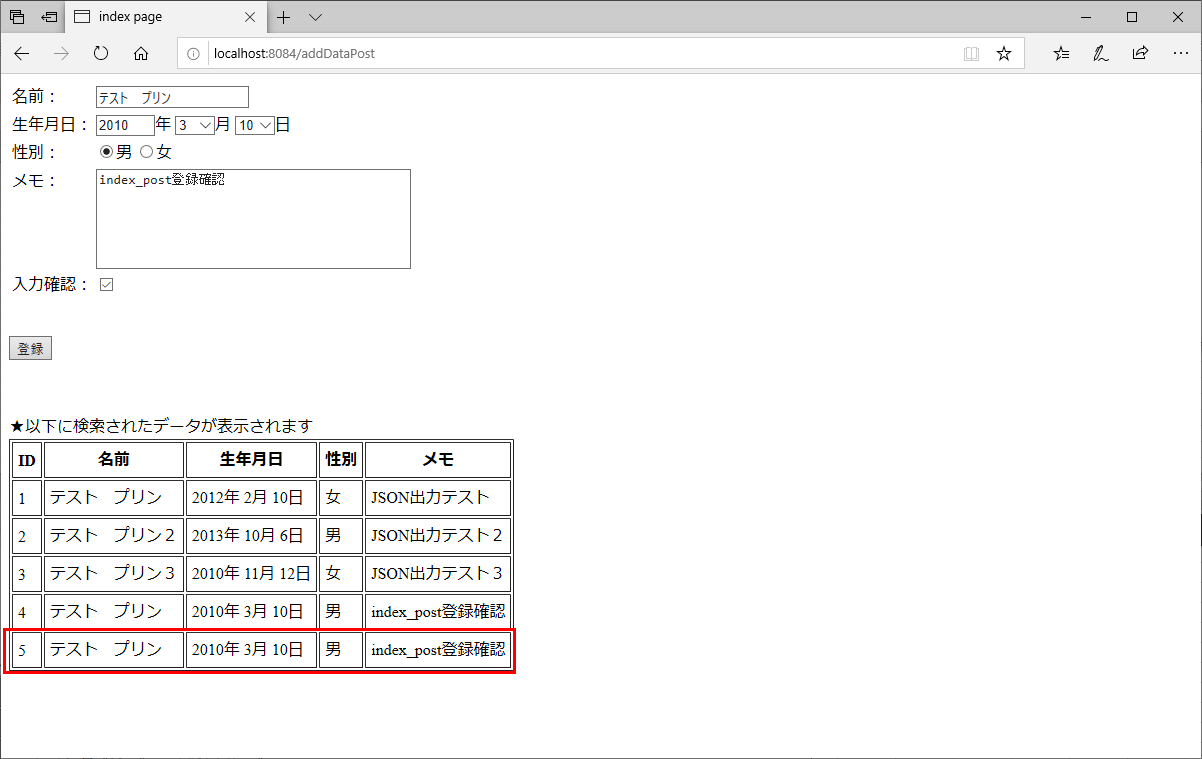
PRGパターンを利用しない場合、以下のように、登録完了後に「最新の情報に更新(F5)」ボタンを押下すると、「フォームを再送信しますか?」というダイアログが表示され、そこで「再試行」を押下すると再度登録処理が行われる。
1) PRGパターンを利用しない登録画面に遷移し、下記のように入力後、「登録」ボタンを押下
2) 下記画面が表示され、登録データが一覧下に確認される。ここで「最新の情報に更新(F5)」ボタンを押下
3)「フォームを再送信しますか?」というダイアログが表示されるため、「再試行」ボタンを押下
4) 下記画面が表示され、登録処理が再度行われたことが確認できる
他方、PRGパターンを利用した場合、以下のように、登録完了後に「最新の情報に更新(F5)」ボタンを押下すると、「フォームを再送信しますか?」というダイアログが表示されず、再度の登録処理は行われない。
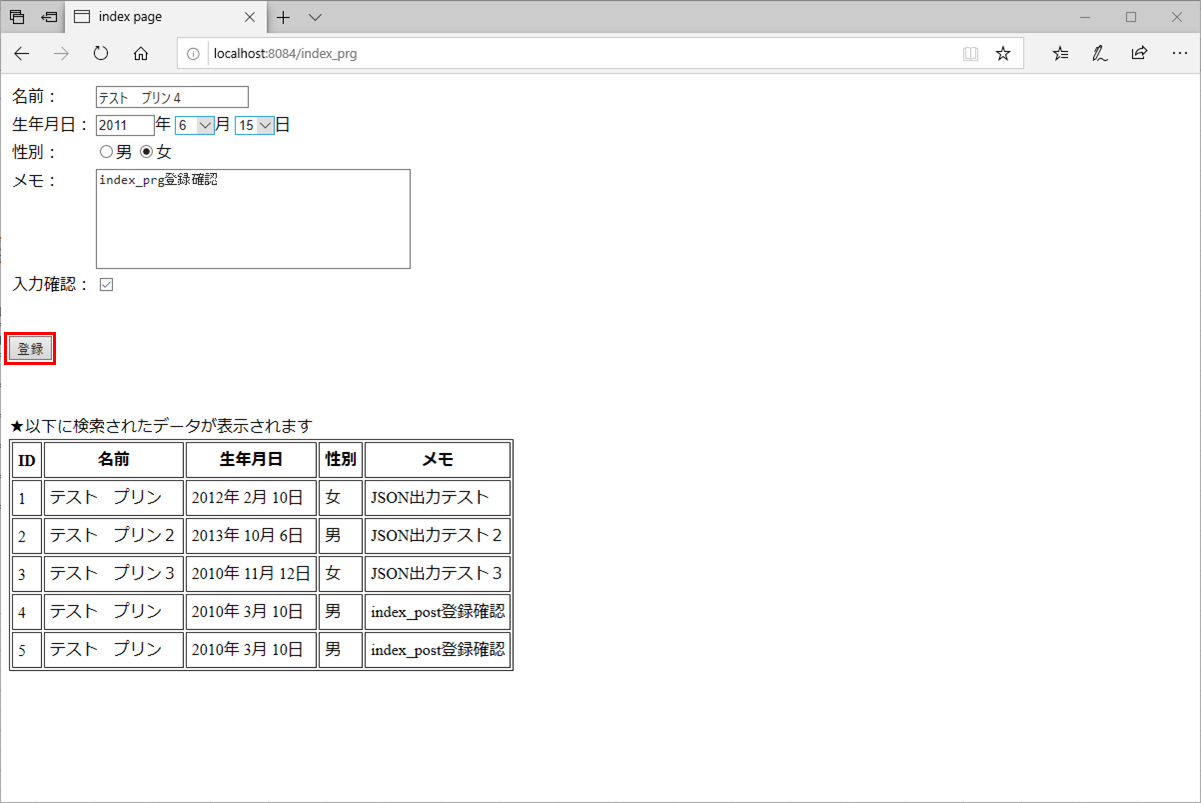
5) PRGパターンを利用する登録画面に遷移し、下記のように入力後、「登録」ボタンを押下
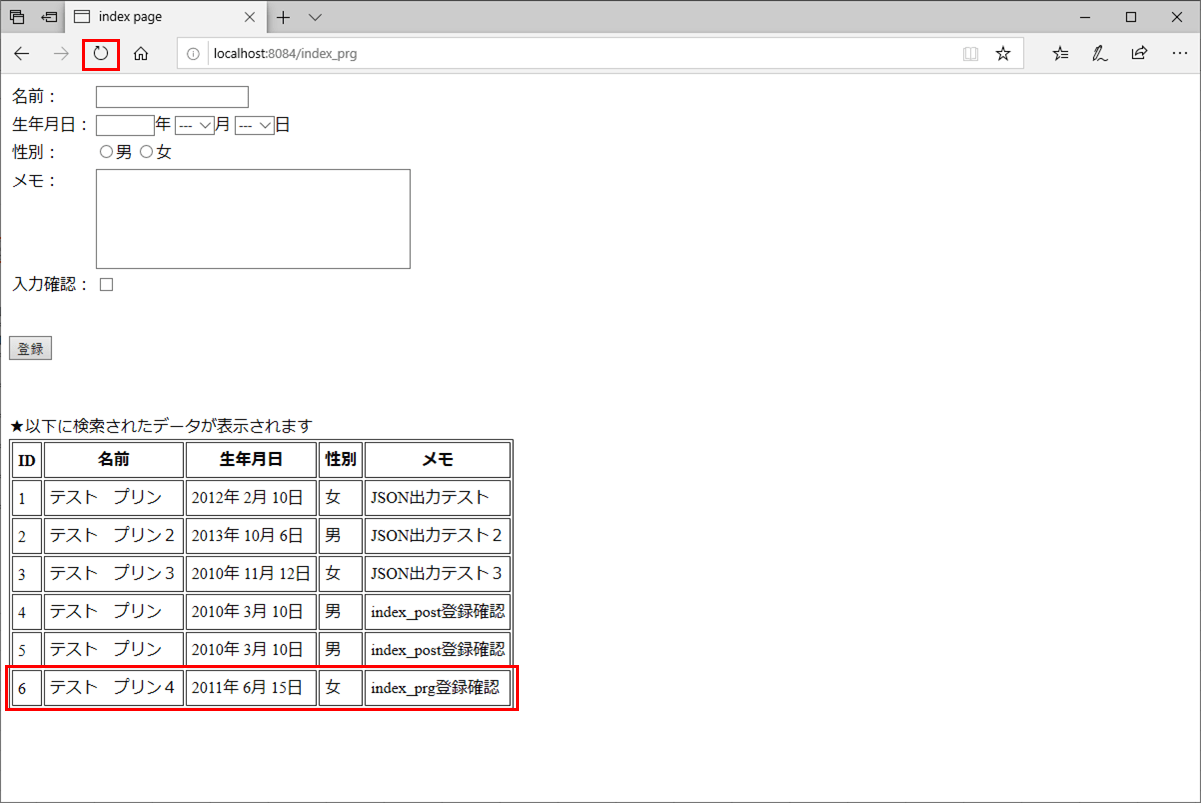
6) 下記画面が表示され、登録データが一覧下に確認される。また、リダイレクトして新しい画面を表示しているため、登録フォームの値は全てクリアされる。ここで「最新の情報に更新(F5)」ボタンを押下
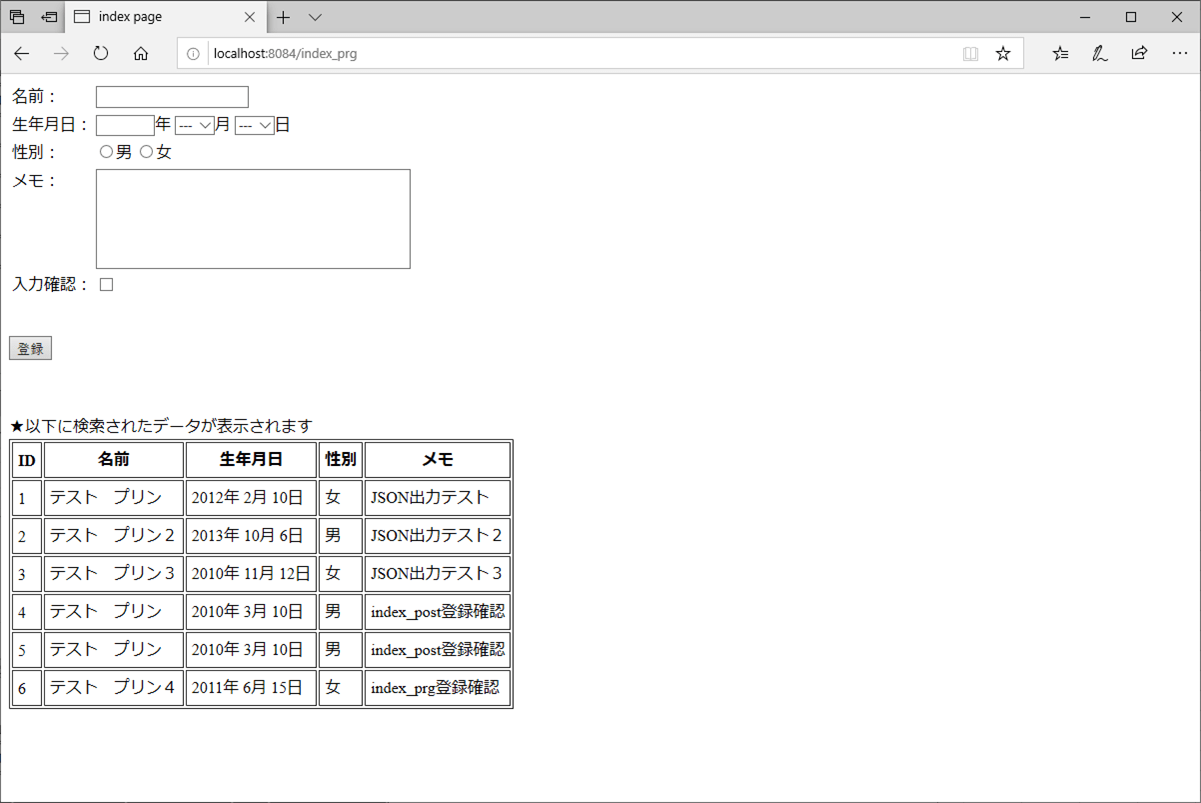
7) 画面表示内容が変わらず、再登録はされないことが確認される。
今回は、このPRG(Post&Redirect&Get)パターンを利用したサンプルプログラムを作成してみたので、共有する。
前提条件
下記記事の実装が完了していること。

サンプルプログラムの作成
作成したサンプルプログラムの構成は以下の通り。
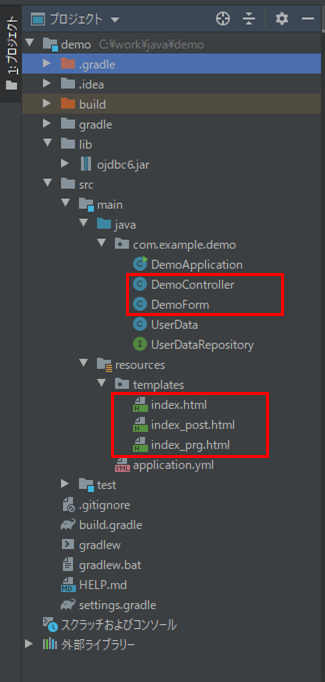
なお、上記の赤枠は、前提条件のプログラムから変更したプログラムである。
まず、Post方式確認用画面のHTMLファイルの内容は以下の通りで、「登録」ボタン押下時に「addDataPost」メソッドが呼ばれるようになっている。
<!DOCTYPE html>
<html lang="ja" xmlns:th="http://www.thymeleaf.org">
<head>
    <meta charset="UTF-8">
    <title>index page</title>
</head>
<body>
    <form method="post" th:action="@{/addDataPost}" th:object="${demoForm}">
        <table border="0">
            <tr>
                <td align="left" valign="top">名前:</td>
                <td>
                    <input type="text" th:value="*{name}" th:field="*{name}" />
                </td>
            </tr>
            <tr>
                <td align="left" valign="top">生年月日:</td>
                <td>
                    <input type="text" th:value="*{birthYear}" size="4"
                           maxlength="4" th:field="*{birthYear}" />年
                    <select th:field="*{birthMonth}">
                        <option value="">---</option>
                        <option th:each="item : *{getMonthItems()}"
                                th:value="${item.key}" th:text="${item.value}"/>
                    </select>月
                    <select th:field="*{birthDay}">
                        <option value="">---</option>
                        <option th:each="item : *{getDayItems()}"
                                th:value="${item.key}" th:text="${item.value}"/>
                    </select>日
                </td>
            </tr>
            <tr>
                <td align="left" valign="top">性別:</td>
                <td>
                    <for th:each="item : *{getSexItems()}">
                        <input type="radio" name="sex" th:value="${item.key}"
                               th:text="${item.value}" th:field="*{sex}" />
                    </for>
                </td>
            </tr>
            <tr>
                <td align="left" valign="top">メモ:</td>
                <td>
                    <textarea rows="6" cols="40" th:value="*{memo}" th:field="*{memo}"></textarea>
                </td>
            </tr>
            <tr>
                <td align="left" valign="top">入力確認:</td>
                <td>
                    <input type="checkbox" name="checked" th:value="確認済" th:field="*{checked}" />
                </td>
            </tr>
        </table>
        <br/><br/>
        <input type="submit" value="登録" />
    </form>
    <br/><br/><br/>
    ★以下に検索されたデータが表示されます
    <table border="1" cellpadding="5">
        <tr>
            <th>ID</th>
            <th>名前</th>
            <th>生年月日</th>
            <th>性別</th>
            <th>メモ</th>
        </tr>
        <tr th:each="obj : ${userDataList}">
            <td th:text="${obj.id}"></td>
            <td th:text="${obj.name}"></td>
            <td th:text="|${obj.birthY}年 ${obj.birthM}月 ${obj.birthD}日|"></td>
            <td th:text="${obj.sex}"></td>
            <td th:text="${obj.memo}"></td>
        </tr>
    </table>
    <br/><br/>
</body>
</html>
次に、Post&Redirect&Get方式確認用画面のHTMLファイルの内容は以下の通りで、「登録」ボタン押下時に「addDataPostRedirectGet」メソッドが呼ばれるようになっている。それ以外はPost方式確認用画面のHTMLファイルと同じ内容になっている。
<!DOCTYPE html>
<html lang="ja" xmlns:th="http://www.thymeleaf.org">
<head>
    <meta charset="UTF-8">
    <title>index page</title>
</head>
<body>
    <form method="post" th:action="@{/addDataPostRedirectGet}" th:object="${demoForm}">
        <table border="0">
            <tr>
                <td align="left" valign="top">名前:</td>
                <td>
                    <input type="text" th:value="*{name}" th:field="*{name}" />
                </td>
            </tr>
            <tr>
                <td align="left" valign="top">生年月日:</td>
                <td>
                    <input type="text" th:value="*{birthYear}" size="4"
                           maxlength="4" th:field="*{birthYear}" />年
                    <select th:field="*{birthMonth}">
                        <option value="">---</option>
                        <option th:each="item : *{getMonthItems()}"
                                th:value="${item.key}" th:text="${item.value}"/>
                    </select>月
                    <select th:field="*{birthDay}">
                        <option value="">---</option>
                        <option th:each="item : *{getDayItems()}"
                                th:value="${item.key}" th:text="${item.value}"/>
                    </select>日
                </td>
            </tr>
            <tr>
                <td align="left" valign="top">性別:</td>
                <td>
                    <for th:each="item : *{getSexItems()}">
                        <input type="radio" name="sex" th:value="${item.key}"
                               th:text="${item.value}" th:field="*{sex}" />
                    </for>
                </td>
            </tr>
            <tr>
                <td align="left" valign="top">メモ:</td>
                <td>
                    <textarea rows="6" cols="40" th:value="*{memo}" th:field="*{memo}"></textarea>
                </td>
            </tr>
            <tr>
                <td align="left" valign="top">入力確認:</td>
                <td>
                    <input type="checkbox" name="checked" th:value="確認済" th:field="*{checked}" />
                </td>
            </tr>
        </table>
        <br/><br/>
        <input type="submit" value="登録" />
    </form>
    <br/><br/><br/>
    ★以下に検索されたデータが表示されます
    <table border="1" cellpadding="5">
        <tr>
            <th>ID</th>
            <th>名前</th>
            <th>生年月日</th>
            <th>性別</th>
            <th>メモ</th>
        </tr>
        <tr th:each="obj : ${userDataList}">
            <td th:text="${obj.id}"></td>
            <td th:text="${obj.name}"></td>
            <td th:text="|${obj.birthY}年 ${obj.birthM}月 ${obj.birthD}日|"></td>
            <td th:text="${obj.sex}"></td>
            <td th:text="${obj.memo}"></td>
        </tr>
    </table>
    <br/><br/>
</body>
</html>
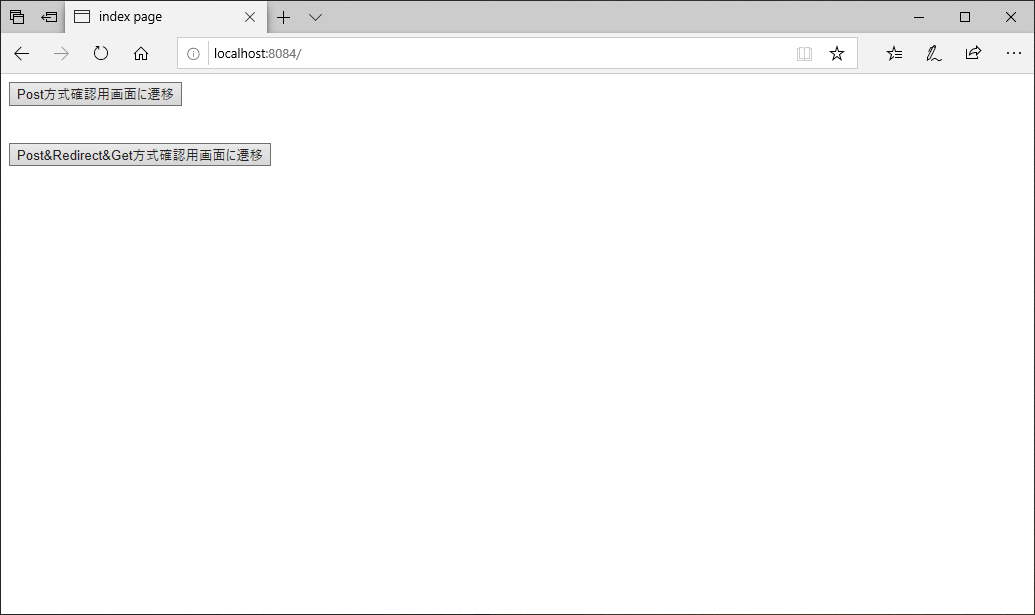
また、初期表示画面は以下の通りで、「index_post.html」「index_prg.html」へ画面遷移する内容になっている。
<!DOCTYPE html>
<html lang="ja" xmlns:th="http://www.thymeleaf.org">
<head>
    <meta charset="UTF-8">
    <title>index page</title>
</head>
<body>
    <form method="get" th:action="@{/index_post}">
        <input type="submit" value="Post方式確認用画面に遷移" />
    </form>
    <br/><br/>
    <form method="get" th:action="@{/index_prg}">
        <input type="submit" value="Post&Redirect&Get方式確認用画面に遷移" />
    </form>
</body>
</html>
また、コントローラクラスの内容は以下の通りで、「addDataPost」メソッドは登録後Postのみ行っていて、「addDataPostRedirectGet」メソッドはPost後にRedirectしてGetする処理を行っている。その他、「index_post.html」「index_prg.html」画面表示時は、ユーザーリストを取得している。
package com.example.demo;

import org.springframework.beans.factory.annotation.Autowired;
import org.springframework.data.domain.Sort;
import org.springframework.stereotype.Controller;
import org.springframework.ui.Model;
import org.springframework.web.bind.annotation.ModelAttribute;
import org.springframework.web.bind.annotation.GetMapping;
import org.springframework.web.bind.annotation.PostMapping;
import org.springframework.web.bind.annotation.RequestMapping;
import java.util.List;

import static org.springframework.data.domain.Sort.Direction.ASC;
import static org.springframework.data.domain.Sort.Direction.DESC;

@Controller
public class DemoController {

    /**
     * ユーザーデータテーブル(user_data)へアクセスするリポジトリ
     */
    @Autowired
    private UserDataRepository repository;

    /**
     * 追加・更新用Formオブジェクトを初期化して返却する
     * @return 追加・更新用Formオブジェクト
     */
    @ModelAttribute("demoForm")
    public DemoForm createDemoForm(){
        DemoForm demoForm = new DemoForm();
        return demoForm;
    }

    /**
     * 初期表示画面に遷移
     * @return 初期表示画面
     */
    @RequestMapping("/")
    public String index(){
        return "index";
    }

    /**
     * Post方式確認用の画面に遷移する
     * @model Modelオブジェクト
     * @return Post方式確認用の画面へのパス
     */
    @GetMapping(path = "/index_post")
    public String index_post(Model model){
        // ユーザーデータリストを取得
        List<UserData> userDataList = getUserDataList();
        model.addAttribute("userDataList", userDataList);
        return "index_post";
    }

    /**
     * Post&Redirect&Get方式確認用の画面に遷移する
     * @model Modelオブジェクト
     * @return Post&Redirect&Get方式確認用の画面へのパス
     */
    @GetMapping(path = "/index_prg")
    public String index_prg(Model model){
        // ユーザーデータリストを取得
        List<UserData> userDataList = getUserDataList();
        model.addAttribute("userDataList", userDataList);
        return "index_prg";
    }

    /**
     * Post方式でデータを登録する
     * @param demoForm 登録用フォーム
     * @param model Modelオブジェクト
     * @return Post方式確認用の画面へのパス
     */
    @PostMapping(path = "/addDataPost")
    public String addDataPost(DemoForm demoForm, Model model){
        // 登録用フォームから送られてきたデータを登録する
        UserData userData = getUserData(demoForm);
        repository.saveAndFlush(userData);
        // Post方式確認用の初期表示画面に遷移する
        return index_post(model);
    }

    /**
     * Post&Redirect&Get方式でデータを登録する
     * @param demoForm 登録用フォーム
     * @param model Modelオブジェクト
     * @return Post方式確認用の画面へのパス
     */
    @PostMapping(path = "/addDataPostRedirectGet")
    public String addDataPostRedirectGet(DemoForm demoForm, Model model){
        // 登録用フォームから送られてきたデータを登録する
        UserData userData = getUserData(demoForm);
        repository.saveAndFlush(userData);
        // ユーザーデータリストを取得
        List<UserData> userDataList = getUserDataList();
        model.addAttribute("userDataList", userDataList);
        // Post&Redirect&Get方式確認用の初期表示画面に遷移する
        return "redirect:/index_prg";
    }

    /**
     * ユーザーリストを取得
     * @return ユーザーリスト
     */
    private List<UserData> getUserDataList(){
        // ユーザーデータをIDの昇順に取得し、取得できなければそのまま返す
        List<UserData> userDataList = repository.findAll(new Sort(ASC, "id"));
        // ユーザーデータが取得できなかった場合は、null値を返す
        if(userDataList == null || userDataList.size() == 0){
            return null;
        }
        for(UserData userData : userDataList){
            // 性別を表示用(男,女)に変換
            userData.setSex("1".equals(userData.getSex()) ? "男" : "女");
        }
        return userDataList;
    }

    /**
     * UserDataオブジェクトに引数のフォームの各値を設定する
     * @param demoForm DemoFormオブジェクト
     * @return ユーザーデータ
     */
    private UserData getUserData(DemoForm demoForm){
        UserData userData = new UserData();
        userData.setId(getMaxId() + 1);
        userData.setName(demoForm.getName());
        userData.setBirthY(Integer.valueOf(demoForm.getBirthYear()));
        userData.setBirthM(Integer.valueOf(demoForm.getBirthMonth()));
        userData.setBirthD(Integer.valueOf(demoForm.getBirthDay()));
        userData.setSex(demoForm.getSex());
        userData.setMemo(demoForm.getMemo());
        return userData;
    }

    /**
     * 登録IDの最大値を取得する
     * @return 登録IDの最大値
     */
    private long getMaxId(){
        List<UserData> userDataList = repository.findAll(new Sort(DESC, "id"));
        if(userDataList == null || userDataList.size() == 0){
            return 0;
        }else{
            return userDataList.get(0).getId();
        }
    }
}
その他、フォームオブジェクトの内容は以下の通りで、今回はチェック処理を入れていない。
package com.example.demo;

import lombok.Data;
import java.io.Serializable;
import java.util.LinkedHashMap;
import java.util.Map;

@Data
public class DemoForm implements Serializable {

    /** ID */
    private String id;

    /** 名前 */
    private String name;

    /** 生年月日_年 */
    private String birthYear;

    /** 生年月日_月 */
    private String birthMonth;

    /** 生年月日_日 */
    private String birthDay;

    /** 性別 */
    private String sex;

    /** メモ */
    private String memo;

    /** 確認チェック */
    private String checked;

    /** 性別(文字列) */
    private String sex_value;

    /** 生年月日_月のMapオブジェクト */
    public Map<String,String> getMonthItems(){
        Map<String, String> monthMap = new LinkedHashMap<String, String>();
        for(int i = 1; i <= 12; i++){
            monthMap.put(String.valueOf(i), String.valueOf(i));
        }
        return monthMap;
    }

    /** 生年月日_日のMapオブジェクト */
    public Map<String,String> getDayItems(){
        Map<String, String> dayMap = new LinkedHashMap<String, String>();
        for(int i = 1; i <= 31; i++){
            dayMap.put(String.valueOf(i), String.valueOf(i));
        }
        return dayMap;
    }

    /** 性別のMapオブジェクト */
    public Map<String,String> getSexItems(){
        Map<String, String> sexMap = new LinkedHashMap<String, String>();
        sexMap.put("1", "男");
        sexMap.put("2", "女");
        return sexMap;
    }

}
その他のソースコード内容は、以下のサイトを参照のこと。
https://github.com/purin-it/java/tree/master/spring-boot-prg-pattern/demo
サンプルプログラムの実行結果
Spring Bootアプリケーションを起動し、「http:// (ホスト名):(ポート番号)」とアクセスすると、以下の画面が表示される
「Post方式確認用画面に遷移」ボタンを押下すると、下記画面が表示される
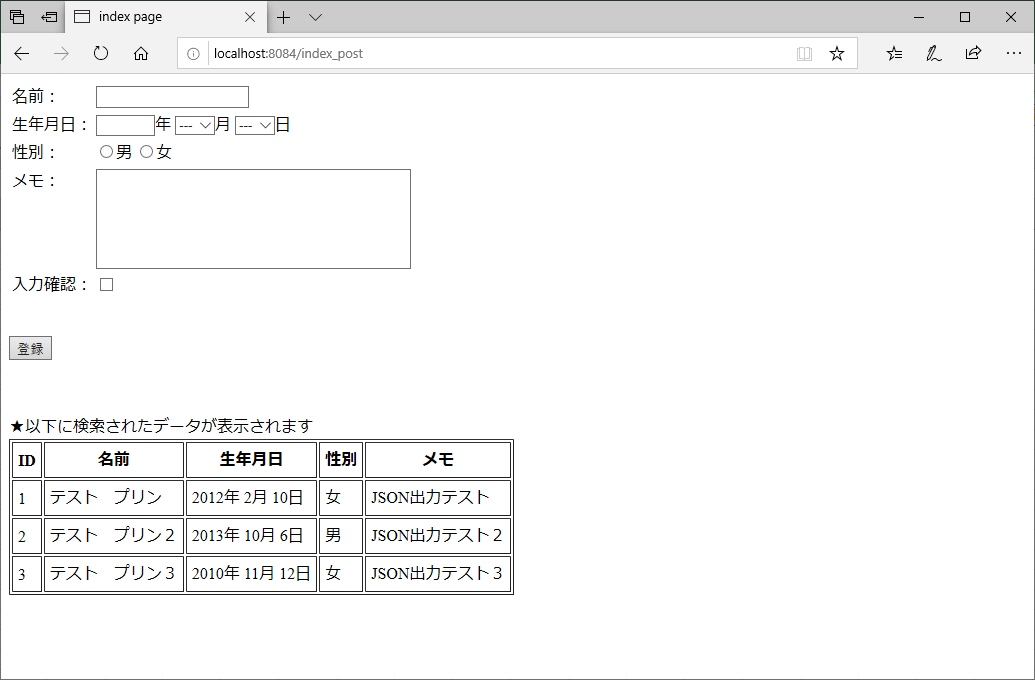
この後の動作は、本記事の前方に記載した1)~4)を参照のこと。
また、「Post&Redirect&Get方式確認用画面に遷移」ボタンを押下すると、下記画面が表示される
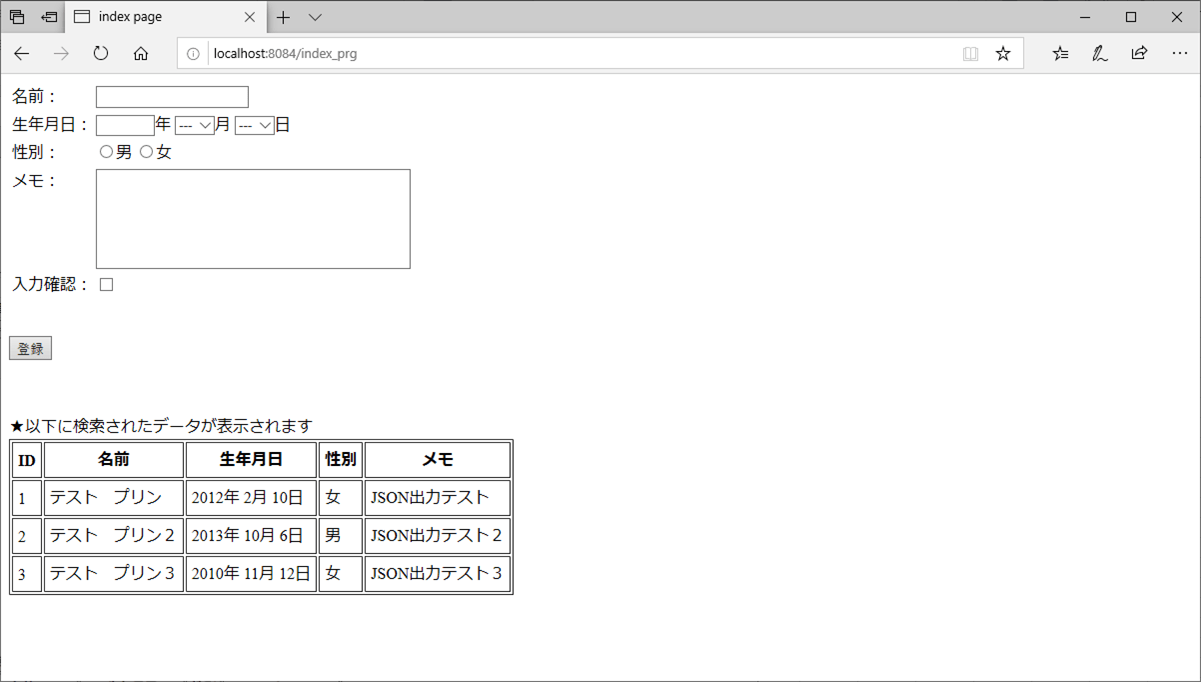
この後の動作は、本記事の前方に記載した5)~7)を参照のこと。
要点まとめ
- PRGパターンとは、Postした後でリダイレクトして画面表示するパターンのことで、これを利用すると、ブラウザを再度読み込んだ場合に再度サブミット処理が実行されるのを防ぐことができる。
- PRGパターンを利用するには、コントローラクラスでパスに「redirect:/(HTMLファイルへのパス)」を指定すればよい。


